

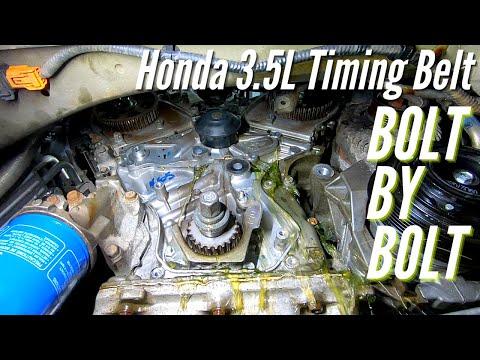





How to Replace the Water Pump on a 2017-2019 Honda Ridgeline 3.5L V6 (Trim: RT | Engine: V6 3.5L)
Step-by-step timing belt removal guide with tools, parts, torque specs, and safety tips for 2017, 2018, 2019
How to Replace the Water Pump on a 2017-2019 Honda Ridgeline 3.5L V6 (Trim: RT | Engine: V6 3.5L)
Step-by-step timing belt removal guide with tools, parts, torque specs, and safety tips for 2017, 2018, 2019


🔧 Ridgeline - Water Pump Replacement
The water pump on your Ridgeline is driven by the timing belt. Replacing it requires removing the timing belt, supporting the engine, and keeping the camshaft and crankshaft timing marks perfectly aligned.
Difficulty Level: Advanced | Estimated Time: 6-9 hours
Assumption: This procedure covers the stock U.S.-market 3.5L V6 installation.
⚠️ Safety & Precautions
- ⚠️ A timing error can cause severe internal engine damage. Do not rotate the camshafts or crankshaft independently after removing the belt.
- 🧊 Work only on a completely cold engine. Hot coolant can cause serious burns.
- 🔋 Disconnect the negative battery cable before removing the engine mount.
- 🏗️ Support the engine before removing the passenger-side engine mount. Never place a jack directly against the aluminum oil pan.
- 🛑 Support your Ridgeline with jack stands. Never work beneath a vehicle supported only by a floor jack.
- 🧤 Coolant is poisonous. Collect it in a sealed drain pan and keep it away from children and animals.
- 🔄 Turn the engine only clockwise when viewed from the crankshaft pulley end.
- 📏 Use a torque wrench for the water pump, timing components, engine mount, and crankshaft pulley bolt.
🔧 Required Tools
You'll need the following tools for this repair:
- 3/8-inch drive metric socket set, 8-17mm
- 1/2-inch drive 19mm impact socket
- 1/2-inch drive breaker bar, 24-inch minimum
- 1/2-inch drive torque wrench, 30-250 Nm
- 3/8-inch drive torque wrench, 5-80 Nm
- 3/8-inch drive ratchet
- 3-inch and 6-inch socket extensions
- 10mm combination wrench
- 14mm combination wrench
- 17mm combination wrench
- Honda-style 50mm crankshaft pulley holder (specialty)
- Crankshaft pulley holder breaker bar, 24-inch minimum
- Serpentine belt tensioner tool, 14mm (specialty)
- Trim-clip removal tool
- Flat-blade screwdriver, 6-inch
- Needle-nose pliers, 6-inch
- Hose-clamp pliers (specialty)
- Plastic gasket scraper
- Cooling-system funnel kit (specialty)
- Coolant drain pan, 12-quart minimum
- Floor jack, rated 2-ton minimum
- Jack stands, rated 2-ton minimum
- Wheel chocks
- Engine support bar, rated 1,000-pound minimum (specialty)
- Paint marker, white
- Inspection mirror with light
- LED work light
- Fender cover
- Nitrile gloves
- Safety glasses
🔩 Required Parts
HowToo sells all the parts you need for this repair:
- Engine water pump with sealing O-ring - Qty: 1
- Timing belt - Qty: 1
- Hydraulic timing belt tensioner - Qty: 1
- Timing belt tensioner pulley - Qty: 1
- Timing belt idler pulley - Qty: 1
- Honda Type 2 blue premixed coolant - Qty: 2 gallons
- Accessory drive belt - Qty: 1
- Engine mount fasteners specified as single-use by Honda - Qty: 1 set
- Crankshaft pulley bolt - Qty: 1
Replace the complete timing-belt service set while accessible.
📋 Before You Begin
- 🚙 Park your Ridgeline on level ground, select Park, apply the parking brake, and chock both rear wheels.
- 🧊 Allow the engine to cool completely before opening the cooling system.
- 🧠 Save any radio presets you want to keep. No infotainment service mode or scan-tool command is required.
- 🔋 Use a 10mm wrench to disconnect the negative battery cable. Isolate the cable so it cannot touch the terminal.
- 🏗️ Install the engine support bar across protected body support points. An engine support bar holds the engine from above while its side mount is removed.
- 📦 Lay removed fasteners out in labeled groups because the timing covers use different bolt lengths.
🔨 Step-by-Step Instructions
Follow these steps in order:
Step 1: Raise and Secure the Vehicle
- Place the wheel chocks behind both rear wheels.
- Use the floor jack at the front center lifting point, then lower your Ridgeline securely onto the jack stands at the approved side support points.
- Remove the right-front wheel using the correct wheel-nut socket from the metric socket set.
- Remove the right splash shield clips with the trim-clip removal tool and remove its screws with the appropriate metric socket.
Step 2: Drain the Coolant
- Position the 12-quart drain pan beneath the radiator drain.
- Remove the radiator cap only when the engine is cold.
- Open the radiator drain carefully with the flat-blade screwdriver or by hand, depending on the fitted drain plug.
- Close the drain after coolant flow stops. Do not overtighten the plastic drain plug.
Step 3: Remove Upper Access Components
- Use the appropriate 10mm socket and trim-clip removal tool to remove the necessary intake ducting and upper covers.
- Disconnect only the wiring clips and brackets that obstruct the passenger-side timing covers. Use the trim-clip removal tool rather than pulling on wiring.
- Mark each disconnected bracket with the paint marker for easier reassembly.
Step 4: Remove the Accessory Drive Belt
- Photograph or sketch the belt routing before removal.
- Fit the 14mm serpentine belt tensioner tool to the automatic tensioner and rotate it slowly to release belt tension.
- Slip the belt off one pulley, then slowly release the tensioner and remove the belt.
- Inspect every exposed pulley by hand. Replace any pulley that feels rough or loose.
Step 5: Support the Engine and Remove the Side Mount
- Install the engine support bar and take up only enough load to support the engine. Do not lift the vehicle with it.
- Use the required metric sockets, extensions, and breaker bar to remove the passenger-side engine mount and mount bracket obstructing the timing covers.
- Keep mount fasteners arranged by position. Several may look similar but differ in length.
- Do not reuse any mount fastener identified as single-use with the replacement parts information.
Step 6: Remove the Crankshaft Pulley
- Insert the Honda-style 50mm crankshaft pulley holder into the pulley and brace it with the dedicated holder breaker bar.
- Use the 19mm impact socket and 24-inch breaker bar to loosen the crankshaft pulley bolt counterclockwise.
- Remove the bolt and pulley carefully. Do not pry against the timing cover or damage the crankshaft position reluctor.
- The pulley bolt is extremely tight.
Step 7: Remove the Timing Belt Covers
- Use the 10mm socket, ratchet, and extensions to remove the upper and lower timing belt cover bolts.
- Record each bolt location because the bolts are not necessarily identical.
- Release wiring retainers with the trim-clip removal tool and remove the covers without forcing them.
- Inspect the covers and rubber seals for cracks or distortion.
Step 8: Set Number-One Cylinder to Top Dead Center
- Temporarily install the crankshaft pulley bolt and use the 19mm socket and breaker bar to turn the engine clockwise.
- Align the crankshaft timing mark with its pointer. Confirm both camshaft pulley marks align with the marks on the rear timing covers.
- Top dead center means the number-one piston is at the top of its compression stroke with all factory timing marks aligned.
- Use the white paint marker to highlight the factory timing marks. Do not create substitute timing marks.
Step 9: Remove the Timing Belt
- Use the appropriate metric socket to remove the hydraulic timing belt tensioner bolts.
- Remove the tensioner without allowing the camshaft pulleys to move.
- Slide the timing belt off the pulleys. Do not rotate the crankshaft or either camshaft after removal.
- Use the appropriate socket and torque wrench to remove the tensioner pulley and idler pulley if replacing the complete service set.
Step 10: Remove the Water Pump
- Place the drain pan beneath the water-pump area because additional coolant will escape.
- Use the 10mm socket and ratchet to loosen the water-pump bolts gradually and evenly.
- Pull the pump straight away from the engine. Use the plastic gasket scraper only if gentle separation is needed.
- Remove the old sealing O-ring completely. Do not scratch the aluminum sealing surface.
Step 11: Install the New Water Pump
- Clean the sealing surface with the plastic gasket scraper and a clean lint-free cloth. The surface must be dry and undamaged.
- Install the new sealing O-ring supplied for the pump. Do not apply RTV silicone unless the pump manufacturer specifically requires it.
- Position the pump squarely and start every bolt by hand.
- Use the 3/8-inch torque wrench and 10mm socket to tighten the bolts evenly in several passes: Torque to 12 Nm (9 ft-lbs).
- Uneven tightening can crack the aluminum pump housing.
Step 12: Install the Timing Pulleys and Belt
- Install the replacement idler and tensioner pulleys using the sockets and 3/8-inch torque wrench.
- Tighten the idler pulley bolt to Torque to 44 Nm (33 ft-lbs).
- Tighten the tensioner pulley bolt to Torque to 44 Nm (33 ft-lbs).
- Confirm the crankshaft and both camshaft timing marks remain exactly aligned.
- Route the new timing belt tightly from the crankshaft around the front camshaft, water pump, rear camshaft, and idler side, leaving slack only at the tensioner.
- Keep the printed belt arrows facing clockwise if the replacement belt has directional arrows.
Step 13: Install and Release the Hydraulic Tensioner
- Install the new hydraulic tensioner with its retaining pin still fitted.
- Use the appropriate socket and 3/8-inch torque wrench to tighten the tensioner mounting bolts: Torque to 22 Nm (16 ft-lbs).
- Confirm all timing marks again, then pull the retaining pin with the needle-nose pliers.
- Wait at least five minutes for the tensioner to apply full belt tension.
Step 14: Verify Mechanical Timing
- Install the crankshaft bolt temporarily and use the 19mm socket and breaker bar to rotate the engine clockwise through two complete crankshaft revolutions.
- Turn slowly. Stop immediately if the engine locks or requires sudden extra force.
- Return the crankshaft mark to top dead center and confirm both camshaft marks align exactly.
- If any mark is incorrect, remove and reinstall the timing belt before proceeding.
Step 15: Reinstall the Timing Covers and Crankshaft Pulley
- Install the timing covers in their original positions and tighten their bolts gently with the 10mm socket and 3/8-inch torque wrench: Torque to 12 Nm (9 ft-lbs).
- Clean the crankshaft pulley and crankshaft mating surfaces. Do not apply lubricant to the mating faces.
- Install the pulley and new crankshaft pulley bolt.
- Hold the pulley with the Honda-style 50mm crankshaft pulley holder and holder breaker bar.
- Use the 19mm socket and 1/2-inch torque wrench to tighten the bolt: Torque to 245 Nm (181 ft-lbs).
Step 16: Reinstall the Engine Mount
- Use the engine support bar to align the engine naturally with the mount. Do not pull the engine into position using the bolts.
- Start all engine-mount and bracket fasteners by hand, then tighten them with the appropriate metric sockets.
- Because Honda uses different torque values by mount fastener position, match each bolt to the supplied service diagram and torque specification. Do not apply one torque value to every mount bolt.
- Remove the engine support bar only after every mount fastener has been fully tightened.
Step 17: Reinstall the Accessory Belt and Shields
- Route the new accessory belt according to your routing photograph.
- Use the 14mm serpentine belt tensioner tool to rotate the tensioner, slide the belt onto the final pulley, and release the tensioner slowly.
- Check that every belt rib is centered in every grooved pulley.
- Reinstall the splash shield using the trim-clip removal tool and appropriate metric socket.
- Install the wheel and snug the wheel nuts using the correct wheel-nut socket.
- Lower your Ridgeline with the floor jack, then tighten the wheel nuts in a crisscross pattern: Torque to 127 Nm (94 ft-lbs).
Step 18: Refill and Bleed the Cooling System
- Install the cooling-system funnel kit at the radiator filler neck.
- Slowly add Honda Type 2 blue premixed coolant until the radiator remains full. Fill the expansion reservoir to the MAX line.
- Reconnect the negative battery cable using the 10mm wrench: Torque to 5 Nm (44 in-lbs).
- Set the cabin heater to maximum heat and start the engine.
- Allow the engine to warm while watching the temperature gauge and coolant level. Add coolant as trapped air escapes.
- When the thermostat opens and bubbles stop, switch off the engine and let it cool completely.
- Top off the radiator and reservoir, then install the radiator cap securely.
✅ After Repair
- 🔍 Inspect the water-pump area, radiator drain, hoses, and radiator cap for leaks while the engine warms.
- 🌡️ Confirm the temperature gauge remains normal and the cabin heater produces steady hot air.
- 👂 Listen for chirping, knocking, scraping, or whining from the timing-cover area. Shut the engine off immediately if unusual noise appears.
- 🧪 After a complete cool-down, recheck the reservoir and radiator levels. Never open a hot radiator cap.
- 🚗 Take a short, gentle road test and monitor engine temperature.
- 📅 Recheck for coolant seepage and verify the cold coolant level after one or two days.
- ⚙️ No battery registration, coding, EPB service mode, ADAS calibration, or scan-tool initialization is normally required.
💰 DIY vs Shop Cost
Shop Cost: ₹55,000-₹95,000 equivalent, depending on imported parts and local labor
DIY Cost: ₹22,000-₹45,000 for the complete timing-belt and water-pump parts set
You Save: Approximately ₹25,000-₹50,000 by doing it yourself!
Sonīpat-area labor and imported U.S.-spec parts pricing vary significantly. This repair takes a shop approximately 5-7 hours.
🎯 Ready to get started?
HowToo makes it easy: same-day/2-day shipping on every part, plus all the tools and specialty tools you need! Check out the parts and tools sections below to add everything to your cart.