

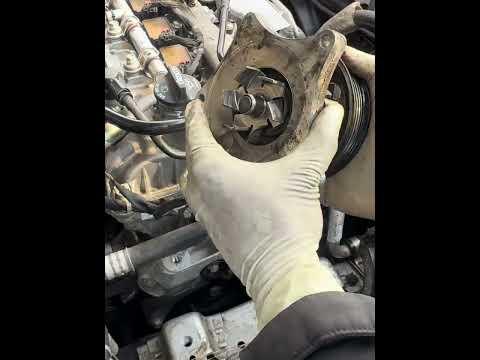





How to Replace the Water Pump on a 2016-2023 Chevrolet Malibu 1.5L Turbo (Trim: LS | Engine: Inline 4 1.5L)
Step-by-step DIY instructions with tools, parts, torque specs, coolant bleeding, and safety tips for 2016, 2017, 2018, 2019, 2020, 2021
How to Replace the Water Pump on a 2016-2023 Chevrolet Malibu 1.5L Turbo (Trim: LS | Engine: Inline 4 1.5L)
Step-by-step DIY instructions with tools, parts, torque specs, coolant bleeding, and safety tips for 2016, 2017, 2018, 2019, 2020, 2021


🔧 Malibu - Water Pump Replacement
The water pump circulates coolant through your Malibu’s 1.5L turbo engine. Replacement requires draining the cooling system, removing the accessory drive belt and pump pulley, installing the new pump, then carefully bleeding trapped air from the system.
Difficulty Level: Advanced | Estimated Time: 3-5 hours
Assumption: This procedure is for the original U.S.-market 1.5L turbo engine and its mechanical water pump.
⚠️ Safety & Precautions
- ⚠️ Work only when the engine is completely cold. Hot coolant can cause severe burns.
- ⚠️ Support your Malibu with jack stands. Never work beneath a vehicle supported only by a jack.
- ⚠️ Keep coolant away from children and animals; it is poisonous and may taste sweet.
- ⚠️ Never open the coolant reservoir cap while the cooling system is hot or pressurized.
- ⚠️ Do not allow coolant to contact the accessory belt or pulley surfaces.
- ⚠️ Disconnect the negative battery cable before working near the belt drive.
🔧 Required Tools
You'll need the following tools for this repair:
- 10mm socket
- 13mm socket
- 15mm socket
- 3/8-inch drive ratchet
- 3/8-inch drive breaker bar
- 3/8-inch drive torque wrench rated 5-80 Nm
- 150mm socket extension
- Flat-blade screwdriver
- Hose-clamp pliers
- Plastic gasket scraper
- Plastic trim-clip removal tool
- Cooling-system pressure tester with GM reservoir adapter (specialty)
- Vacuum cooling-system filling tool (specialty)
- Air compressor rated 90 psi minimum
- Drain pan rated 10-liter minimum
- Funnel with flexible spout
- Floor jack rated 2-ton minimum
- Jack stands rated 2-ton minimum
- Wheel chocks
- Nitrile gloves
- Safety glasses
- Shop towels
🔩 Required Parts
HowToo sells all the parts you need for this repair:
- Engine water pump - Qty: 1
- Water-pump molded seal - Qty: 1
- Accessory drive belt - Qty: 1 if worn or coolant-contaminated
- GM-approved DEX-COOL 50/50 premixed coolant - Qty: 8 liters
- Distilled water - Qty: 4 liters if concentrated coolant is used
📋 Before You Begin
- 📋 Park your Malibu on firm, level ground. Shift into Park, apply the parking brake, and chock both rear wheels.
- 📋 Allow the engine to become completely cold—preferably overnight.
- 📋 Record radio presets if desired. No battery registration or programming is required afterward.
- 📋 Remove the coolant reservoir cap slowly only after confirming the upper radiator hose is cold and soft.
- 📋 A vacuum filling tool removes air by drawing the cooling system into a vacuum before pulling coolant in. It is strongly recommended for this turbocharged engine.
🔨 Step-by-Step Instructions
Follow these steps in order:
Step 1: Disconnect the Battery
- Open the hood and locate the battery beneath its cover on the driver side.
- Use a 10mm socket and ratchet to loosen the negative battery-terminal clamp.
- Lift the clamp from the terminal and position it where it cannot spring back into contact.
Step 2: Raise and Support the Front
- Place wheel chocks securely against both sides of the rear tires.
- Use a 2-ton floor jack at the approved front lifting point.
- Lower your Malibu onto 2-ton jack stands positioned beneath the reinforced side support points.
- Gently shake the vehicle to confirm it is stable before reaching underneath.
Step 3: Drain the Coolant
- Position a 10-liter drain pan below the radiator drain area.
- Use a flat-blade screwdriver or hose-clamp pliers, as equipped, to open the lower drain connection.
- Allow the coolant to drain completely, then close and secure the drain connection.
- Cover nearby belts before opening coolant connections.
Step 4: Remove the Air-Cleaner Assembly
- Use a flat-blade screwdriver to loosen the intake-hose clamp.
- Disconnect the electrical connector from the intake sensor by releasing its locking tab by hand.
- Use a 10mm socket and ratchet to remove the air-cleaner fasteners.
- Lift the air-cleaner housing and intake duct from the engine compartment.
Step 5: Remove the Lower Splash Shield
- Use a plastic trim-clip removal tool to release the push clips without breaking their centers.
- Use a 10mm socket and ratchet to remove the remaining lower shield fasteners.
- Lower the shield and arrange its fasteners in removal order.
Step 6: Record the Belt Routing
- Photograph the accessory drive belt before removing it.
- Check for a factory routing diagram near the radiator support.
- Inspect the belt for cracks, missing ribs, fraying, glazing, or coolant contamination. Replace it if any condition is present.
Step 7: Remove the Accessory Drive Belt
- A belt tensioner is a spring-loaded pulley that keeps the drive belt tight.
- Fit a 15mm socket and breaker bar onto the tensioner.
- Rotate the tensioner against spring pressure until the belt becomes loose.
- Slip the belt from the water-pump pulley, then slowly release the tensioner.
- Remove the belt from the remaining pulleys.
Step 8: Remove the Water-Pump Pulley
- Use a 13mm socket and ratchet to loosen the pulley bolts while preventing the pulley from rotating by hand.
- Remove the pulley bolts, then lift the pulley from the water-pump hub.
- Do not pry against the sealing surface or nearby plastic coolant fittings.
Step 9: Disconnect the Pump Hose
- Place shop towels and the drain pan below the water pump.
- Use hose-clamp pliers to compress and move the spring clamp away from the pump connection.
- Carefully twist and pull the hose from the pump. Do not crush or pry against the fitting.
- Allow the remaining coolant to drain into the pan.
Step 10: Remove the Water Pump
- Use a 10mm socket, extension, and ratchet to remove the water-pump mounting bolts.
- Note each bolt’s original location in case different lengths are used.
- Pull the pump straight away from the engine. Use a plastic gasket scraper only if gentle separation is needed.
- Do not insert a metal screwdriver between the aluminum mating surfaces.
Step 11: Clean and Inspect the Mounting Surface
- Use a plastic gasket scraper and shop towels to remove old seal material and residue.
- Keep debris out of the open coolant passage.
- Inspect the aluminum surface for deep scratches, corrosion, and cracks.
- Wipe the bolt holes clean. Do not force tools or compressed air into blind bolt holes.
Step 12: Install the New Water Pump
- Fit the new molded seal into the pump groove. Install it dry unless the replacement-pump instructions specifically require clean coolant as a lubricant.
- Do not apply RTV silicone sealant to a molded-seal pump.
- Position the pump squarely against the engine and start every bolt by hand.
- Use a 10mm socket and torque wrench to tighten the mounting bolts evenly in a crossing pattern to 10 Nm (89 in-lbs).
- Make two passes around the bolt pattern so the seal is compressed evenly.
Step 13: Reconnect the Coolant Hose
- Push the hose fully onto the pump connection by hand.
- Use hose-clamp pliers to return the spring clamp to its original position behind the fitting bead.
- Verify that the hose is not twisted, stretched, or touching the belt.
Step 14: Reinstall the Pump Pulley
- Place the pulley squarely onto the water-pump hub.
- Start all pulley bolts by hand to prevent cross-threading.
- Use a 13mm socket and torque wrench to tighten the pulley bolts evenly to 25 Nm (18 ft-lbs).
Step 15: Install the Accessory Drive Belt
- Route the belt around each pulley according to your photograph or the factory diagram.
- Leave the easiest accessible smooth pulley for last.
- Use a 15mm socket and breaker bar to rotate the tensioner, slip the belt into place, and slowly release the tensioner.
- Inspect every pulley and confirm all belt ribs sit fully inside the pulley grooves.
Step 16: Reinstall the Air Cleaner and Splash Shield
- Position the air-cleaner housing and use a 10mm socket and ratchet to tighten its fasteners snugly.
- Reconnect the intake sensor connector until its lock clicks.
- Install the intake hose and use a flat-blade screwdriver to tighten its clamp.
- Position the lower splash shield and install its clips with the plastic trim-clip removal tool.
- Use a 10mm socket and ratchet to reinstall the lower shield fasteners snugly.
Step 17: Refill the Cooling System
- Connect the vacuum cooling-system filling tool and air compressor to the coolant reservoir according to the tool manufacturer’s directions.
- Draw the cooling system into a vacuum and verify that it holds. A falling reading indicates a leak that must be corrected.
- Use the vacuum filling tool to draw GM-approved DEX-COOL 50/50 premixed coolant into the system.
- If a vacuum tool is unavailable, use a funnel to add coolant slowly to the reservoir’s cold-fill mark. Pause frequently so trapped air can escape.
- Never mix DEX-COOL with conventional green coolant.
Step 18: Reconnect the Battery and Lower the Vehicle
- Reconnect the negative battery clamp and use a 10mm socket and torque wrench to tighten it to 5 Nm (44 in-lbs).
- Use the floor jack to raise your Malibu slightly and remove both jack stands.
- Lower the vehicle completely and remove the wheel chocks.
✅ After Repair
- ✅ With the engine cold, verify that coolant reaches the reservoir’s marked cold-fill line.
- ✅ Start the engine and immediately inspect the pump, hose connection, and drain connection for leaks.
- ✅ Turn the cabin heater to maximum heat and keep the blower at a low speed.
- ✅ Watch the temperature gauge. Shut the engine off immediately if the gauge rises abnormally, the heater suddenly blows cold, or a warning appears.
- ✅ Allow the engine to cool completely, then adjust the reservoir level with DEX-COOL 50/50 premix.
- ✅ Use the cooling-system pressure tester to pressurize the cold system to the pressure printed on the reservoir cap. Do not exceed the cap rating.
- ✅ Check again for leakage around the pump seal, hose, radiator drain, and reservoir.
- ✅ Recheck the coolant level after two or three complete warm-up and cool-down cycles.
- ✅ Dispose of old coolant through an authorized hazardous-waste or automotive-fluid collection facility.
💰 DIY vs Shop Cost
Shop Cost: ₹25,000-₹45,000 (parts + labor)
DIY Cost: ₹8,000-₹18,000 (parts only)
You Save: ₹17,000-₹27,000 by doing it yourself!
Labor rates around Sonīpat vary considerably. This repair takes a shop approximately 3-4 hours, and imported U.S.-spec parts may increase the total.
🎯 Ready to get started?
HowToo makes it easy: same-day/2-day shipping on every part, plus all the tools and specialty tools you need! Check out the parts and tools sections below to add everything to your cart.