






How to Replace the Water Pump on a 2010-2012 Subaru Outback 3.6L EZ36 (Trim: 3.6R Limited | Engine: Flat 6 3.6L)
Advanced step-by-step guide with required tools, parts, torque specs, and safety tips for 2010, 2011, 2012
How to Replace the Water Pump on a 2010-2012 Subaru Outback 3.6L EZ36 (Trim: 3.6R Limited | Engine: Flat 6 3.6L)
Advanced step-by-step guide with required tools, parts, torque specs, and safety tips for 2010, 2011, 2012


🔧 Outback - Water Pump Replacement
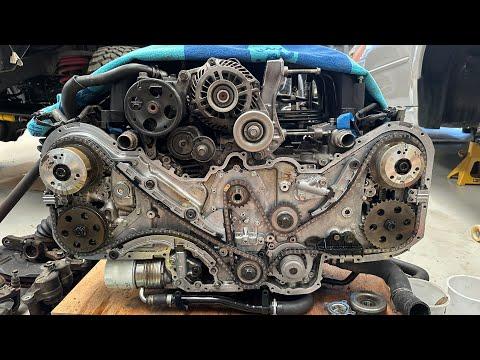
The 3.6L EZ36 water pump sits behind the front timing-chain cover and is driven by the timing chain. Access requires removing the radiator, accessories, crankshaft pulley, timing cover, and timing chains, so this is not a beginner-friendly first repair.
Difficulty Level: Advanced | Estimated Time: 10-14 hours
Assumption: Your Outback has its original stock EZ36 engine.
⚠️ Safety & Precautions
- ⚠️ Work only on a completely cold engine. Hot coolant can cause severe burns.
- Disconnect the negative battery cable before removing accessories or working near the electric cooling fans.
- Support your Outback with jack stands. Never work underneath it while supported only by a floor jack.
- Support the engine from above before removing an engine-mount bracket.
- Incorrect camshaft timing can cause severe engine damage. Never rotate the crankshaft or camshafts independently with the chains removed.
- Do not open the air-conditioning system. Move the compressor aside with its hoses connected.
- Keep coolant away from children and animals. Collect it in a closed container for proper recycling.
- If the timing marks cannot be positively identified, stop and use the Subaru EZ36 timing-chain diagrams before proceeding.
🔧 Required Tools
You'll need the following tools for this repair:
- 3/8-inch drive metric socket set, 8-19mm
- 1/2-inch drive metric socket set, 12-22mm
- Metric combination wrench set, 8-19mm
- 1/2-inch drive breaker bar, 24-inch minimum
- 3/8-inch drive torque wrench, 5-80 ft-lbs
- 1/2-inch drive torque wrench, 30-200 ft-lbs
- Crankshaft pulley holding tool (specialty)
- Camshaft sprocket holding tool (specialty)
- Timing-chain tensioner retaining pins, 1.5mm
- Engine support bar, rated 1,000-lb minimum (specialty)
- Cooling-system vacuum filling tool (specialty)
- Compressed-air supply, regulated to 90 psi
- Floor jack, rated 2-ton minimum
- Jack stands, rated 2-ton minimum
- Wheel chocks, 2-piece
- Drain pan, 12-quart minimum
- Hose-clamp pliers
- Needle-nose pliers, 6-inch
- Flat-blade screwdriver, 6-inch
- Phillips No. 2 screwdriver
- Plastic trim-clip removal tool
- Plastic gasket scraper, 1-inch
- Plastic sealant nozzle, 2.5-3mm opening
- White paint marker
- LED work light
- Safety glasses, ANSI Z87.1
- Chemical-resistant nitrile gloves
🔩 Required Parts
HowToo sells all the parts you need for this repair:
- EZ36 engine water pump - Qty: 1
- Water-pump O-ring set - Qty: 1
- Front timing-cover liquid gasket, Subaru-compatible - Qty: 1 tube
- Front crankshaft oil seal - Qty: 1
- Primary timing-chain tensioner - Qty: 1
- Secondary timing-chain tensioners - Qty: 2
- Accessory drive belt - Qty: 1
- Subaru Super Coolant or compatible blue premixed coolant - Qty: 2 gallons
- Engine oil, SAE 5W-30 - Qty: 7 quarts
- Engine oil filter - Qty: 1
- Oil drain-plug gasket - Qty: 1
- Residue-free brake cleaner - Qty: 2 cans
Inspect the timing chains, guides, sprockets, and idlers after opening the engine. Replace any component showing wear, cracks, scoring, or looseness.
📋 Before You Begin
- 📋 Park your Outback on level pavement, select Park, apply the parking brake, and chock both rear wheels.
- Let the engine cool fully before loosening the cooling-system pressure cap.
- Use a 10mm socket to disconnect the negative battery terminal and isolate the cable.
- Photograph the belt routing, brackets, connectors, timing chains, sprockets, and factory timing marks.
- Prepare labeled containers for the front-cover bolts. The bolts vary in length and must return to their original holes.
- An engine support bar spans the engine bay and supports the engine from above while its mount bracket is removed.
- A vacuum filling tool pulls air from the cooling system before drawing in coolant, reducing the risk of an air pocket.
🔨 Step-by-Step Instructions
Follow these steps in order:
Step 1: Raise the front and remove the lower cover
- Use the floor jack at the front-center lifting point, then place both jack stands under the approved front support points.
- Use the plastic trim-clip removal tool and 10mm socket to remove the lower engine cover.
- Position the 12-quart drain pan beneath the engine and radiator.
Step 2: Drain the engine oil and coolant
- Use a 17mm socket to remove the oil drain plug and drain the engine oil.
- Install a new drain-plug gasket and tighten the plug to Torque to 42 Nm (31 ft-lbs).
- Slowly remove the cooling-system pressure cap only after confirming the engine is cold.
- Use the flat-blade screwdriver to open the radiator drain fitting. Do not overtighten the plastic fitting when closing it.
Step 3: Remove the intake components
- Use a 10mm socket and Phillips No. 2 screwdriver to remove the air-intake duct and air-cleaner housing.
- Use hose-clamp pliers to release attached breather hoses.
- Use the white paint marker to label each hose and electrical connector before disconnecting it.
Step 4: Remove the cooling fans and radiator
- Use a 10mm socket to remove both cooling-fan assemblies and disconnect their electrical connectors.
- Use hose-clamp pliers to disconnect the upper and lower radiator hoses.
- Use a 10mm and 12mm socket to remove the radiator brackets and overflow hose.
- Disconnect the automatic-transmission cooler hoses with hose-clamp pliers. Cap the hoses and radiator fittings immediately.
- Lift the radiator straight upward without damaging its cooling fins.
Step 5: Remove the accessory belt and accessories
- Use a 14mm socket and breaker bar to rotate the automatic belt tensioner, then remove the accessory belt.
- Use 12mm and 14mm sockets to remove the alternator.
- Use 12mm and 14mm sockets to unbolt the power-steering pump and secure it aside without disconnecting its hoses.
- Use 12mm and 14mm sockets to unbolt the air-conditioning compressor. Secure it aside without bending or disconnecting the refrigerant hoses.
Step 6: Support the engine
- Install the 1,000-lb engine support bar and connect it to the engine lifting point.
- Apply only enough upward tension to carry the engine’s weight.
- Use 14mm and 17mm sockets to remove the engine mount and brackets obstructing the timing cover.
- Keep each bracket’s bolts together because their lengths and tightening specifications differ.
Step 7: Set the engine at its timing reference
- Use a 22mm socket and breaker bar to rotate the crankshaft clockwise until the crankshaft and camshaft timing marks reach their specified reference positions.
- Use the LED work light to identify every factory timing mark.
- Use the white paint marker to add reference marks across each chain and sprocket.
- Do not rotate the engine counterclockwise.
Step 8: Remove the crankshaft pulley
- Install the crankshaft pulley holding tool so the crankshaft cannot turn.
- Use a 22mm socket and 1/2-inch breaker bar to loosen and remove the crankshaft pulley bolt.
- Pull the pulley straight off. Do not pry against the aluminum timing cover.
Step 9: Remove the front timing-chain cover
- Use 10mm, 12mm, and 14mm sockets to remove the front-cover bolts.
- Record each bolt’s location and push it through a labeled cardboard template.
- Use the plastic gasket scraper only at the cover’s cast separation points. Do not insert a metal screwdriver between the sealing surfaces.
- Remove the cover carefully and prevent old sealant from entering exposed oil passages.
Step 10: Document the timing-chain positions
- Use the LED work light to confirm all crankshaft, camshaft, and chain reference marks before loosening a tensioner.
- Take close photographs of the primary chain, secondary chains, guides, tensioners, and sprockets.
- Use the white paint marker to label left-side and right-side parts.
- If the factory marks are not in their specified positions, do not remove the chains.
Step 11: Remove the timing chains
- Use the camshaft sprocket holding tool to control each camshaft against valve-spring pressure.
- Use 10mm and 12mm sockets to remove the primary-chain tensioner and guides in the Subaru removal sequence.
- Compress each tensioner slowly and insert a 1.5mm retaining pin. A tensioner is the oil-pressurized device that keeps a timing chain tight.
- Remove the primary chain, then remove the secondary tensioners, guides, and chains.
- Do not rotate any camshaft or the crankshaft after removing a chain.
Step 12: Remove the water pump
- Place the drain pan below the front of the engine because more coolant will drain.
- Use a 10mm socket to loosen the water-pump bolts gradually and evenly.
- Pull the pump straight out. Use needle-nose pliers to remove the old O-rings without scratching the sealing grooves.
- Use the plastic gasket scraper and residue-free brake cleaner to clean the pump mounting surface.
Step 13: Install the new water pump
- Compare the new and old pumps before installation. Their body, outlet, mounting holes, and impeller depth must match.
- Wet the new O-rings with fresh coolant and seat them squarely in their grooves. Do not apply liquid gasket to the O-rings.
- Push the pump squarely into place without pinching or rolling either O-ring.
- Start every bolt by hand, then use a 10mm socket to tighten them evenly in stages.
- Tighten the water-pump bolts to Torque to 10 Nm (7 ft-lbs).
Step 14: Reinstall the timing chains
- Use the photographs and factory marks to install the secondary chains, guides, and tensioners in their original positions.
- Install the primary chain, guides, and tensioner with 10mm and 12mm sockets.
- Use the camshaft sprocket holding tool whenever tightening a sprocket fastener. Never use the timing chain to hold a camshaft.
- Apply the EZ36 fastener-specific torque for each sprocket, guide, and tensioner bolt; these values differ by bolt diameter and location.
- Confirm every factory timing mark, then use needle-nose pliers to remove the tensioner retaining pins.
- Use a 22mm socket to rotate the crankshaft clockwise through two complete revolutions by hand.
- Stop immediately if firm mechanical resistance is felt. Return to the reference position and verify the crankshaft and camshaft marks again.
Step 15: Clean and reseal the timing cover
- Use the plastic gasket scraper and brake cleaner to remove all old sealant from the cover and engine mating surfaces.
- Keep debris and cleaner out of the crankcase, oil passages, and timing components.
- Use the plastic sealant nozzle to apply a continuous 2.5-3mm bead of Subaru-compatible liquid gasket along the original sealing path.
- Apply sealant around the required bolt holes exactly as shown by the original sealant trace.
- Install the cover within the sealant manufacturer’s assembly window without sliding it across the engine.
Step 16: Tighten the timing cover
- Start every front-cover bolt by hand in its original location.
- Use 10mm, 12mm, and 14mm sockets to tighten the bolts gradually from the center outward.
- Tighten M6 cover bolts to Torque to 6.4 Nm (57 in-lbs).
- Tighten M8 cover bolts to Torque to 15 Nm (11 ft-lbs).
- Identify bolt diameter by its threads, not by the socket size used on its head.
- Allow the liquid gasket to cure for the product’s stated time before adding oil or coolant.
Step 17: Install the crankshaft pulley
- Use the plastic gasket scraper carefully to remove the old crankshaft seal without scratching the cover.
- Use a matching socket from the metric socket set to press the new seal evenly into the cover.
- Coat the seal lip lightly with clean engine oil, then install the crankshaft pulley.
- Use the crankshaft pulley holding tool, 22mm socket, and torque wrench to tighten the bolt to Torque to 200 Nm (148 ft-lbs).
Step 18: Reinstall the mount and accessories
- Use 14mm and 17mm sockets to reinstall the engine-mount brackets and mount in their original positions.
- Remove the engine support bar only after every mount fastener is secure.
- Use 12mm and 14mm sockets to reinstall the compressor, power-steering pump, alternator, and related brackets.
- Use a 14mm socket and breaker bar to retract the belt tensioner, then install the new accessory belt.
- Check that every belt rib is fully seated in its pulley groove.
Step 19: Reinstall the radiator and intake
- Lower the radiator into its lower rubber mounts.
- Use 10mm and 12mm sockets to install the radiator brackets and both cooling-fan assemblies.
- Use hose-clamp pliers to reconnect the radiator hoses and transmission cooler hoses.
- Use a 10mm socket and Phillips No. 2 screwdriver to reinstall the air-cleaner housing and intake duct.
- Reconnect every electrical connector and verify that wiring is clear of the belt and fans.
Step 20: Refill the fluids
- Install the new oil filter and fill the engine with SAE 5W-30 oil. Use the dipstick to set the final level rather than adding the full listed capacity at once.
- Connect the cooling-system vacuum filling tool and regulated compressed-air supply.
- Pull a vacuum following the filling-tool instructions. Verify that the system holds vacuum before drawing in premixed blue coolant.
- Use a 10mm socket to reconnect the negative battery terminal and tighten it to Torque to 6 Nm (53 in-lbs).
✅ After Repair
- ✅ Confirm that the engine oil and coolant are at their proper cold levels before starting.
- Set the climate control to maximum heat, start the engine, and check immediately for oil, coolant, and transmission-fluid leaks.
- Listen for chain rattling or scraping. Shut the engine off immediately if abnormal mechanical noise is present.
- Monitor engine temperature and heater output. Loss of cabin heat can indicate trapped air in the cooling system.
- Verify that both radiator fans operate and that the upper radiator hose becomes warm as coolant circulates.
- Switch off the engine and allow it to cool completely before correcting the coolant level.
- If radiator transmission-cooler hoses were opened, check the automatic-transmission fluid using the Subaru temperature-dependent level procedure.
- Use the 10mm socket and plastic trim-clip tool to reinstall the lower engine cover, then lower your Outback with the floor jack.
- Inspect the timing cover, water-pump area, radiator drain, and all hose connections after one complete heat cycle.
- Recheck the coolant and engine-oil levels the following morning with the engine cold.
💰 DIY vs Shop Cost
Shop Cost: ₹95,000-₹165,000 (parts + labor)
DIY Cost: ₹25,000-₹55,000 (parts only)
You Save: ₹70,000-₹110,000 by doing it yourself!
Labor and imported-parts prices vary in Haryana. This repair takes a shop approximately 9-12 hours.
🎯 Ready to get started?
HowToo makes it easy: same-day/2-day shipping on every part, plus all the tools and specialty tools you need! Check out the parts and tools sections below to add everything to your cart.