

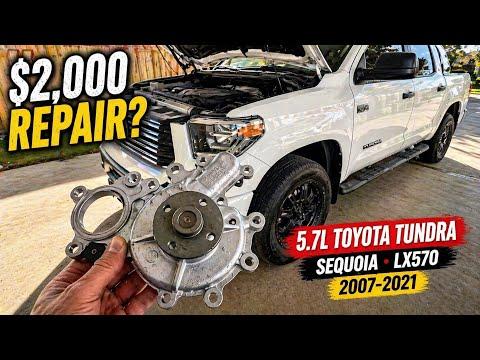






How to Replace the Water Pump on a 2007-2021 Toyota Tundra 5.7L V8 (Trim: Limited | Engine: V8 5.7L)
Step-by-step 3UR-FE repair guide with tools, parts, torque specs, and safety tips for 2007, 2008, 2009, 2010, 2011, 2012, 2013
How to Replace the Water Pump on a 2007-2021 Toyota Tundra 5.7L V8 (Trim: Limited | Engine: V8 5.7L)
Step-by-step 3UR-FE repair guide with tools, parts, torque specs, and safety tips for 2007, 2008, 2009, 2010, 2011, 2012, 2013


🔧 Tundra - Water Pump Replacement
The water pump circulates coolant through your Tundra’s 5.7L V8. Replacement requires draining the cooling system, removing the fan and drive belt, and carefully transferring the different-length pump bolts to the new pump.
Difficulty Level: Advanced | Estimated Time: 5-8 hours
Assumption: This procedure is for the original 5.7L 3UR-FE engine and factory mechanical cooling fan.
⚠️ Safety & Precautions
- ⚠️ Work only with the engine completely cold. Hot coolant can cause severe burns.
- 🛑 Never open the radiator cap while the engine is warm.
- 🧤 Toyota Super Long Life Coolant is poisonous. Catch it in a clean drain pan and keep it away from children and animals.
- 🔋 Disconnect the negative battery cable because your hands will be close to the fan and belt drive.
- 🚫 Do not rotate or start the engine while the cooling fan is removed.
- 📌 Keep every water-pump bolt in its original location. Several bolts have different lengths.
- 🧼 Do not use a powered abrasive disc on the aluminum sealing surface. It can remove metal and cause a leak.
- ♻️ Take used coolant to an authorized recycling or hazardous-waste facility.
🔧 Required Tools
You'll need the following tools for this repair:
- 3/8-inch drive ratchet
- 1/2-inch drive breaker bar
- 3/8-inch drive torque wrench rated 5-80 Nm
- 10mm shallow socket
- 12mm shallow socket
- 12mm deep socket
- 14mm shallow socket
- 17mm shallow socket
- 12mm combination wrench
- 14mm combination wrench
- 6-inch socket extension
- 10-inch adjustable pliers
- Hose-clamp pliers (specialty)
- Plastic gasket scraper
- Plastic trim-clip removal tool
- Serpentine-belt routing marker
- Cooling-system vacuum filling tool (specialty)
- Air compressor rated 90 psi minimum
- Coolant funnel with radiator adapters (specialty)
- Drain pan rated 20-quart minimum
- Parts-cleaning brush
- Shop towels
- Safety glasses
- Nitrile mechanic gloves
🔩 Required Parts
HowToo sells all the parts you need for this repair:
- Engine water pump assembly - Qty: 1
- Water pump molded gasket - Qty: 1
- Water inlet O-ring - Qty: 1
- Toyota Super Long Life Coolant or exact pink phosphate-OAT equivalent - Qty: 4 gallons premixed
- Serpentine drive belt - Qty: 1
- Thermostat and sealing ring - Qty: 1, recommended
- Radiator hose clamps - Qty: As required if damaged
📋 Before You Begin
- 📍 Park your Tundra on level ground, select Park, apply the parking brake, and let the engine cool completely.
- 📷 Photograph the serpentine-belt routing before removal. A routing diagram is also located near the radiator support.
- 🗂️ Prepare a piece of cardboard shaped like the water pump. Push each removed bolt through the cardboard in its matching position.
- 🔋 Use a 10mm socket to loosen the negative battery-terminal nut. Remove the cable and isolate it so it cannot spring back.
- 🧊 Set the cabin temperature controls to full hot before disconnecting the battery.
- 🛠️ A vacuum filling tool uses compressed air to remove trapped air before drawing coolant into the system. It is strongly recommended for this large V8 cooling system.
🔨 Step-by-Step Instructions
Follow these steps in order:
Step 1: Drain the Cooling System
- Put on safety glasses and nitrile mechanic gloves.
- Remove the radiator cap only after confirming the upper radiator hose is completely cold.
- Position the 20-quart drain pan under the radiator drain cock.
- Open the plastic radiator drain cock by hand. Use adjustable pliers only if necessary, applying very light pressure.
- Move the drain pan under the engine block drains. Use a 10mm socket or 10mm hex fitting, depending on the installed drain-plug style, to open the left and right block drains when accessible.
- Install the block-drain plugs with their original sealing washers. Torque to 13 Nm (10 ft-lbs).
- Close the plastic radiator drain cock by hand until snug. Do not use a torque wrench on it.
Step 2: Remove the Upper Covers and Intake Duct
- Use a plastic trim-clip removal tool to release the radiator-support cover clips, then lift away the cover.
- Use a 10mm socket to remove the intake duct fasteners.
- Use a 10-inch adjustable pliers to release the intake hose clamp if required, then move the duct out of the work area.
- Cover the open intake tube with a clean shop towel.
Step 3: Remove the Fan Shroud and Cooling Fan
- Use hose-clamp pliers to release the coolant reservoir hose clamp where necessary.
- Use a 10mm socket and plastic trim-clip removal tool to release the upper fan-shroud fasteners.
- Use a 12mm combination wrench to loosen the four fan-clutch nuts at the water-pump pulley. Hold another accessible nut with a second 12mm wrench if the pulley turns.
- Remove the four nuts with the 12mm wrench.
- Lift the fan and shroud upward together. Keep the fan upright to protect the viscous clutch.
- Do not rest the fan flat or bend its blades.
Step 4: Remove the Serpentine Belt
- Verify the belt-routing photograph or mark the routing with the serpentine-belt routing marker.
- Place a 14mm socket and breaker bar on the automatic tensioner bolt.
- Rotate the tensioner clockwise slowly to release belt tension, then slide the belt off a smooth pulley.
- Release the tensioner slowly. Never let it snap back.
- Remove the belt and inspect the tensioner and idler pulleys for looseness, noise, or roughness.
- Spin each pulley by hand before reassembly.
Step 5: Remove the Water-Pump Pulley
- Slide the water-pump pulley straight off its studs after the fan-clutch nuts are removed.
- If corrosion holds it in place, tap around its center lightly with the plastic handle of the gasket scraper.
- Do not pry against the aluminum pump housing.
Step 6: Clear Access to the Water Pump
- Use a 10mm socket to remove wiring-harness brackets crossing the front of the pump.
- Use a 12mm socket to remove the coolant-pipe and hose brackets attached near the pump.
- Use hose-clamp pliers to compress each spring clamp. Slide the clamp back before twisting the hose free by hand.
- Use a 14mm socket and breaker bar to remove any idler pulley or tensioner assembly that blocks a pump bolt.
- Place all fasteners in labeled groups and photograph each bracket before moving it.
Step 7: Remove the Water Pump
- Place the drain pan directly below the pump because additional coolant will spill.
- Use 10mm, 12mm, and 14mm sockets as required to loosen the water-pump fasteners gradually.
- Push each bolt through the matching position in the prepared cardboard template immediately after removal.
- Check carefully for hidden bolts behind brackets. Do not pry until every fastener has been removed.
- Pull the pump forward evenly. If it is stuck, tap the housing gently with the plastic handle of the gasket scraper.
- Remove the molded gasket and any water-inlet O-ring that remained in the engine.
Step 8: Clean and Inspect the Sealing Surface
- Use a plastic gasket scraper to remove gasket residue without scratching the aluminum.
- Use a parts-cleaning brush and shop towels to clean the sealing surface and bolt holes.
- Keep debris out of the open coolant passages.
- Compare the replacement pump with the original. Confirm the mounting holes, pulley studs, bypass passages, and hose connections match.
- Inspect the old pump for bearing looseness, coolant staining, and damage to the impeller.
Step 9: Install the New Water Pump
- Install the new molded gasket and water-inlet O-ring dry unless the replacement-pump instructions specifically require lubricant.
- Do not add RTV silicone to a molded gasket. Excess sealant can enter the cooling system.
- Position the new pump against the engine without shifting the gasket.
- Install every bolt by hand using the cardboard template. Turn each bolt several threads before using a ratchet.
- Use the 10mm, 12mm, and 14mm sockets to tighten the bolts evenly from the center outward.
- Tighten M6 pump bolts with the torque wrench to 9 Nm (80 in-lbs).
- Tighten M8 pump bolts with the torque wrench to 21 Nm (15 ft-lbs).
- Do not apply the higher torque to the smaller 10mm-head bolts.
Step 10: Reinstall Brackets and Pulleys
- Use the 10mm and 12mm sockets to reinstall the wiring, coolant-pipe, and hose brackets in their original positions.
- Use the 14mm socket and torque wrench to reinstall any removed idler-pulley bolt. Torque to 40 Nm (30 ft-lbs).
- Use hose-clamp pliers to return each spring clamp to its original hose position.
- Slide the water-pump pulley fully onto the four studs.
Step 11: Install the Serpentine Belt
- Route the new serpentine belt according to the original photograph or under-hood diagram.
- Use a 14mm socket and breaker bar to rotate the automatic tensioner clockwise.
- Slip the belt over the final smooth pulley, then release the tensioner slowly.
- Check every pulley. Each belt rib must sit fully inside its matching groove.
Step 12: Install the Cooling Fan and Shroud
- Lower the fan and shroud into place together without touching the radiator fins.
- Start all four fan-clutch nuts by hand using a 12mm deep socket without the ratchet.
- Use a 12mm socket and torque wrench to tighten the fan-clutch nuts evenly. Torque to 21 Nm (15 ft-lbs).
- Use a 10mm socket and plastic trim-clip removal tool to install the fan-shroud fasteners.
- Reconnect the reservoir hose using hose-clamp pliers.
- Rotate the fan by hand one complete turn and confirm it does not contact the shroud.
Step 13: Reinstall the Intake Components
- Remove the shop towel from the intake opening.
- Reinstall the intake duct and clamp using the 10mm socket and adjustable pliers.
- Use the 10mm socket to secure the intake fasteners. Tighten them snugly without crushing plastic components.
- Reinstall the radiator-support cover using the plastic trim-clip removal tool by pressing the clips into place by hand.
Step 14: Refill and Bleed the Cooling System
- Connect the cooling-system vacuum filling tool to the radiator neck and connect the air compressor at the tool manufacturer’s specified pressure.
- Pull the system into a vacuum. Close the tool valve and verify the vacuum holds for at least two minutes.
- If the vacuum falls, stop and inspect the water-pump gasket, drain plugs, hoses, and clamps for leakage.
- Place the tool’s fill hose into Toyota Super Long Life Coolant and open the fill valve to draw coolant into the system.
- If a vacuum tool is unavailable, attach the coolant funnel to the radiator neck and add coolant slowly. Squeeze the upper radiator hose by hand several times to release trapped air.
- Fill the reservoir to the FULL mark.
Step 15: Reconnect the Battery and Check Operation
- Use a 10mm socket to reconnect the negative battery cable. Torque to 5.4 Nm (48 in-lbs).
- Confirm all tools are removed from the engine compartment.
- Start the engine and immediately inspect the pump, hoses, and drain plugs for leaks.
- Run the cabin heater at maximum temperature. Warm air from the vents helps confirm coolant is circulating through the heater core.
- Watch the temperature gauge continuously. Shut the engine off if it rises above its normal position or the heater suddenly blows cold.
✅ After Repair
- ✅ Allow the engine to reach normal operating temperature while checking for leaks and abnormal pulley noise.
- 🌡️ Confirm the upper radiator hose becomes warm and both the cabin heater and cooling fan operate normally.
- 🧊 Shut the engine off and let it cool completely. Recheck the radiator and reservoir levels, then add the specified coolant as needed.
- 🔍 Inspect under your Tundra after the first drive and again the following morning for pink coolant residue.
- 📏 Recheck the coolant level over the next three complete heat cycles.
- 🕒 The clock, radio presets, and automatic window functions may require resetting after the battery disconnect.
- 🪟 If an automatic window loses one-touch operation, close it fully and hold the switch upward for approximately one second.
💰 DIY vs Shop Cost
Shop Cost: ₹55,000-₹95,000 (parts + labor)
DIY Cost: ₹18,000-₹38,000 (parts only)
You Save: ₹37,000-₹57,000 by doing it yourself!
Local labor and imported-part prices vary. This repair takes a shop approximately 4-6 hours.
🎯 Ready to get started?
HowToo makes it easy: same-day/2-day shipping on every part, plus all the tools and specialty tools you need! Check out the parts and tools sections below to add everything to your cart.