







How to Replace the Thermostat on a 2007-2020 Honda Fit (Trim: LX | Engine: Inline 4 1.5L)
Step-by-step DIY instructions with tools, parts, torque specs, coolant bleeding, and safety tips for 2007, 2008, 2009, 2010, 2011, 2012, 2013
How to Replace the Thermostat on a 2007-2020 Honda Fit (Trim: LX | Engine: Inline 4 1.5L)
Step-by-step DIY instructions with tools, parts, torque specs, coolant bleeding, and safety tips for 2007, 2008, 2009, 2010, 2011, 2012, 2013


🔧 Fit - Thermostat Replacement
The thermostat regulates coolant flow between the engine and radiator. Replacing it requires draining the coolant, removing the lower radiator-hose housing, installing the thermostat in the correct orientation, and bleeding trapped air from the cooling system.
Difficulty Level: Intermediate | Estimated Time: 2-3 hours
⚠️ Safety & Precautions
- ⚠️ Work only when the engine and radiator are completely cold. Hot coolant can cause severe burns.
- 🧤 Wear safety glasses and chemical-resistant gloves because coolant is poisonous.
- 🐾 Collect all drained coolant immediately and keep it away from children and animals.
- 🛑 Never work beneath your Fit while it is supported only by a floor jack.
- 🔋 Battery disconnection is not normally required for this repair.
- 🌡️ Use only Honda-compatible blue, silicate-free 50/50 premixed coolant. Do not mix it with green or universal coolant.
🔧 Required Tools
You'll need the following tools for this repair:
- 3/8-inch drive ratchet
- 6-inch 3/8-inch drive extension
- 10mm socket
- Torque wrench rated 5-25 Nm
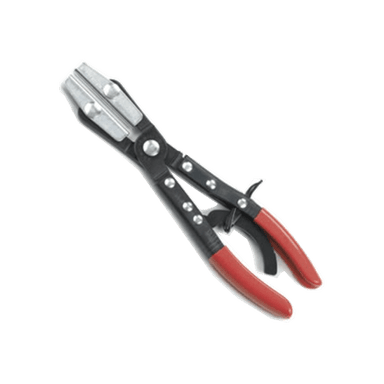
- Hose-clamp pliers
- Plastic trim-clip removal tool
- No. 2 Phillips screwdriver
- 90-degree pick tool
- Plastic gasket scraper
- Coolant drain pan rated 10 liters minimum
- Spill-free coolant funnel kit (specialty)
- Floor jack rated 2-ton minimum
- Jack stands rated 2-ton minimum
- Wheel chocks
- LED work light
- Safety glasses
- Chemical-resistant gloves
- Shop towels
🔩 Required Parts
HowToo sells all the parts you need for this repair:
- Engine coolant thermostat - Qty: 1
- Thermostat rubber seal - Qty: 1
- Honda-compatible blue 50/50 premixed coolant - Qty: 4 liters
📋 Before You Begin
- 🅿️ Park your Fit on firm, level ground, select Park or first gear, engage the parking brake, and switch off the engine.
- ❄️ Allow the engine to become completely cold, preferably for several hours.
- 🧱 Use wheel chocks behind both rear wheels before raising the front.
- ♻️ Have a sealed container ready if the drained coolant will be recycled.
- 📌 The thermostat is inside the housing where the lower radiator hose connects to the engine.
🔨 Step-by-Step Instructions
Follow these steps in order:
Step 1: Raise and Support the Front
- Place the wheel chocks securely behind both rear wheels.
- Use the 2-ton floor jack at the reinforced front center lifting point.
- Position the 2-ton jack stands under the reinforced side support points, then lower your Fit onto them.
- Gently push the vehicle to confirm it is stable before going underneath.
Step 2: Remove the Lower Splash Shield
- Use the plastic trim-clip removal tool and No. 2 Phillips screwdriver to remove the clips and screws securing the lower splash shield.
- Support the shield with one hand while removing the last fastener.
- Place the fasteners in order so each one returns to its original location.
Step 3: Drain the Cold Coolant
- Place the 10-liter coolant drain pan beneath the radiator drain valve.
- Use your gloved hand to turn the plastic radiator drain valve counterclockwise. Do not force it with pliers.
- Remove the radiator cap slowly by hand only after confirming the radiator is cold.
- Allow the coolant to drain completely, then close the drain valve by hand until snug.
- Do not overtighten the plastic drain valve.
Step 4: Locate and Disconnect the Lower Radiator Hose
- Use the LED work light to follow the lower radiator hose to its engine-side thermostat housing.
- Use the hose-clamp pliers to compress the spring clamp and slide it several centimeters back along the hose.
- Twist the hose carefully by hand to break its seal, then pull it straight off the housing.
- Use the 90-degree pick tool only between the hose and fitting if stuck. Do not puncture the hose or scratch the sealing surface.
- Expect additional coolant to drain into the pan.
Step 5: Remove the Thermostat Housing
- Use the 10mm socket, 6-inch extension, and 3/8-inch ratchet to loosen the thermostat-housing bolts evenly.
- Support the housing while removing the final bolt.
- Pull the housing straight away from the engine. Do not pry against the aluminum mating surface.
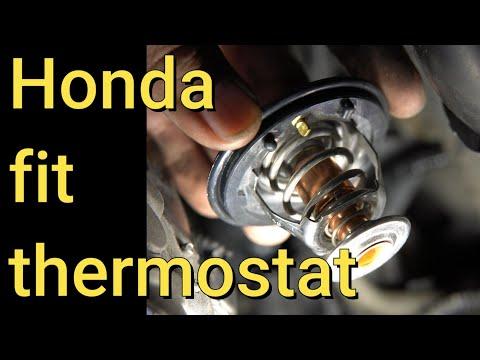
- Note the installed direction and top position of the original thermostat before removing it.
Step 6: Remove the Old Thermostat and Seal
- Remove the thermostat and rubber seal by hand.
- Use the plastic gasket scraper and shop towels to clean both sealing surfaces.
- Do not use a metal scraper, abrasive disc, or powered tool on the aluminum housing.
- Keep debris and old seal material out of the coolant passage.
Step 7: Install the New Thermostat
- Fit the new thermostat rubber seal evenly around the new thermostat.
- Install the thermostat in the same direction as the original, with its air-bleed pin at the top and within approximately 5 degrees of vertical.
- Seat the seal fully in its groove by hand. Do not apply RTV silicone or gasket maker.
- A twisted seal will cause a coolant leak.
Step 8: Reinstall the Thermostat Housing
- Position the housing without disturbing the thermostat or seal.
- Start all housing bolts by hand to prevent cross-threading.
- Use the 10mm socket and 3/8-inch ratchet to draw the housing down evenly.
- Use the 5-25 Nm torque wrench and 10mm socket to tighten the housing bolts evenly to 12 Nm (9 ft-lbs).
- Do not overtighten the bolts because the housing and engine are aluminum.
Step 9: Reconnect the Lower Radiator Hose
- Push the lower radiator hose fully onto the housing fitting by hand.
- Use the hose-clamp pliers to return the spring clamp to its original position behind the raised bead on the fitting.
- Use the LED work light to confirm the clamp is straight and the hose is not twisted.
Step 10: Refill the Cooling System
- Install the spill-free coolant funnel on the radiator filler neck.
- Pour Honda-compatible blue 50/50 premixed coolant slowly into the funnel until the radiator remains full.
- Use gloved hands to squeeze the upper radiator hose several times, helping trapped air move toward the filler neck.
- Fill the coolant reservoir by hand to its MAX line.
- Do not add water to premixed coolant.
Step 11: Bleed Air from the Cooling System
- Keep the spill-free coolant funnel installed and make sure all tools are clear of the radiator fan and drive belt.
- Start the engine and set the cabin temperature to maximum heat with the blower on low.
- Allow the engine to idle while watching the coolant level in the funnel.
- Add premixed coolant as the level drops. Use gloved hands to squeeze the upper radiator hose occasionally.
- Briefly hold the engine near 1,500 rpm until the upper radiator hose becomes hot, indicating the thermostat has opened.
- Continue until the radiator fan has cycled twice and no steady stream of air bubbles appears.
- Switch off the engine, let the coolant settle, and use the funnel stopper to remove the spill-free coolant funnel without spilling coolant.
- Install the radiator cap securely by hand.
Step 12: Inspect and Reassemble
- Use the LED work light to inspect the thermostat housing, lower hose, radiator drain valve, and radiator cap for leaks.
- Use the plastic trim-clip removal tool and No. 2 Phillips screwdriver to reinstall the lower splash shield and its original fasteners.
- Use the 2-ton floor jack to raise your Fit slightly, remove the 2-ton jack stands, and lower the vehicle slowly.
- Remove the wheel chocks only after your Fit is fully on the ground.
✅ After Repair
- 🌡️ Verify the temperature warning light remains off and warm air comes steadily from the cabin vents.
- 🔍 Check the thermostat housing and lower hose for leaks while the engine runs.
- 🚗 Take a short local test drive, then park and inspect underneath for dripping coolant.
- ❄️ After the engine becomes completely cold, check the reservoir and add premixed coolant to the MAX line if needed.
- 📅 Recheck the cold coolant level and all repaired connections over the next several driving cycles.
- 🛑 Stop driving if the temperature warning illuminates, the heater suddenly blows cold air, or coolant leaks appear.
- ♻️ Transfer old coolant into a sealed container and take it to an authorized automotive-fluid recycling facility.
💰 DIY vs Shop Cost
Shop Cost: ₹8,000-₹16,000 (parts + labor)
DIY Cost: ₹2,500-₹6,000 (parts only)
You Save: ₹5,500-₹10,000 by doing it yourself!
Labor rates around Sonīpat vary by workshop. This repair takes a shop approximately 1.5-2.5 hours.
🎯 Ready to get started?
HowToo makes it easy: same-day/2-day shipping on every part, plus all the tools and specialty tools you need! Check out the parts and tools sections below to add everything to your cart.