

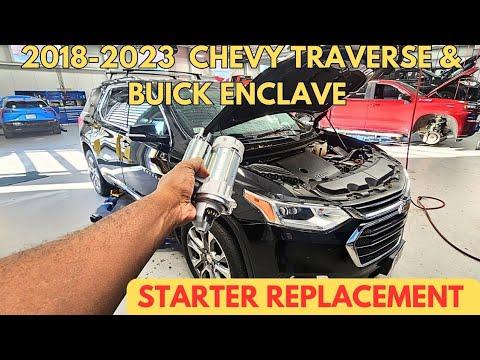





How to Replace the Starter Motor on a 2018-2023 Chevrolet Traverse (Engine: V6 3.6L)
Step-by-step DIY instructions with tools, parts, torque specs, and safety tips for 2018, 2019, 2020, 2021, 2022, 2023
How to Replace the Starter Motor on a 2018-2023 Chevrolet Traverse (Engine: V6 3.6L)
Step-by-step DIY instructions with tools, parts, torque specs, and safety tips for 2018, 2019, 2020, 2021, 2022, 2023


🔧 Traverse - Starter Motor Replacement
This is an intermediate job, but it’s manageable from underneath with careful lifting and long extensions. The starter sits low where the engine joins the transmission, behind the lower splash shielding.
Difficulty Level: Intermediate | Estimated Time: 2-4 hours
Assumption: These instructions use the normal bottom-access route for your Traverse.
⚠️ Safety & Precautions
- ⚠️ Disconnect the actual battery negative cable before touching the starter. Its large power cable remains live otherwise.
- ⚠️ Wait at least two minutes after disconnecting the battery before beginning work.
- ⚠️ Support your Traverse with jack stands. Never work beneath a vehicle supported only by a floor jack.
- ⚠️ Let the engine, exhaust, and catalytic converter cool completely.
- ⚠️ Wear safety glasses because dirt falls continuously during this job.
- ⚠️ If the starter grinds or spins without turning the engine, inspect the flexplate teeth before installing parts. GM documented damaged flexplate teeth on some 2019-2020 Traverses. gm-techlink.com)
🔧 Required Tools
You'll need the following tools for this repair:
- 10mm socket
- 13mm socket
- 15mm socket
- 3/8-inch drive ratchet
- 3/8-inch drive torque wrench rated 10-80 Nm
- 3-inch socket extension
- 6-inch socket extension
- 12-inch socket extension
- 3/8-inch universal-joint adapter
- Flat-blade screwdriver
- Trim-clip removal tool
- Wire brush with nylon or brass bristles
- Digital multimeter rated for 12-volt automotive use
- Floor jack rated 3-ton minimum
- Jack stands rated 3-ton minimum
- Wheel chocks
- Mechanic gloves
- Safety glasses
- LED work light
🔩 Required Parts
HowToo sells all the parts you need for this repair:
- Starter motor compatible with automatic stop/start - Qty: 1
- Starter mounting bolts - Qty: 2 only if damaged or corroded
- Starter heat shield - Qty: 1 only if damaged or missing
- Dielectric grease - Qty: 1 small tube
The starter aisle is open beside this guide. New and remanufactured units are available from approximately $120-$315. I’d choose a new starter if the budget allows. Nobody wants to do this cramped job twice.
📋 Before You Begin
- Park on level pavement, shift into Park, apply the parking brake, and chock both rear wheels.
- Switch off the ignition and keep the key or transmitter away from your Traverse.
- Use a 10mm socket to disconnect the actual negative battery cable. Isolate it so it cannot spring back against the terminal.
- Take a clear picture of the starter wiring before disconnecting anything.
- Confirm the battery is charged and the cable connections are clean. A weak battery can imitate a failed starter.
- No infotainment service mode, starter programming, or battery registration is normally required for starter replacement.
🔨 Step-by-Step Instructions
Follow these steps in order:
Step 1: Raise and support the vehicle
- Use the 3-ton floor jack at an approved front lifting point.
- Place both 3-ton jack stands beneath the approved support points.
- Lower your Traverse onto the stands and gently push the body to confirm it is stable.
- Keep the floor jack lightly positioned as secondary support without carrying the vehicle’s weight.
Step 2: Remove the lower splash shield
- Use the trim-clip removal tool to release the plastic retainers.
- Use a 10mm socket and ratchet for the screw-type fasteners.
- Lower the shield and keep its different fasteners organized.
- Use the LED work light to locate the starter near the engine-to-transmission joint. The solenoid is the smaller cylinder attached to it.
Step 3: Check the starter area
- Confirm the negative battery cable remains disconnected.
- Inspect the starter, heat shield, cables, and nearby connectors for heat or corrosion damage.
- If access is restricted, use the 10mm socket to remove any small shield or wiring bracket blocking the starter.
- Do not remove the intake manifold unless bottom access is genuinely blocked.
Step 4: Disconnect the starter control connector
- Use the flat-blade screwdriver to slide the colored secondary lock away from the connector.
- Press the connector’s black release tab and pull the connector straight away from the starter.
- Pull on the connector body, not the wires.
- Slide the lock first, then press the tab.
Step 5: Disconnect the main starter cable
- Pull the protective rubber cap away from the large starter terminal.
- Use a 13mm socket, extension, and ratchet to remove the terminal nut.
- Lift the cable eyelet from the stud and move it safely aside.
- Do not allow the cable eyelet to contact the starter case or surrounding metal.
Step 6: Remove the starter mounting bolts
- Support the starter with one hand because it will drop when the final bolt comes out.
- Use a 15mm socket, ratchet, and suitable extension to loosen both mounting bolts.
- Add the universal-joint adapter only if a straight extension cannot reach the upper bolt.
- Remove the lower bolt first and the upper bolt last.
- Guide the starter downward without pulling on nearby wiring or hoses.
Step 7: Inspect the old starter and flexplate
- Compare the old and replacement starters. The nose, mounting ears, electrical terminal positions, and connector must match.
- Use the LED work light to inspect the starter pinion teeth for chipping or unusual wear.
- Look through the starter opening at the flexplate teeth. The flexplate is the large toothed engine plate engaged by the starter.
- If teeth are missing or heavily damaged, stop. Replacing only the starter won’t correct the problem, and GM specifically warns against replacing an undamaged starter when flexplate damage is responsible. gm-techlink.com
Step 8: Clean the mounting surface
- Use the wire brush to remove loose corrosion from the starter mounting surface.
- Keep debris out of the opening and do not grind or remove metal.
- Do not install a shim unless one was originally present. This application normally uses direct starter-to-engine mounting.
Step 9: Install the replacement starter
- Lift the starter into position and align both mounting holes.
- Start both bolts by hand for several turns to prevent cross-threading.
- Use the 15mm socket and ratchet to seat the bolts evenly.
- Use the torque wrench and 15mm socket to tighten both starter mounting bolts to 50 Nm (37 ft-lbs). charm.li)
Step 10: Reconnect the starter wiring
- Place the large cable eyelet squarely over the starter terminal.
- Install the terminal nut by hand before using the 13mm socket.
- Use the torque wrench and 13mm socket to tighten the main terminal nut to 9 Nm (80 in-lbs). howtoo.com
- Do not overtighten the terminal. Twisting the stud can damage the new solenoid.
- Apply a very thin film of dielectric grease around the control connector seal, not on its metal contacts.
- Push the control connector into place until it clicks, then return its secondary lock to the secured position.
Step 11: Reinstall shields and brackets
- Use the 10mm socket to reinstall every removed heat shield or wiring bracket in its original position.
- Make sure no cable rests against the exhaust, heat shield edge, or rotating components.
- Use the 10mm socket and trim-clip removal tool to reinstall the lower splash shield.
- Replace any broken plastic retainers rather than leaving the shield loose.
Step 12: Lower the vehicle and reconnect the battery
- Use the 3-ton floor jack to lift your Traverse slightly off the stands.
- Remove both jack stands and lower the vehicle completely.
- Use the 10mm socket to reconnect and secure the negative battery cable.
- Check battery voltage with the digital multimeter. A fully charged resting battery should be approximately 12.6 volts.
✅ After Repair
- Start the engine and listen for smooth, immediate cranking without grinding or free-spinning noises.
- Switch the engine off and restart it two or three times, allowing approximately 30 seconds between attempts.
- Confirm there are no warning messages and that the automatic stop/start system operates normally after its usual enabling conditions are met.
- If the starter only clicks, recheck battery voltage, the large starter cable, control connector, and engine grounds.
- If a grinding noise remains, stop using the starter and inspect the flexplate before further cranking.
- Reset the clock and any personalized settings lost during battery disconnection.
💰 DIY vs Shop Cost
Shop Cost: $400-$750 equivalent for parts and labor
DIY Cost: $120-$315 for the starter, plus any needed tools
You Save: Approximately $200-$450 by doing it yourself!
Local labor prices around Sonīpat vary considerably. A professional normally bills approximately 1.5-3.0 hours for straightforward bottom access.
🎯 Ready to get started?
HowToo makes it easy: same-day/2-day shipping on every part, plus all the tools and specialty tools you need! Check out the parts and tools sections below to add everything to your cart.