

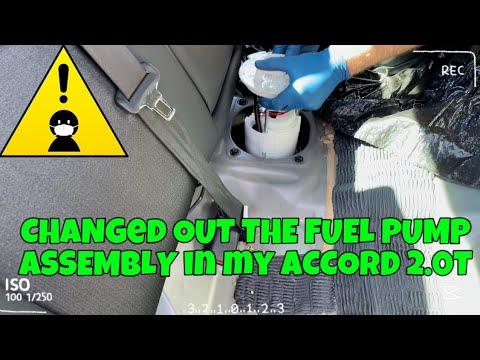







How to Replace the In-Tank Fuel Pump on a 2018-2020 Honda Accord (Trim: Hybrid)
Step-by-step instructions with required tools, parts, safety tips, and recall guidance for 2018, 2019, 2020
How to Replace the In-Tank Fuel Pump on a 2018-2020 Honda Accord (Trim: Hybrid)
Step-by-step instructions with required tools, parts, safety tips, and recall guidance for 2018, 2019, 2020


🔧 Accord - In-Tank Fuel Pump Module Replacement
The low-pressure fuel pump is inside the fuel tank and is reached from beneath the rear seat. Because certain Accord fuel pumps are covered by a safety recall for a defective impeller, check recall eligibility before buying parts; an authorized Honda dealer may replace it at no charge.
Difficulty Level: Advanced | Estimated Time: 2-3 hours
Assumption: This procedure covers the complete in-tank fuel-pump module, not wiring diagnosis or recall-specific pump-motor rebuilding.
⚠️ Safety & Precautions
- 🔥 Work outdoors or in a well-ventilated repair area. Keep cigarettes, flames, heaters, sparks, and incandescent work lights away.
- 🧯 Keep a Class B fire extinguisher within reach.
- ⚡ Switch your Accord completely off and keep the key fob at least 10 feet away.
- 🟠 Never touch, disconnect, or probe an orange high-voltage hybrid cable or connector.
- 🔋 Disconnect the 12-volt battery negative terminal before opening the fuel tank.
- ⛽ Reduce the fuel level to one-quarter tank or lower before starting. Do not siphon fuel by mouth.
- 🚫 Do not use an impact wrench, steel punch, drill, shop vacuum, or other spark-producing equipment near the open tank.
- 🧼 Clean spilled gasoline immediately and dispose of fuel-soaked materials according to local hazardous-waste regulations.
- 🛑 Stop if the replacement module or connector differs from the original part.
🔧 Required Tools
You'll need the following tools for this repair:
- 10mm socket
- 3/8-inch drive ratchet
- 3/8-inch drive torque wrench rated 5-80 ft-lbs
- 150mm socket extension
- Fuel tank lock-ring wrench sized for Honda module (specialty)
- Fuel-line quick-connector release tool set (specialty)
- Nylon trim-clip removal tool
- Flat-blade screwdriver with 6mm tip
- Plastic scraper 25mm wide
- Fuel-safe drain pan rated 2 gallons
- Fuel-safe absorbent pads
- Compressed-air blow gun regulated below 30 psi
- Class B fire extinguisher
- Nitrile fuel-resistant gloves
- Safety glasses with side shields
🔩 Required Parts
HowToo sells all the parts you need for this repair:
- Complete in-tank fuel-pump module - Qty: 1
- Fuel-pump module tank seal - Qty: 1
- Fuel-line connector retainer - Qty: 1
- Fuel-pump access-cover butyl sealer - Qty: As needed
- Fuel-safe absorbent pads - Qty: As needed
📋 Before You Begin
- 🚗 Park your Accord outdoors on level pavement, select Park, apply the parking brake, and lower all windows.
- ⛽ Run the fuel level down to one-quarter tank or less. Fuel expands with heat, so allow the vehicle to cool before opening the tank.
- 📱 No infotainment service mode, battery registration, EPB command, or high-voltage isolation procedure is required.
- 🔎 Check the NHTSA recall-lookup website or contact an authorized Honda dealer before purchasing parts. Do not provide a VIN here; enter it only through an official recall-lookup service.
- 🧹 Remove loose items from the rear seating area and place fuel-safe absorbent pads around the work area.
🔨 Step-by-Step Instructions
Follow these steps in order:
Step 1: Relieve Residual Fuel Pressure
- Switch the climate control off, place the transmission in Park, and switch the vehicle completely off.
- Open the fuel-filler door and slowly loosen the fuel cap by hand to release tank vapor pressure. Reinstall the cap after pressure equalizes.
- Wait at least three minutes before disconnecting the battery.
- No tool is required for this step.
Step 2: Disconnect the 12-Volt Battery
- Keep the key fob at least 10 feet away from your Accord.
- Use a 10mm socket and 3/8-inch drive ratchet to loosen the negative battery-terminal nut.
- Lift the negative clamp from the terminal and isolate it so it cannot make accidental contact.
- Do not disconnect any orange high-voltage component.
Step 3: Remove the Rear Seat Cushion
- Reach beneath the front edge of the rear seat cushion and locate the cushion-release points.
- Release the cushion retainers by hand. Use a nylon trim-clip removal tool only if gentle assistance is necessary.
- Lift the front of the cushion, disengage its rear hooks, and remove it through a rear door.
- Do not force the cushion around seat-belt buckles or nearby wiring.
- Photograph every clip before removal.
Step 4: Expose and Clean the Pump Access Area
- Locate the fuel-pump access cover beneath the removed seat cushion.
- Use a plastic scraper 25mm wide to separate the access cover from its butyl sealer without bending the cover.
- Use a compressed-air blow gun regulated below 30 psi to blow dirt away from the pump-module flange before disconnecting anything.
- Position fuel-safe absorbent pads and a fuel-safe drain pan rated 2 gallons around the module.
- Do not allow dirt to enter the fuel tank.
Step 5: Disconnect the Electrical Connector and Fuel Line
- Press the locking tab and disconnect the fuel-pump electrical connector by hand. Pull on the connector body, not its wires.
- Wrap the fuel connection with a fuel-safe absorbent pad.
- Release the fuel-line connector using the correctly sized tool from the fuel-line quick-connector release tool set.
- A quick connector is the locking fitting that secures the plastic fuel line without a threaded nut.
- Pull the fuel line straight from the module nipple and collect the small amount of released fuel in the fuel-safe drain pan rated 2 gallons.
- Inspect the connector for broken tabs, deformation, or contamination.
Step 6: Mark and Remove the Lock Ring
- Use the flat-blade screwdriver with 6mm tip only to make a light orientation reference on the removable ring area; do not puncture or pry against the tank.
- Fit the fuel tank lock-ring wrench sized for Honda module squarely onto the lock ring.
- Use the 3/8-inch drive ratchet with the lock-ring wrench to turn the ring counterclockwise.
- Do not use an impact wrench, hammer, or steel punch.
- Remove the lock ring and place it on a clean, dry surface.
Step 7: Remove the Fuel-Pump Module
- Lift the module slowly by hand while watching the fuel-level float arm.
- Tilt the module only enough to clear the tank opening without bending the float arm.
- Drain retained gasoline from the module into the fuel-safe drain pan rated 2 gallons.
- Remove and discard the old tank seal. Never reuse a compressed seal.
- Cover the opening temporarily with a clean, fuel-safe absorbent pad. Do not push the pad into the tank.
Step 8: Compare and Install the New Module
- Compare the new and old modules on a clean surface. Confirm that the connector, fuel outlet, float arm, filter, and locating features match.
- Install a new fuel-pump module tank seal into the tank groove by hand. Keep it dry unless the replacement-part instructions specify otherwise.
- Lower the new module into the tank by hand while carefully guiding the float arm through the opening.
- Align the module’s locating mark with the corresponding tank mark. The module must sit flat without compressing or displacing the seal.
- Never force the float arm downward.
Step 9: Install and Tighten the Lock Ring
- Start the lock ring by hand and confirm that it engages evenly.
- Install the fuel tank lock-ring wrench sized for Honda module and turn the ring clockwise with the 3/8-inch drive ratchet.
- Align the lock ring to Honda’s fully seated index position. Honda uses a lock-ring seating position for this joint rather than a universal fastener torque.
- If the replacement module includes a different ring or installation specification, follow the instructions supplied with that exact matched component.
- Stop and reseat the seal if the ring binds or the module flange rises unevenly.
Step 10: Reconnect the Fuel Line and Wiring
- Install the new fuel-line connector retainer in its specified position.
- Push the fuel-line connector straight onto the module nipple by hand until it clicks.
- Pull gently on the connector by hand to confirm it is locked.
- Connect the electrical connector until its locking tab clicks.
- Use a fuel-safe absorbent pad to dry the surrounding area completely.
Step 11: Reconnect the Battery and Prime the System
- Use a 10mm socket and 3/8-inch drive torque wrench rated 5-80 ft-lbs to reconnect the negative battery terminal.
- Torque the 12-volt negative terminal nut to 5.4 Nm (48 in-lbs).
- With the access cover and seat still removed, enter the vehicle with dry gloves and press the brake pedal while pressing the POWER button.
- Confirm that the green READY indicator illuminates. The engine may or may not start immediately; this is normal for the hybrid system.
- Switch the vehicle off, wait 30 seconds, and repeat the READY cycle twice to prime the fuel system.
Step 12: Check for Leaks
- With your Accord in READY mode, inspect the module flange and fuel-line connector visually.
- Use a clean fuel-safe absorbent pad to touch the outside of the joint carefully. The pad must remain completely dry.
- Switch the vehicle off immediately if you see fuel, smell strong gasoline vapor, or find wetness.
- Do not reinstall the access cover until the system remains completely dry through several READY cycles.
Step 13: Reinstall the Access Cover and Rear Seat
- Switch your Accord off and move the key fob away.
- Apply new fuel-pump access-cover butyl sealer around the cover’s original sealing path.
- Press the access cover into place by hand, making sure the sealer forms an uninterrupted seal.
- Position the rear seat cushion, engage its rear hooks, and route the seat-belt buckles through their openings.
- Press directly above each front retainer until it locks. Pull upward gently to confirm the cushion is secure.
- No fastener torque applies to a cushion retained only by hooks and snap retainers.
✅ After Repair
- ✅ Start your Accord in READY mode and confirm that no warning message appears.
- 👃 Check inside and outside the vehicle for gasoline odor before driving.
- 🔍 Reinspect beneath the rear seat for leaks after a short drive and again after filling the tank.
- ⛽ Do not top off the tank during the first refueling. Stop when the pump nozzle clicks off automatically.
- 🛑 If the vehicle does not enter READY mode, cranks without starting, or develops a fuel leak, switch it off and recheck the connector and fuel-line lock.
- 📟 A warning light that remains on requires diagnosis with a Honda-capable scan tool; do not replace additional components without testing.
💰 DIY vs Shop Cost
Shop Cost: $650-$1,100 (parts + labor)
DIY Cost: $300-$650 (parts only)
You Save: $350-$450 by doing it yourself!
Shop labor rates vary but typically run $100-$150/hour. This repair takes a shop approximately 1.5-2.5 hours. An eligible safety-recall repair should be completed by Honda at no charge.
🎯 Ready to get started?
HowToo makes it easy: same-day/2-day shipping on every part, plus all the tools and specialty tools you need! Check out the parts and tools sections below to add everything to your cart.