





How to Replace the Fuel Pump on a 2017-2025 Honda Ridgeline (Engine: V6 3.5L)
Step-by-step module replacement with tools, parts, torque specs, safety tips, and recall guidance for 2017, 2018, 2019, 2020, 2021, 2022, 2023, 2024, 2025
How to Replace the Fuel Pump on a 2017-2025 Honda Ridgeline (Engine: V6 3.5L)
Step-by-step module replacement with tools, parts, torque specs, safety tips, and recall guidance for 2017, 2018, 2019, 2020, 2021, 2022, 2023, 2024, 2025


🔧 Ridgeline - Fuel Pump Module Replacement
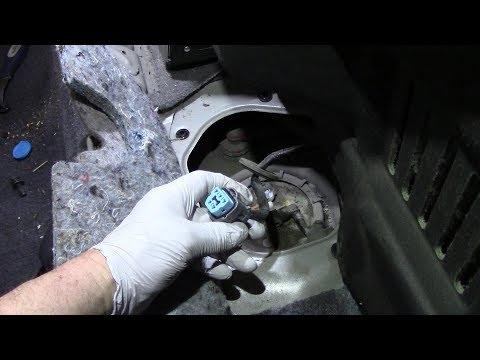
The electric fuel pump sits inside the fuel tank and is reached through a service opening beneath the rear-seat area. Replacing it requires relieving fuel pressure, removing the rear seat and access cover, disconnecting the fuel line, and installing a complete pump module with a new seal and locknut.
Difficulty Level: Advanced | Estimated Time: 3-5 hours
Important: Your Ridgeline may qualify for Honda’s fuel-pump impeller safety recall. Check its recall status with an authorized Honda dealer before purchasing parts because eligible replacement is performed free of charge.
⚠️ Safety & Precautions
- 🔥 Work outdoors or in an extremely well-ventilated area. Gasoline vapor can ignite explosively.
- 🚭 Do not smoke or use heaters, lamps, power tools, or anything capable of producing a spark nearby.
- 🧯 Keep an automotive Class B fire extinguisher within reach.
- 🥽 Wear safety glasses and fuel-resistant nitrile gloves.
- ⚡ Relieve fuel pressure before opening the fuel system, then disconnect the negative battery cable.
- ⛽ Perform this repair with the tank below one-quarter full. A full tank increases spill and vapor hazards.
- 🧼 Clean the module area completely before opening the tank. Dirt inside the tank can damage the new pump and injectors.
- 🚫 Never test the pump by applying power outside the fuel tank.
- 🔧 Do not strike the locknut with a steel punch. Sparks near gasoline vapor can cause a fire.
🔧 Required Tools
You'll need the following tools for this repair:
- 3/8-inch drive ratchet
- 3/8-inch drive torque wrench rated 10-100 Nm
- 10mm socket
- 12mm socket
- 14mm socket
- 6-inch socket extension
- Honda-compatible fuel tank locknut wrench (specialty)
- Honda-compatible fuel-line quick-disconnect tool (specialty)
- Non-marring trim removal tool set
- Small flat-blade screwdriver
- Needle-nose pliers
- Digital multimeter rated CAT III
- Low-pressure compressed-air blow gun
- Shop vacuum rated for dry debris only
- Fuel-safe drain pan rated 8-quart minimum
- Clean lint-free shop towels
- Fuel-resistant nitrile gloves
- ANSI Z87.1 safety glasses
- Class B automotive fire extinguisher
🔩 Required Parts
HowToo sells all the parts you need for this repair:
- In-tank fuel pump module assembly - Qty: 1
- Fuel pump module sealing gasket - Qty: 1
- Fuel pump module locknut - Qty: 1
- Fuel-line quick-connector retainer - Qty: 1
- Fuel pump service-cover butyl sealer - Qty: 1 roll
📋 Before You Begin
- 🅿️ Park your Ridgeline outside on level ground, select Park, apply the parking brake, and switch the ignition off.
- ⛽ Reduce the fuel level below one-quarter tank before beginning.
- 🗝️ Move the key or keyless remote at least 15 feet away so the electrical system cannot be activated accidentally.
- 📻 Record any personal audio settings that you want to restore after reconnecting the battery.
- 🧯 Place the fire extinguisher nearby and remove every possible flame or spark source from the work area.
- 🧹 Vacuum only dry dirt before opening the fuel system. Never use a normal vacuum on spilled fuel or gasoline vapor.
- 🔍 Inspect the replacement module before opening the tank. The electrical connector, fuel outlet, float arm, and module height must match the original assembly.
🔨 Step-by-Step Instructions
Follow these steps in order:
Step 1: Relieve Fuel-System Pressure
- Use the owner’s manual and the fuse-box legend to identify and remove the fuel-pump fuse with needle-nose pliers. Do not substitute a similarly named fuse.
- Start the engine and let it run until it stalls. Crank it for approximately five additional seconds, then switch the ignition off.
- Reinstall the original fuse with needle-nose pliers after pressure has been relieved.
- Place clean lint-free shop towels around the future fuel-line connection because a small amount of pressurized fuel may remain.
Step 2: Disconnect the Battery
- Open the hood and use a 10mm socket and ratchet to loosen the negative battery-terminal clamp.
- Remove the negative clamp and isolate it where it cannot spring back onto the terminal.
- Wait at least three minutes before disturbing wiring around the rear seat.
- Photograph connectors before disconnecting them.
Step 3: Raise and Remove the Rear Seat Assembly
- Raise the rear-seat cushions using their normal release handles and remove any stored items.
- Use a non-marring trim removal tool to remove the bolt covers without scratching the interior.
- Use the correctly fitting 12mm or 14mm socket, extension, and ratchet to remove the rear-seat mounting bolts. Keep each bolt in its original location.
- Disconnect any seat electrical connector by releasing its lock with a small flat-blade screwdriver; never pull on the wires.
- With a helper, lift the seat assembly clear of the cabin. It is awkward and can damage trim if dragged.
- During installation, tighten the seat mounting fasteners to the specification identified for their exact size in Honda service information. Do not estimate this safety-critical seat torque.
Step 4: Expose the Fuel-Pump Service Cover
- Use a non-marring trim removal tool to release the rear-floor trim and carefully fold the carpet and insulation away from the service opening.
- Use a 10mm socket and ratchet to remove any bolted cover fasteners, if fitted.
- If the cover is bonded with sealer, use a non-marring trim removal tool to lift it gradually without bending it.
- Move the cover aside while keeping dirt away from its sealing surface.
Step 5: Clean and Identify the Connections
- Use a dry-debris shop vacuum to remove loose dirt around the unopened module. Do not use the vacuum if liquid fuel or strong concentrated vapor is present.
- Use low-pressure compressed air and safety glasses to clear the remaining dust away from the locknut.
- Use clean lint-free shop towels to wipe the module top completely clean.
- Mark the module’s installed direction with a small flat-blade screwdriver only on the surrounding metal service area, away from hoses and wiring.
Step 6: Disconnect the Wiring and Fuel Line
- Use a digital multimeter set to DC volts to confirm there is no voltage at the pump power terminals before continuing.
- Release the electrical connector lock with a small flat-blade screwdriver and unplug the connector by holding its housing.
- Place a fuel-safe drain pan and clean lint-free shop towels beneath the fuel connection.
- Remove the connector’s secondary retainer with a small flat-blade screwdriver.
- Use the Honda-compatible fuel-line quick-disconnect tool to release the fitting, then pull the line straight off without twisting the plastic outlet.
- Cap the open line with a clean lint-free shop towel positioned so no fibers enter the fitting.
Step 7: Remove the Fuel-Pump Module
- Fit the Honda-compatible fuel tank locknut wrench squarely over the locknut.
- Use the 3/8-inch drive ratchet and locknut wrench to rotate the locknut counterclockwise. Do not use a hammer or steel punch.
- Remove and discard the old locknut.
- Lift the pump module slowly while using the fuel-safe drain pan to catch fuel.
- Tilt the module only enough to guide the float arm through the opening without bending it.
- Remove and discard the old sealing gasket. Do not let it fall into the tank.
Step 8: Install the New Module
- Use clean lint-free shop towels to clean the tank’s gasket channel. Do not push dirt into the tank.
- Install the new fuel pump module sealing gasket dry and evenly in its channel. Do not apply grease, silicone, or fuel to the gasket.
- Guide the new module and float arm into the tank without forcing or bending them.
- Align the module’s index mark with the tank mark so the outlet and wiring face their original directions.
- Press the module down evenly and start the new locknut by hand. If it binds, remove it and restart it rather than forcing the threads.
- Use the Honda-compatible fuel tank locknut wrench and torque wrench to tighten the new locknut to 93 Nm (69 ft-lbs).
- Keep the gasket flat while tightening.
Step 9: Reconnect the Fuel Line and Wiring
- Inspect the quick connector for damage and install the new fuel-line quick-connector retainer.
- Push the fuel line straight onto the module outlet until it clicks.
- Pull gently on the line by hand to verify that it is locked. Do not pull on the hose itself.
- Reconnect the electrical plug until its locking tab clicks.
Step 10: Perform the First Leak Check
- Keep the service cover and carpet removed so the module remains visible.
- Reconnect the negative battery terminal with a 10mm socket and torque wrench. Tighten it to 5.4 Nm (48 in-lbs).
- Switch the ignition to ON for two seconds without starting the engine, then switch it OFF for ten seconds. Repeat this cycle three times to prime the system.
- Use a bright visual inspection and clean lint-free shop towels to check the locknut and fuel connection for wetness or fuel odor.
- If any leak appears, switch the ignition off immediately, disconnect the negative battery cable with a 10mm socket, and correct the seal or connector before proceeding.
Step 11: Reinstall the Service Cover and Interior
- After confirming there are no leaks, switch the ignition off and disconnect the negative battery cable again with a 10mm socket.
- Apply fuel pump service-cover butyl sealer continuously around the cover flange, matching the original sealing path.
- Reinstall the cover. Use a 10mm socket and ratchet for any original cover fasteners, tightening them only until the cover is seated without distortion.
- Return the insulation and carpet to their original positions and engage the trim using a non-marring trim removal tool.
- With a helper, position the rear seat without trapping wiring or seat belts.
- Reconnect the seat electrical connector and confirm its lock is fully engaged.
- Install the original seat fasteners with the appropriate 12mm or 14mm socket, then tighten them to the applicable Honda service specification for the fastener location.
- Reinstall the bolt covers with the non-marring trim removal tool.
- Reconnect the negative battery terminal with a 10mm socket and tighten it to 5.4 Nm (48 in-lbs).
✅ After Repair
- 🔑 Cycle the ignition ON for two seconds and OFF for ten seconds three times, then start the engine.
- 🔍 Let the engine idle and inspect for fuel odor, hesitation, warning lights, or leakage.
- 🛣️ Take a short low-speed test drive, then park outside and inspect the service-cover area again.
- ⛽ Add only a small amount of fuel initially. Recheck for leaks before filling the tank completely.
- 📊 If the engine does not start, use the digital multimeter to check battery voltage and pump power. Do not repeatedly crank the engine.
- 🪟 Restore the automatic window function if needed by fully lowering and then fully raising each affected window while holding its switch briefly.
- 📻 Restore personal audio and clock settings if they were lost.
- ⚠️ If a fuel smell persists, stop driving, park outdoors away from ignition sources, and have the system inspected immediately.
💰 DIY vs Shop Cost
Shop Cost: ₹70,000-₹130,000 (imported parts + labor)
DIY Cost: ₹35,000-₹80,000 (parts only)
You Save: ₹35,000-₹50,000 by doing it yourself!
Independent labor rates around Sonīpat vary significantly for an imported U.S.-market vehicle. This repair takes a properly equipped shop approximately 3-4 hours; recall-eligible replacement through Honda should be free where supported.
🎯 Ready to get started?
HowToo makes it easy: same-day/2-day shipping on every part, plus all the tools and specialty tools you need! Check out the parts and tools sections below to add everything to your cart.