

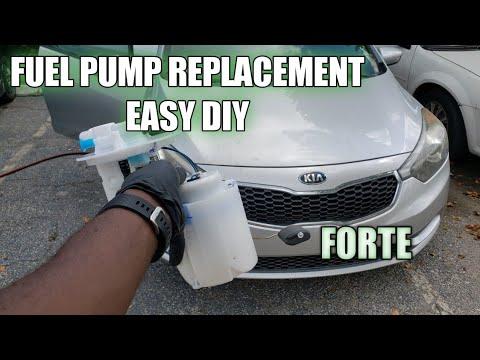





How to Replace the Fuel Pump on a 2014-2018 Kia Forte (Trim: LX | Engine: Inline 4 2.0L)
Step-by-step in-tank fuel pump module replacement with tools, torque specs, and safety tips for 2014, 2015, 2016
How to Replace the Fuel Pump on a 2014-2018 Kia Forte (Trim: LX | Engine: Inline 4 2.0L)
Step-by-step in-tank fuel pump module replacement with tools, torque specs, and safety tips for 2014, 2015, 2016


🔧 Forte - Fuel Pump Module Replacement
The fuel pump module is inside the fuel tank and is reached through an access opening beneath the rear seat cushion. You will relieve fuel pressure, disconnect the battery, remove the module, install a new sealing ring, and check carefully for leaks.
Difficulty Level: Intermediate | Estimated Time: 2-3 hours
Assumption: This procedure is for the original equipment-style complete in-tank fuel pump module.
⚠️ Safety & Precautions
- Work outdoors or in a well-ventilated area, away from flames, heaters, cigarettes, sparks, and hot work lights.
- Wear safety glasses and fuel-resistant nitrile gloves. Gasoline can injure your eyes and skin.
- Disconnect the negative battery cable after relieving fuel pressure.
- Do not use an impact wrench, steel punch, or hammer near the open fuel tank.
- Keep a Class B fire extinguisher within reach.
- Allow the engine and exhaust system to cool completely before starting.
- Reduce the fuel level below one-quarter tank. A full tank can spill through the module opening.
- Prevent dirt from entering the tank. Even small debris can damage the new pump or injectors.
🔧 Required Tools
You'll need the following tools for this repair:
- 3/8-inch drive ratchet
- 3/8-inch drive 6-inch extension
- 12mm socket
- 10mm socket
- 3/8-inch drive torque wrench rated 10-100 Nm
- Fuel pump lock-ring wrench (specialty)
- Non-marring trim removal tool
- Small flat-blade screwdriver
- Soft nylon detailing brush
- Permanent marker
- Fuel-resistant drain pan rated 5 liters minimum
- Class B fire extinguisher
- Fuel-resistant nitrile gloves
- ANSI Z87.1 safety glasses
🔩 Required Parts
HowToo sells all the parts you need for this repair:
- Complete in-tank fuel pump module - Qty: 1
- Fuel pump module sealing ring - Qty: 1
- Fuel-resistant absorbent pads - Qty: 1 pack
📋 Before You Begin
- Park your Forte on level ground, select Park, engage the parking brake, and switch off every electrical accessory.
- Lower the fuel level below one-quarter tank before opening the fuel system.
- Open the windows and rear doors for ventilation.
- Keep the replacement module sealed until the tank opening has been cleaned.
- Have the lock-ring wrench ready. It grips the large retaining ring without creating sparks.
🔨 Step-by-Step Instructions
Follow these steps in order:
Step 1: Relieve Fuel-System Pressure
- Open the hood and locate the engine-compartment fuse and relay box.
- Use the diagram inside the fuse-box cover to identify the fuel-pump fuse or relay, normally labeled F/PUMP.
- Use your fingers to remove the identified relay. If the box identifies only a fuel-pump fuse, remove that fuse with the fuse puller stored in the box.
- Start the engine and let it run until it stalls.
- Crank the engine for approximately three seconds, then switch the ignition completely off.
- Reinstall the fuse or relay with your fingers after pressure has been relieved.
Step 2: Disconnect the Battery
- Use a 10mm socket and ratchet to loosen the negative battery-terminal nut.
- Lift the negative terminal from the battery post and position it where it cannot spring back.
- Wait at least one minute before disconnecting the fuel-pump wiring.
Step 3: Remove the Rear Seat Cushion
- Check the lower front edge of the rear cushion for retaining bolts. If fitted, use a 12mm socket, extension, and ratchet to remove them.
- Lift sharply at the front corners to release the cushion retainers, then pull the cushion forward and out through a rear door.
- Do not pull against any seat-belt buckles or wiring.
- Photograph each connector before unplugging it.
Step 4: Open the Fuel-Pump Access Cover
- Locate the access cover beneath the removed cushion.
- Use a non-marring trim removal tool to lift the cover carefully without bending it.
- Use a soft nylon detailing brush to remove all loose dirt from the cover and surrounding floor.
- Lift the cover far enough to expose the pump-module wiring and fuel connection.
Step 5: Disconnect the Electrical Connector
- Press the connector lock with your gloved fingers and unplug the pump-module electrical connector.
- If the lock is difficult to release, use a small flat-blade screwdriver to lift only the locking tab. Do not pry against the connector terminals.
- Inspect the connector for melted plastic, corrosion, or darkened terminals. Damaged terminals must be repaired before installing the new pump.
Step 6: Disconnect the Fuel Line
- Place fuel-resistant absorbent pads around the module and position the 5-liter fuel-resistant drain pan nearby.
- Push the fuel-line connector slightly toward the module, press its release tabs with your gloved fingers, and pull the connector straight off.
- Catch the small amount of remaining fuel with an absorbent pad.
- Do not use the screwdriver on the plastic fuel-line sealing surface.
Step 7: Mark the Module Position
- Use a permanent marker to place matching alignment marks on the module flange and tank.
- Use the soft nylon detailing brush again to remove every trace of dirt around the locking ring.
Step 8: Remove the Locking Ring
- Fit the fuel pump lock-ring wrench securely onto the retaining ring.
- Use the 3/8-inch drive ratchet and extension to rotate the ring counterclockwise until it releases.
- Lift off the retaining ring and place it on a clean absorbent pad.
- Never strike the ring with a steel punch or metal hammer.
Step 9: Remove the Old Fuel Pump Module
- Lift the module slowly with both gloved hands.
- Tilt the module only as needed to clear the fuel-level float arm without bending it.
- Allow fuel inside the reservoir to drain into the tank, then place the module upright in the fuel-resistant drain pan.
- Remove and discard the old sealing ring. Do not reuse it.
Step 10: Install the New Module
- Compare the electrical connector, fuel outlet, float arm, and module height with the old assembly.
- Install the new fuel pump module sealing ring into the tank groove using clean, gloved fingers. Install it dry unless the replacement-pump instructions specify otherwise.
- Lower the new module into the tank carefully, guiding the float arm past the opening.
- Align the module with the marks made by the permanent marker. Ensure the sealing ring remains flat and is not pinched.
Step 11: Tighten the Locking Ring
- Install the retaining ring by hand and verify that it engages evenly.
- Fit the fuel pump lock-ring wrench and tighten it with the 3/8-inch drive torque wrench and extension.
- Torque the fuel pump retaining ring to 69-79 Nm (51-58 ft-lbs).
- Stop and reposition the sealing ring if the module rises, tilts, or turns out of alignment.
Step 12: Reconnect the Line and Wiring
- Push the fuel-line connector straight onto the module until it clicks.
- Pull back gently with your gloved fingers to confirm it is locked.
- Push the electrical connector into place until its locking tab clicks.
- Keep the access cover open for the initial leak check.
Step 13: Prime and Inspect the System
- Use the 10mm socket and ratchet to reinstall the negative battery terminal.
- Torque the negative battery-terminal nut to 4-6 Nm (35-53 in-lbs).
- Switch the ignition to ON for five seconds without starting the engine, then switch it off for ten seconds.
- Repeat the ON-and-OFF cycle three times to fill the new pump and fuel line.
- Use your safety glasses and inspect the module connection and sealing flange for liquid fuel or a strong fuel odor.
- If any leak appears, switch the ignition off immediately and disconnect the negative battery terminal.
Step 14: Reinstall the Access Cover and Seat
- Once no leaks are present, press the access cover securely back into position using your hands and the non-marring trim removal tool.
- Guide the seat-belt buckles through the cushion openings and position the rear cushion.
- Press the front corners downward until the retainers lock.
- If seat-cushion bolts were fitted, install them with the 12mm socket and torque wrench.
- Torque the rear seat-cushion bolts to 20-30 Nm (15-22 ft-lbs).
✅ After Repair
- Start the engine. A slightly longer first crank is normal while the system finishes priming.
- Let the engine idle for five minutes and confirm that it runs smoothly.
- Switch the engine off and recheck beneath the rear cushion for fuel odor or moisture.
- Verify that the fuel gauge responds normally after driving several minutes.
- If the engine does not start, recheck the pump fuse or relay, electrical connector, and fuel-line connection before further cranking.
- Do not reinstall or drive the vehicle if any gasoline leak is present.
💰 DIY vs Shop Cost
Shop Cost: $650-$1,050 (parts + labor)
DIY Cost: $220-$500 (parts only)
You Save: $430-$550 by doing it yourself!
Shop labor rates vary but typically run $100-$150/hour. This repair takes a shop approximately 1.5-2.5 hours.
🎯 Ready to get started?
HowToo makes it easy: same-day/2-day shipping on every part, plus all the tools and specialty tools you need! Check out the parts and tools sections below to add everything to your cart.