








How to Replace the Fuel Pump on a 2012-2014 Subaru Outback (Trim: 3.6R Limited | Engine: Flat 6 3.6L)
Step-by-step module replacement with required tools, parts, torque specs, and safety tips for 2012, 2013
How to Replace the Fuel Pump on a 2012-2014 Subaru Outback (Trim: 3.6R Limited | Engine: Flat 6 3.6L)
Step-by-step module replacement with required tools, parts, torque specs, and safety tips for 2012, 2013


🔧 Outback - Fuel Pump Module Replacement
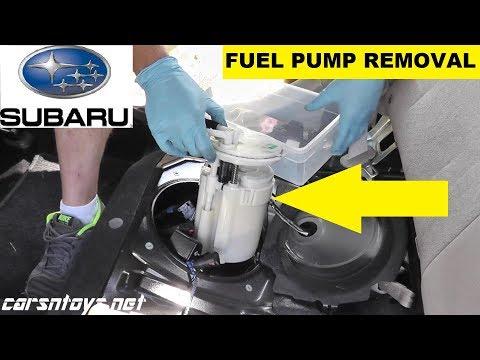
The fuel pump module is inside the fuel tank, beneath an access panel under the right side of the rear seat. Replacing the complete module is safer and simpler for a beginner than rebuilding it with a bare pump.
Difficulty Level: Intermediate | Estimated Time: 2-3 hours
⚠️ Safety & Precautions
- 🔥 Gasoline vapor is extremely flammable. Work outdoors or in a well-ventilated area away from flames, heaters, sparks, and smoking materials.
- 🧯 Keep a Class B fire extinguisher within immediate reach.
- 🔋 Relieve fuel pressure before disconnecting the negative battery cable.
- ⚡ Do not use incandescent work lights, power tools, or anything that could create a spark near the open fuel tank.
- 🛡️ Wear safety glasses and fuel-resistant nitrile gloves throughout the repair.
- ⛽ Perform the repair with the fuel tank below one-quarter full. The module opening may spill fuel if the tank is too full.
- 🚫 Never use a shop vacuum to collect gasoline or gasoline vapor.
🔧 Required Tools
You'll need the following tools for this repair:
- 10mm socket
- 1/4-inch drive ratchet
- 1/4-inch drive extension, 6-inch
- Low-range torque wrench, 2-20 Nm
- Plastic trim removal tool
- Small flat-tip screwdriver
- Needle-nose pliers, 6-inch
- LED flashlight rated for automotive use
- Fuel-resistant drain pan, 2-gallon minimum
- Fuel-resistant absorbent pads
- Lint-free shop towels
- Class B fire extinguisher
- Fuel-resistant nitrile gloves
- Safety glasses
🔩 Required Parts
HowToo sells all the parts you need for this repair:
- Complete in-tank fuel pump module - Qty: 1
- Fuel pump module sealing gasket - Qty: 1
- Fuel pump inlet strainer - Qty: 1, if not included with module
📋 Before You Begin
- 🚙 Park your Outback outdoors on level ground. Select Park, apply the parking brake, and switch the ignition off.
- ⛽ Reduce the tank to below one-quarter full before beginning.
- 🧤 Put on fuel-resistant nitrile gloves and safety glasses. Place the Class B fire extinguisher nearby.
- 📱 Record radio presets and the clock setting. Disconnecting the battery may erase them.
- 🔌 Do not disconnect the battery until the fuel-pressure relief procedure in Step 3 is complete.
- 🧼 Cleanliness is critical. Dirt entering the tank can damage the new pump and fuel injectors.
🔨 Step-by-Step Instructions
Follow these steps in order:
Step 1: Remove the Rear Seat Cushion
- Use the plastic trim removal tool at the front lower edge of the rear seat cushion to release the retaining clips.
- Lift the front of the cushion, then pull it forward to disengage the rear hooks.
- Carefully move the cushion out of the vehicle without pulling on the seat-belt buckles.
- Take a photo before moving any wiring.
Step 2: Open the Fuel-Pump Access Area
- Locate the fuel-pump access cover beneath the right side of the rear seat area.
- Use the plastic trim removal tool to lift the carpet or insulation without tearing it.
- Use the small flat-tip screwdriver and plastic trim removal tool to carefully release the access cover from its sealing material.
- Use the LED flashlight to identify the pump electrical connector and fuel lines.
- Use lint-free shop towels to clean loose dirt from the cover and surrounding floor before opening the tank.
Step 3: Relieve Fuel-System Pressure
- Press the locking tab and unplug the fuel-pump electrical connector by hand. Pull on the connector housing, not the wires.
- Move all tools and towels away from the access opening.
- Start the engine and let it run until it stalls. Crank it for approximately five additional seconds to remove remaining pressure.
- Switch the ignition fully off and remove the key.
- Use fuel-resistant absorbent pads around the pump module to catch the small amount of fuel remaining in the lines.
Step 4: Disconnect the Battery
- Open the hood and use the 10mm socket, 1/4-inch drive extension, and ratchet to loosen the negative battery-terminal clamp.
- Remove the negative clamp and position it where it cannot spring back onto the terminal.
- Wait at least one minute before returning to the fuel-pump opening.
Step 5: Clean and Disconnect the Fuel Lines
- Use lint-free shop towels to clean the top of the module thoroughly. No dirt should fall into the tank.
- Place the fuel-resistant drain pan beside the access area and surround the fittings with absorbent pads.
- Release each quick-connect fuel fitting by pressing its locking tabs. A quick-connect fitting is a plastic connector that locks onto the fuel pipe without a threaded nut.
- If a secondary retaining clip is fitted, use the small flat-tip screwdriver to release it gently.
- Use needle-nose pliers only on a hose clamp or retaining clip. Do not squeeze or twist the plastic fuel fitting.
- Wrap the disconnected line ends in clean, lint-free shop towels to keep dirt out.
Step 6: Remove the Fuel Pump Module
- Use the 10mm socket, 1/4-inch drive extension, and ratchet to loosen the fuel-pump retaining nuts gradually in a crisscross pattern.
- Remove all retaining nuts and place them in a clean location.
- Lift the module slowly by hand. Tilt it only as needed to clear the fuel-level float without bending its arm.
- Drain the fuel held inside the old module into the fuel-resistant drain pan.
- Remove the old sealing gasket from the tank opening by hand.
- Use lint-free shop towels to clean the sealing surface. Do not allow debris or towel fibers to enter the tank.
Step 7: Install the New Fuel Pump Module
- Compare the new complete module with the old one. Confirm the electrical connector, fuel outlets, float arm, and locating marks match.
- Install the new fuel-pump sealing gasket onto the tank opening. Install it dry unless the replacement-part instructions specifically require clean gasoline as a lubricant.
- Lower the module into the tank by hand while guiding the float carefully past the opening.
- Align the module’s locating marks and studs exactly as the original module was positioned.
- Install the retaining nuts finger-tight.
- Use the 10mm socket and low-range torque wrench to tighten the nuts evenly in a crisscross pattern to 4.4 Nm (39 in-lbs).
- Do not overtighten the nuts. Excess force can distort the flange and cause a vapor or fuel leak.
Step 8: Reconnect the Fuel Lines and Wiring
- Push each fuel-line fitting onto its correct outlet by hand until it clicks.
- Pull back gently on each fitting to verify that it is locked.
- Reinstall any secondary locking clips using the small flat-tip screwdriver.
- Push the electrical connector into the new module until its lock clicks.
- Use the LED flashlight to check that no wire or hose is trapped beneath the module flange.
Step 9: Prime and Leak-Test the System
- Use the 10mm socket and ratchet to reconnect and snug the negative battery-terminal clamp securely.
- Keep the access cover and rear seat cushion removed during the leak check.
- Turn the ignition to ON for five seconds without starting the engine, then switch it OFF for ten seconds. Repeat this cycle three times to fill the new pump and fuel lines.
- Use the LED flashlight to inspect the module flange and fuel fittings. Do not continue if any wetness or gasoline odor appears.
- Start the engine and let it idle while checking the area again with the LED flashlight.
- Switch the engine off immediately if a leak is found. Disconnect the negative battery cable before correcting it.
Step 10: Reinstall the Access Cover and Seat
- Once the area is completely dry and leak-free, reinstall the access cover by hand and press its seal evenly into place.
- Return the carpet and insulation to their original positions using the plastic trim removal tool.
- Guide the seat-belt buckles through their openings and engage the rear seat-cushion hooks.
- Push firmly downward over each front retaining clip until it locks.
- Pull upward gently at both front corners to confirm the cushion is secure.
✅ After Repair
- ✅ Start your Outback and allow it to idle for several minutes. Confirm the engine runs smoothly and starts normally.
- 👃 Check for gasoline odor around the rear seat and outside the vehicle. Any persistent odor requires immediate inspection.
- 🔍 Recheck the module and line connections after the first short drive.
- ⛽ Verify that the fuel gauge responds normally. It may take a short drive to stabilize.
- 🕒 Restore the clock and radio presets if they were erased.
- ♻️ Place the old pump in a sealed, fuel-safe container and take it to an approved automotive-waste facility.
💰 DIY vs Shop Cost
Shop Cost: $650-$1,050 (parts + labor)
DIY Cost: $250-$500 (parts only)
You Save: $400-$550 by doing it yourself!
Shop labor rates vary but typically run $100-$150/hour. This repair takes a shop approximately 1.5-2.5 hours.
🎯 Ready to get started?
HowToo makes it easy: same-day/2-day shipping on every part, plus all the tools and specialty tools you need! Check out the parts and tools sections below to add everything to your cart.