

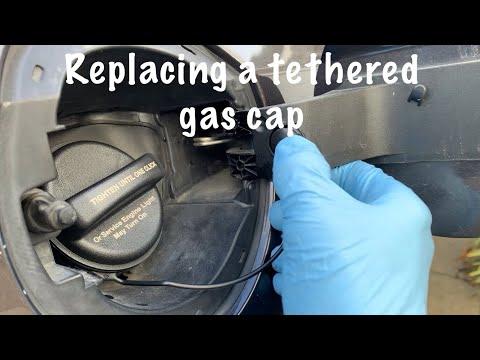






How to Replace the Fuel Cap on a 2004-2020 Kia Optima (Engine: Inline 4 2.4L)
Step-by-step DIY instructions covering required tools, parts, safety, and installation checks for 2004, 2005, 2006, 2007, 2008, 2009, 2010, 2011, 2012, 2013, 2014, 2015, 2016, 2017, 2018, 2019, 2020
How to Replace the Fuel Cap on a 2004-2020 Kia Optima (Engine: Inline 4 2.4L)
Step-by-step DIY instructions covering required tools, parts, safety, and installation checks for 2004, 2005, 2006, 2007, 2008, 2009, 2010, 2011, 2012, 2013, 2014, 2015, 2016, 2017, 2018, 2019, 2020


🔧 Optima - Fuel Cap Replacement
Replacing the fuel cap is a quick repair. A worn seal, damaged tether, or loose cap can allow fuel vapors to escape and may turn on the check-engine light.
Difficulty Level: Beginner | Estimated Time: 5-10 minutes
⚠️ Safety & Precautions
- ⚠️ Turn the engine off and keep flames, cigarettes, and sparks away from the vehicle.
- 🧤 Wear gloves and avoid touching spilled fuel.
- 🔋 Battery disconnection is not required.
🔧 Required Tools
You'll need the following tools for this repair:
- Nylon trim-removal tool (specialty)
- Fuel-resistant nitrile gloves
- ANSI Z87.1 safety glasses
- Clean lint-free shop towel
🔩 Required Parts
HowToo sells all the parts you need for this repair:
- Fuel filler cap with sealing gasket and tether - Qty: 1
📋 Before You Begin
- 🅿️ Park your Optima outdoors on level ground, shift into Park, apply the parking brake, and turn the engine off.
- ⛽ Use a cap specifically matched to the evaporative-emissions system on your Optima. A generic cap may leak vapor and trigger a warning light.
- 🧊 Let the area cool if the vehicle has been parked in direct sunlight.
🔨 Step-by-Step Instructions
Follow these steps in order:
Step 1: Open the Fuel Door
- Wear the fuel-resistant nitrile gloves and ANSI Z87.1 safety glasses.
- Use the fuel-door release inside your Optima, then open the fuel door by hand.
- If the door will not release, do not force or pry its painted edge.
Step 2: Remove the Old Fuel Cap
- Use your gloved hand to turn the old cap counterclockwise until it comes off the filler neck.
- Remove the tether retainer from its mounting hole with the nylon trim-removal tool. A trim-removal tool is a nonmetal pry tool that helps release plastic clips without scratching them.
- Support the tether while removing it so the retainer does not snap.
Step 3: Inspect the Filler Neck
- Use the clean lint-free shop towel to wipe dirt from the cap-sealing surface.
- Check that the filler-neck sealing surface is smooth and undamaged.
- Do not allow dirt, towel fibers, or tools to enter the filler opening.
Step 4: Install the New Cap Tether
- Compare the new cap and tether with the removed cap. Their sealing surfaces and tether mounting points should match.
- Use your gloved hand to press the new tether retainer fully into the original mounting hole.
- If gentle assistance is needed, use the nylon trim-removal tool. Do not bend or cut the tether.
Step 5: Tighten the New Fuel Cap
- Place the new cap squarely onto the filler neck with your gloved hand.
- Turn it clockwise until it clicks at least once. No separate torque specification applies because the cap’s ratcheting mechanism controls tightening.
- Gently pull on the cap to verify that it is seated securely.
- Do not stop before the cap clicks.
Step 6: Close the Fuel Door
- Use your gloved hand to position the tether so it is not pinched.
- Close the fuel door and press it until it latches flush with the body.
✅ After Repair
- ✅ Start your Optima and confirm that there is no fuel smell around the filler door.
- 🚗 If a loose-cap warning was present, it may clear after the cap is tightened and the vehicle completes several normal drive cycles.
- 🔍 If the check-engine light remains on, the evaporative-emissions system should be scanned for diagnostic trouble codes. Do not disconnect the battery simply to erase the light.
- ⚠️ Stop and inspect the installation if you smell strong fuel vapor or the new cap will not click.
💰 DIY vs Shop Cost
Shop Cost: ₹1,200-₹3,500 (parts + labor)
DIY Cost: ₹800-₹2,500 (parts only)
You Save: ₹400-₹1,000 by doing it yourself!
Local labor rates around Sonīpat vary. This repair takes a shop approximately 0.1-0.2 hour.
🎯 Ready to get started?
HowToo makes it easy: same-day/2-day shipping on every part, plus all the tools and specialty tools you need! Check out the parts and tools sections below to add everything to your cart.