

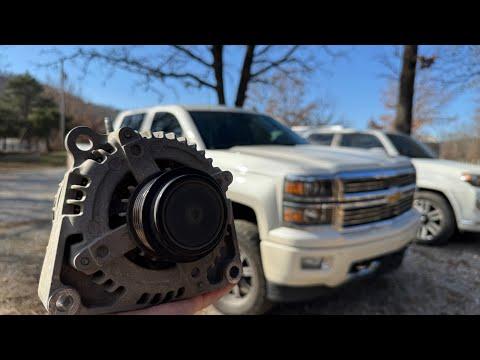




How to Replace the Alternator on a 2014-2018 GMC Sierra 1500 6.2L V8 (Engine: V8 6.2L)
Step-by-step DIY instructions with required tools, parts, torque specs, and safety tips for 2014, 2015, 2016, 2017, 2018
How to Replace the Alternator on a 2014-2018 GMC Sierra 1500 6.2L V8 (Engine: V8 6.2L)
Step-by-step DIY instructions with required tools, parts, torque specs, and safety tips for 2014, 2015, 2016, 2017, 2018


🔧 Sierra 1500 - Alternator Replacement
The alternator is mounted at the front of the 6.2L V8 and is driven by the serpentine belt. Replacement requires disconnecting the battery, releasing belt tension, disconnecting the alternator wiring, and removing its mounting bolts.
Difficulty Level: Intermediate | Estimated Time: 1-2 hours
⚠️ Safety & Precautions
- ⚠️ Disconnect the negative battery cable before touching the alternator wiring. The output terminal is continuously connected to battery power.
- 🧤 Allow the engine and exhaust components to cool completely before starting.
- 🔑 Keep the ignition off and the key away from your Sierra 1500 while working.
- 👓 Wear safety glasses and gloves because the belt tensioner is spring-loaded.
- ⚡ Never allow a tool to bridge the alternator output terminal and metal engine parts.
🔧 Required Tools
You'll need the following tools for this repair:
- 8mm socket
- 10mm socket
- 13mm socket
- 15mm six-point socket
- 3/8-inch-drive ratchet
- 3/8-inch-drive 6-inch extension
- 15mm serpentine-belt tool (specialty)
- 5-60 Nm torque wrench
- Small plastic trim tool
- Electrical contact-cleaning brush
- Mechanic's gloves
- Safety glasses
🔩 Required Parts
HowToo sells all the parts you need for this repair:
- Alternator compatible with the 6.2L V8 electrical system - Qty: 1
- Alternator output-terminal protective cap - Qty: 1, only if damaged
- Serpentine drive belt - Qty: 1, only if cracked, glazed, frayed, or contaminated
📋 Before You Begin
- 🅿️ Park your Sierra 1500 on level ground, select Park, engage the parking brake, and switch off all electrical accessories.
- 🌡️ Open the hood and let the engine cool completely.
- 📷 Photograph the serpentine-belt routing or locate the routing diagram under the hood.
- 🔋 Disconnecting the battery may reset the clock, saved audio settings, and automatic window functions.
- 🔍 Compare the replacement alternator with the original before installation. The mounting points, connector, pulley, and output terminal must match.
🔨 Step-by-Step Instructions
Follow these steps in order:
Step 1: Disconnect the Battery
- Use a 10mm socket and 3/8-inch-drive ratchet to loosen the negative battery-terminal clamp.
- Lift the negative cable from the battery post and position it where it cannot spring back into contact.
- Wait at least two minutes before working on the alternator wiring.
Step 2: Remove the Air-Intake Duct
- Use an 8mm socket and 3/8-inch-drive ratchet to loosen the intake-duct clamps at the air-filter housing and throttle-body connection.
- Disconnect the breather hose carefully. Release any plastic retaining clip with a small plastic trim tool.
- Lift the duct out of the engine compartment without pulling on attached wiring.
- During installation, tighten the intake clamps snugly to approximately 4 Nm (35 in-lbs). Do not crush the plastic duct.
Step 3: Record the Belt Routing
- Use your under-hood diagram or photograph to identify how the belt travels around every pulley.
- Inspect the belt for missing ribs, edge damage, shiny glazing, oil contamination, or cracks.
- Draw the pulley layout before removing the belt.
Step 4: Release the Serpentine Belt
- Fit the 15mm serpentine-belt tool onto the belt-tensioner bolt.
- Rotate the spring-loaded tensioner clockwise slowly to remove belt tension. A tensioner automatically keeps the belt tight while the engine runs.
- Slide the belt off the alternator pulley while firmly controlling the tool.
- Slowly return the tensioner to its resting position. Do not let it snap back.
- Leave the belt routed around the remaining pulleys if it is being reused.
Step 5: Disconnect the Alternator Wiring
- Press the locking tab and unplug the small alternator electrical connector by its plastic housing, not its wires.
- Lift the rubber protective cap from the large output terminal.
- Use a 13mm socket, 3/8-inch-drive extension, and 3/8-inch-drive ratchet to remove the output-cable retaining nut.
- Lift the cable eyelet from the terminal and move it aside without sharply bending it.
Step 6: Remove the Alternator
- Support the alternator with one hand. It is heavier than it appears.
- Use a 15mm six-point socket, 3/8-inch-drive extension, and 3/8-inch-drive ratchet to remove the alternator mounting bolts.
- Keep track of each bolt's original location.
- Rock the alternator gently to release it from the close-fitting mounting bracket, then lift it out.
- Do not pry against the pulley, plastic housing, or nearby wiring.
Step 7: Inspect the Connections and Bracket
- Use an electrical contact-cleaning brush to remove light corrosion from the output-cable eyelet.
- Check the mounting bracket for cracks, damaged threads, or trapped debris.
- Verify that the replacement alternator pulley has the same groove count and alignment as the original.
Step 8: Install the Replacement Alternator
- Lower the alternator squarely into its mounting bracket.
- Start every mounting bolt by hand for several turns to prevent crossed threads.
- Use a 15mm six-point socket and 5-60 Nm torque wrench to tighten the alternator mounting bolts evenly to 50 Nm (37 ft-lbs).
- Do not use an impact wrench for final tightening.
Step 9: Reconnect the Alternator Wiring
- Place the output-cable eyelet flat against the alternator terminal.
- Install the retaining nut, then use a 13mm socket and 5-60 Nm torque wrench to tighten it to 13 Nm (115 in-lbs).
- Do not overtighten the nut because the insulated terminal can break or rotate.
- Cover the terminal completely with its protective cap.
- Push the small electrical connector into place until its lock clicks.
Step 10: Reinstall the Serpentine Belt
- Confirm that the belt follows the photographed routing and sits correctly in every grooved pulley.
- Use the 15mm serpentine-belt tool to rotate the tensioner clockwise.
- Slip the belt over the alternator pulley, then release the tensioner slowly.
- Inspect every pulley again. Each belt rib must sit inside a matching groove.
- Misaligned ribs can destroy a new belt quickly.
Step 11: Reinstall the Air-Intake Duct
- Position the duct fully over the throttle body and air-filter housing connections.
- Reconnect the breather hose until its retainer locks.
- Use an 8mm socket, 3/8-inch-drive ratchet, and 5-60 Nm torque wrench to tighten the clamps to approximately 4 Nm (35 in-lbs).
- Check that no tools or loose parts remain in the engine compartment.
Step 12: Reconnect the Battery
- Place the negative cable fully onto the negative battery post.
- Use a 10mm socket and 5-60 Nm torque wrench to tighten the terminal clamp to 6 Nm (53 in-lbs).
- Confirm that the terminal cannot rotate by hand. Do not overtighten it.
✅ After Repair
- 👀 Before starting the engine, inspect the belt once more for correct routing and alignment.
- 🚙 Start the engine and watch the belt from a safe distance. It should track smoothly without wandering, squealing, or flapping.
- ⚠️ Confirm that the charging-system warning light turns off after the engine starts.
- 🔌 Turn on the headlights and climate-control blower, then verify that the lights remain steady and no warning message appears.
- 🔍 Shut the engine off immediately if the belt moves off-center, the alternator makes grinding noises, or there is a burning smell.
- 🪟 Restore the clock and saved settings. If an automatic window loses express operation, fully lower it, then fully raise it and hold the switch briefly.
- 🧾 A replacement alternator normally does not require programming or battery registration on your Sierra 1500.
💰 DIY vs Shop Cost
Shop Cost: ₹55,000-₹95,000, including an imported alternator and labor
DIY Cost: ₹38,000-₹75,000 for the alternator and related parts
You Save: Approximately ₹12,000-₹25,000 by doing it yourself!
Local pricing in Sonīpat varies significantly because this U.S.-market alternator may require import sourcing. This repair takes a shop approximately 1-1.5 hours.
🎯 Ready to get started?
HowToo makes it easy: same-day/2-day shipping on every part, plus all the tools and specialty tools you need! Check out the parts and tools sections below to add everything to your cart.