





How to Replace the A/C Compressor on a 2010-2019 Toyota Tundra (Trim: Limited | Engine: V8 5.7L)
Step-by-step R-134a replacement guide with tools, parts, torque specs, and safety tips for 2010, 2011, 2012, 2013
How to Replace the A/C Compressor on a 2010-2019 Toyota Tundra (Trim: Limited | Engine: V8 5.7L)
Step-by-step R-134a replacement guide with tools, parts, torque specs, and safety tips for 2010, 2011, 2012, 2013


🔧 Tundra - A/C Compressor Replacement
Replacing the A/C compressor requires recovering the refrigerant, removing the drive belt, replacing the compressor and sealing O-rings, then evacuating and accurately recharging the system. Refrigerant recovery and charging require certified A/C equipment; do not vent refrigerant into the air.
Difficulty Level: Advanced | Estimated Time: 4-6 hours
Assumption: These instructions cover the factory R-134a system; 4WD models may have an additional front skid plate.
⚠️ Safety & Precautions
- ⚠️ Have a qualified A/C shop recover the refrigerant before loosening any refrigerant line.
- 🧤 Liquid refrigerant can cause severe frostbite. Wear safety glasses and refrigerant-rated gloves.
- 🚫 Never vent R-134a refrigerant into the atmosphere.
- 🔥 Work only with the engine completely cool and keep hands away from the cooling fan.
- 🔋 Disconnect the negative battery terminal before touching the compressor connector.
- 🛢️ PAG refrigerant oil absorbs moisture. Keep the new compressor and lines sealed until installation.
- ⚙️ If the old compressor failed internally or produced metal debris, replacing only the compressor can cause another failure. The condenser, receiver/drier and expansion valve must be inspected, and contaminated lines must be professionally flushed.
- 🚙 Never work beneath your Tundra while it is supported only by a floor jack.
🔧 Required Tools
You'll need the following tools for this repair:
- 10mm socket
- 12mm socket
- 14mm socket
- 3/8-inch drive ratchet
- 1/2-inch drive breaker bar
- 3/8-inch drive torque wrench (5-80 ft-lbs)
- Plastic trim-clip removal tool
- Small plastic O-ring pick
- Serpentine belt routing diagram or camera
- Refrigerant oil measuring cup (graduated milliliters)
- R-134a recovery, recycling and charging station (specialty)
- R-134a electronic leak detector (specialty)
- Digital refrigerant scale (rated 50-pound minimum)
- Floor jack (rated 3-ton minimum)
- Jack stands (rated 3-ton minimum)
- Wheel chocks
- Mechanic gloves
- Refrigerant-rated gloves
- Safety glasses
- Drain pan (2-quart minimum)
- Clean lint-free shop towels
- Protective caps for R-134a lines
🔩 Required Parts
HowToo sells all the parts you need for this repair:
- A/C compressor with clutch assembly - Qty: 1
- A/C compressor manifold O-ring set for R-134a - Qty: 1
- Toyota-specification ND-OIL 8 refrigerant oil - Qty: 1 container
- R-134a refrigerant - Qty: Per under-hood refrigerant label
- Serpentine drive belt - Qty: 1 if worn, cracked or contaminated
- Receiver/drier desiccant element - Qty: 1 if the system was open, contaminated or the compressor failed internally
- A/C condenser - Qty: 1 if metal debris is present
- A/C expansion valve - Qty: 1 if metal debris is present
📋 Before You Begin
- 🅿️ Park your Tundra on level ground, shift into Park and apply the parking brake.
- 🛞 Place wheel chocks firmly behind both rear tires.
- 🏷️ Photograph the under-hood A/C label. Use its exact refrigerant type and charge weight during recharging.
- ❄️ Use an R-134a recovery station to completely recover the existing refrigerant before opening the system.
- 🔍 Ask the recovery operator to record how much refrigerant and oil were removed.
- 🔋 After recovery, switch the ignition off and disconnect the negative battery cable with a 10mm socket.
- 🧼 Clean around both compressor refrigerant-line connections before disconnecting them.
🔨 Step-by-Step Instructions
Follow these steps in order:
Step 1: Recover the Refrigerant
- Connect an R-134a recovery, recycling and charging station to the high- and low-pressure service ports.
- A recovery station safely removes and stores refrigerant instead of releasing it into the air.
- Use the station according to its operating instructions and recover the system until the machine confirms recovery is complete.
- Record the recovered refrigerant and oil amounts.
- Disconnect the station only after both service hoses are isolated.
Step 2: Disconnect the Battery
- Switch off the ignition and remove the key from the vehicle.
- Use a 10mm socket and 3/8-inch drive ratchet to loosen the negative battery-terminal clamp.
- Lift the clamp from the post and position it where it cannot spring back.
- During reassembly, tighten the terminal securely without crushing it; Toyota’s typical terminal-nut specification is Torque to 5.4 Nm (48 in-lbs).
Step 3: Raise and Support the Front
- Use a floor jack rated for at least 3 tons at the front frame crossmember.
- Position 3-ton jack stands beneath the approved frame support points, then lower your Tundra onto them.
- Push the truck lightly to confirm it is stable before going underneath.
- Keep the floor jack nearby as backup support.
Step 4: Remove the Lower Engine Covers
- Use a 10mm or 12mm socket and 3/8-inch drive ratchet to remove the lower splash-shield fasteners, as fitted.
- Use a plastic trim-clip removal tool for any plastic retainers.
- On a 4WD model, use a 12mm socket to remove the front skid-plate bolts and support the plate as the final bolts come out.
- Arrange all fasteners in removal order so each returns to its original location.
Step 5: Record the Drive-Belt Routing
- Use a camera or serpentine belt routing diagram to record how the belt passes around every pulley.
- Inspect the belt for cracking, glazing, missing ribs or refrigerant-oil contamination.
- Replace the belt if any damage or contamination is found.
Step 6: Remove the Serpentine Belt
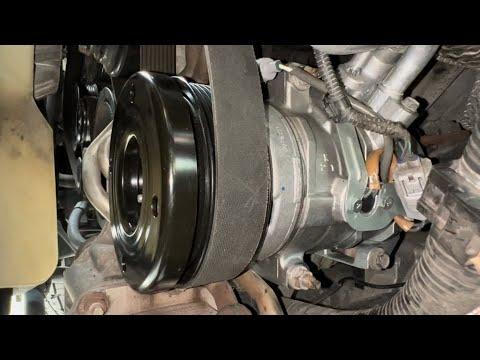
- Fit a 14mm socket and 1/2-inch drive breaker bar onto the automatic belt tensioner.
- Rotate the tensioner slowly against spring pressure until the belt becomes loose.
- Slip the belt from the compressor pulley, then slowly release the tensioner.
- Remove the belt or secure it away from the compressor.
- Never let the tensioner snap back.
Step 7: Disconnect the Compressor Wiring
- Locate the electrical connector on the A/C compressor.
- Press the connector lock by hand and pull on the connector housing, not the wires.
- Inspect the connector for melted plastic, corrosion or damaged terminals.
Step 8: Disconnect the Refrigerant Lines
- Place a drain pan beneath the compressor and wear refrigerant-rated gloves and safety glasses.
- Use a 10mm socket and 3/8-inch drive ratchet to remove the refrigerant manifold retaining bolt.
- Pull the manifold block straight away from the compressor without bending the aluminum lines.
- Immediately install protective caps over the open lines.
- Use a small plastic O-ring pick to remove the old O-rings without scratching the sealing surfaces.
- Discard the old O-rings; never reuse them.
Step 9: Remove the Old Compressor
- Support the compressor with one hand because it is heavy.
- Use a 12mm or 14mm socket and 3/8-inch drive ratchet, as fitted, to remove the compressor mounting bolts.
- Note the location and length of every bolt.
- Lower the compressor carefully through the available space beneath the engine.
- Do not force it against the radiator, fan shroud or refrigerant pipes.
Step 10: Check for Internal Compressor Damage
- Pour the old compressor oil into a graduated refrigerant oil measuring cup while rotating the old compressor hub by hand.
- Look for shiny metal flakes, dark sludge or burned-smelling oil.
- If debris is present, stop the repair. Use an A/C service facility to inspect the condenser, receiver/drier, expansion valve and lines.
- Do not flush the new compressor, and do not attempt to flush a contaminated parallel-flow condenser.
Step 11: Prepare the New Compressor
- Read the compressor supplier’s oil instructions before removing its shipping caps.
- If the new compressor is supplied with a full system oil charge, adjust it only as directed by the compressor manufacturer.
- If it is supplied without oil, add Toyota-specification ND-OIL 8 using the graduated refrigerant oil measuring cup.
- When replacing only the compressor and no oil was lost elsewhere, match the measured quantity drained from the old compressor unless the replacement manufacturer specifies otherwise.
- Rotate the new compressor hub by hand approximately 10 turns to distribute oil internally.
- Keep all ports capped until immediately before connecting the lines.
Step 12: Install the New Compressor
- Lift the compressor into position by hand and align it squarely with the mounting bracket.
- Start every mounting bolt by hand to prevent crossed threads.
- Use the correct 12mm or 14mm socket and 3/8-inch drive ratchet to seat the bolts evenly.
- Use a 3/8-inch drive torque wrench to tighten the compressor mounting bolts to Torque to 25 Nm (18 ft-lbs).
- Connect the compressor electrical plug by hand until its lock clicks.
Step 13: Reconnect the Refrigerant Lines
- Lightly coat each new R-134a O-ring with clean ND-OIL 8 using a gloved fingertip.
- Install the O-rings without twisting or stretching them.
- Remove the protective caps and immediately position the manifold block squarely against the compressor.
- Start the retaining bolt by hand, then use a 10mm socket and 3/8-inch drive torque wrench.
- Torque to 9.8 Nm (87 in-lbs).
- Do not use sealant, tape or grease on the connections.
Step 14: Reinstall the Serpentine Belt
- Route the belt around every pulley according to your photograph or routing diagram, leaving the easiest smooth pulley for last.
- Use a 14mm socket and 1/2-inch drive breaker bar to rotate the automatic tensioner.
- Slide the belt onto the final pulley, then release the tensioner slowly.
- Check by sight and touch that every belt rib is seated in every grooved pulley.
Step 15: Reinstall the Lower Covers
- Use a plastic trim-clip removal tool by hand to reinstall the reusable plastic retainers.
- Use a 10mm or 12mm socket and 3/8-inch drive ratchet to install the splash-shield fasteners.
- On a 4WD model, support the skid plate and start all bolts by hand before tightening them.
- Use a 3/8-inch drive torque wrench to tighten factory M8 skid-plate bolts to Torque to 29 Nm (21 ft-lbs).
Step 16: Lower the Vehicle and Reconnect the Battery
- Use the floor jack to lift your Tundra slightly, remove the jack stands, then lower it slowly.
- Install the negative battery clamp and tighten it with a 10mm socket and 3/8-inch drive torque wrench.
- Torque to 5.4 Nm (48 in-lbs).
Step 17: Evacuate and Leak-Test the System
- Connect the R-134a recovery, recycling and charging station to both service ports.
- Use the station to draw a deep vacuum for at least 30 minutes.
- Close the station valves and verify that the vacuum holds for at least 10 minutes.
- If vacuum is lost, use an R-134a electronic leak detector to locate the leak. Repair it before charging.
Step 18: Recharge by Exact Weight
- Use the R-134a charging station and digital refrigerant scale to add the exact refrigerant weight printed on the under-hood A/C label.
- Do not charge by pressure alone and do not substitute a guessed capacity.
- Use only R-134a unless the original under-hood label explicitly states otherwise.
- Close the service valves, disconnect the couplers and reinstall both service-port caps by hand.
✅ After Repair
- ✅ Start the engine and let it idle with the transmission in Park.
- ❄️ Set the temperature to maximum cooling, select recirculation and set the blower to high.
- 👀 Confirm the compressor operates quietly and the serpentine belt tracks correctly.
- 🌡️ Check that the center-vent temperature drops steadily after several minutes.
- 🔍 Use an R-134a electronic leak detector around the compressor connections and service ports.
- 🛢️ Inspect beneath the compressor for refrigerant-oil residue, which can indicate a leak.
- 🔊 Stop the engine immediately if the compressor knocks, the belt squeals continuously or the pulley wobbles.
- 🕒 Recheck the line connections and belt after one normal drive cycle.
💰 DIY vs Shop Cost
Shop Cost: $1,200-$2,000 (parts + labor)
DIY Cost: $450-$900 (parts only; recovery and recharge service extra)
You Save: $500-$1,000 by doing it yourself!
Shop labor rates vary but typically run $100-$150/hour. This repair takes a shop approximately 3-5 hours.
🎯 Ready to get started?
HowToo makes it easy: same-day/2-day shipping on every part, plus all the tools and specialty tools you need! Check out the parts and tools sections below to add everything to your cart.