

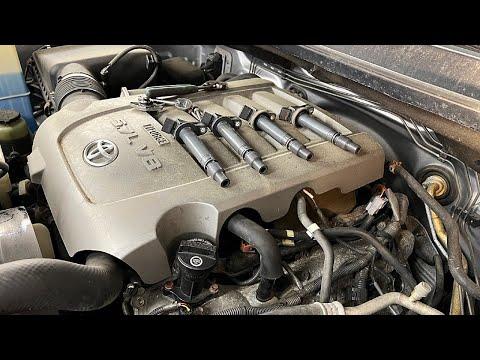







How to Replace Spark Plugs on a 2005-2021 Toyota Tundra 5.7L V8 (Trim: Limited | Engine: V8 5.7L)
Step-by-step DIY instructions with tools, plug gap, torque specs, and safety tips for 2005, 2006, 2007, 2008, 2009, 2010, 2011, 2012, 2013
How to Replace Spark Plugs on a 2005-2021 Toyota Tundra 5.7L V8 (Trim: Limited | Engine: V8 5.7L)
Step-by-step DIY instructions with tools, plug gap, torque specs, and safety tips for 2005, 2006, 2007, 2008, 2009, 2010, 2011, 2012, 2013


🔧 Tundra - Spark Plug Replacement
Your Tundra’s 5.7L V8 uses eight long-life iridium spark plugs, one for each cylinder. Replacement involves removing the ignition coils, cleaning each plug well, and installing the new plugs without damaging the aluminum cylinder-head threads.
Difficulty Level: Intermediate | Estimated Time: 2-3 hours
⚠️ Safety & Precautions
- ⚠️ Work only when the engine is completely cold. Removing plugs from a hot aluminum cylinder head can damage its threads.
- 🔋 Disconnect the negative battery cable before unplugging the ignition coils.
- 🧹 Clean each spark plug well before removal so dirt cannot enter the cylinder.
- 🧤 Wear safety glasses and gloves when using compressed air.
- 🚫 Do not apply anti-seize to the new plug threads. It changes tightening force and can cause over-tightening.
- 🔧 Start every spark plug by hand. A ratchet can hide cross-threading.
🔧 Required Tools
You'll need the following tools for this repair:
- 10mm socket
- 5/8-inch spark plug socket with rubber insert
- 3/8-inch drive ratchet
- 3/8-inch drive torque wrench rated 10-80 ft-lbs
- 3-inch 3/8-inch drive extension
- 6-inch 3/8-inch drive extension
- 10-inch 3/8-inch drive extension
- 3/8-inch drive universal joint
- 0.031-inch wire-style spark plug gap gauge
- Small flat-blade screwdriver
- Soft-bristle detailing brush
- Compressed-air blow gun rated 90 psi maximum
- Magnetic pickup tool with 18-inch reach
- Fender cover
- Nitrile mechanic gloves
- ANSI Z87.1 safety glasses
🔩 Required Parts
HowToo sells all the parts you need for this repair:
- Iridium spark plugs specified for the 5.7L V8 - Gap: 0.031" (0.8mm) - Qty: 8
- Dielectric ignition boot grease - Qty: 1 tube
📋 Before You Begin
- 🅿️ Park your Tundra on level ground, shift into Park, engage the parking brake, and let the engine cool completely.
- 🔑 Remove the key and keep it away from the vehicle so nobody attempts to start the engine.
- 📦 Match all eight replacement plugs before disassembly. Their thread length, seat, and electrical-terminal shape must match.
- 🔌 A universal joint is a hinged socket adapter that helps an extension reach plugs at an angle.
- 🔋 Use a 10mm socket and 3/8-inch drive ratchet to loosen the negative battery-terminal clamp. Remove and isolate the cable where it cannot spring back onto the terminal.
🔨 Step-by-Step Instructions
Follow these steps in order:
Step 1: Open Access Around the Ignition Coils
- Place the fender cover over the painted bodywork.
- Use a 10mm socket, extensions, and 3/8-inch drive ratchet to remove any small wiring brackets that prevent straight access to the ignition coils.
- Move only flexible hoses or harnesses that are secured by those brackets. Do not disconnect fuel lines or air-conditioning pipes.
- Photograph each bracket location before moving it. Photos make hose and bracket routing much easier.
Step 2: Disconnect the First Ignition Coil
- Work on one cylinder at a time so connectors and coils cannot become mixed up.
- Press the coil connector’s locking tab and pull the connector straight back. If needed, use a small flat-blade screwdriver to press the tab gently without prying on the wires.
- Use a 10mm socket, extension, and 3/8-inch drive ratchet to remove the coil retaining bolt.
- Twist the ignition coil slightly, then pull it straight out by its body. The ignition coil is the long electrical unit directly above each spark plug.
Step 3: Inspect and Clean the Spark Plug Well
- Inspect the removed coil boot for cracks, burn marks, oil, or coolant.
- Use a soft-bristle detailing brush to loosen dirt around the plug well.
- Wear ANSI Z87.1 safety glasses, then use the compressed-air blow gun at no more than 90 psi to blow debris away from the plug well.
- If oil is pooled inside a well, stop and correct the leaking spark plug tube seal before installing new plugs.
Step 4: Remove the Old Spark Plug
- Fit the 5/8-inch spark plug socket to the combination of 3-inch, 6-inch, or 10-inch extensions that provides the straightest approach.
- Use the 3/8-inch drive universal joint only where surrounding components prevent straight access.
- Use the 3/8-inch drive ratchet to turn the plug counterclockwise until it is completely loose.
- Lift the plug out with the spark plug socket. If it separates from the socket, retrieve it with the 18-inch magnetic pickup tool.
- Check the old plug for heavy oil deposits, coolant-like deposits, broken ceramic, or a melted electrode. Uneven deposits between cylinders can indicate an engine problem.
Step 5: Check the New Spark Plug
- Inspect the new plug for shipping damage, especially cracks in the white ceramic insulator.
- Use the 0.031-inch wire-style spark plug gap gauge to verify a gap of 0.031 inch (0.8mm).
- Do not force a flat blade between the fine iridium electrodes, and do not bend the center electrode.
- Do not put anti-seize, oil, or grease on the plug threads.
Step 6: Install and Torque the New Spark Plug
- Place the new plug securely into the 5/8-inch spark plug socket.
- Use the spark plug socket and extension without the ratchet to lower the plug into its well.
- Turn the extension clockwise by hand for several full rotations. It should turn smoothly with little resistance.
- If the plug binds, remove it and restart by hand. Never force it into the aluminum threads.
- Attach the 3/8-inch drive torque wrench and tighten the plug to 18 Nm (13 ft-lbs).
- Use a straight extension whenever possible so the torque wrench reading remains accurate.
Step 7: Reinstall the Ignition Coil
- Apply a very small amount of dielectric ignition boot grease inside the opening at the bottom of the coil boot. Keep grease away from the metal terminal and spark plug threads.
- Push the coil straight down until it is fully seated over the new plug.
- Install the coil retaining bolt by hand, then use the 10mm socket and 3/8-inch drive torque wrench to tighten it to 10 Nm (89 in-lbs).
- Push the electrical connector onto the coil until its lock clicks.
Step 8: Replace the Remaining Seven Spark Plugs
- Repeat Steps 2 through 7 for the other seven cylinders.
- Use the 3/8-inch drive universal joint and suitable extension on the rear cylinders where clearance is limited.
- Keep each spark plug well open only as long as necessary.
- Count the removed plugs when finished. You should have exactly eight.
Step 9: Restore Brackets and Battery Power
- Use the 10mm socket, extensions, and 3/8-inch drive ratchet to reinstall every wiring bracket in its original position.
- Confirm that no harness is trapped against an exhaust component or pinched beneath a bracket.
- Place the negative battery cable fully onto its terminal. Use the 10mm socket and 3/8-inch drive ratchet to tighten the clamp until secure; do not crush or distort the terminal.
- Remove the fender cover and account for every tool before starting the engine.
✅ After Repair
- ✅ Turn the ignition on briefly, then start the engine and let it idle.
- 👂 Listen for a smooth idle. A flashing check-engine light or severe shaking usually means a coil connector is loose or a coil is not fully seated.
- 🔍 Switch the engine off and inspect all eight coil connectors and the surrounding harnesses.
- 🚙 Take a gentle 10-15 minute test drive. Confirm normal acceleration and no warning lights.
- 🕒 The clock and some stored settings may require resetting after the battery disconnect.
- 🚫 The new iridium plugs do not require a break-in procedure.
💰 DIY vs Shop Cost
Shop Cost: ₹35,000-₹65,000 (parts + labor)
DIY Cost: ₹12,000-₹25,000 (parts only)
You Save: ₹23,000-₹40,000 by doing it yourself!
Imported parts and local labor rates vary. This repair takes a shop approximately 2-3 hours.
🎯 Ready to get started?
HowToo makes it easy: same-day/2-day shipping on every part, plus all the tools and specialty tools you need! Check out the parts and tools sections below to add everything to your cart.