

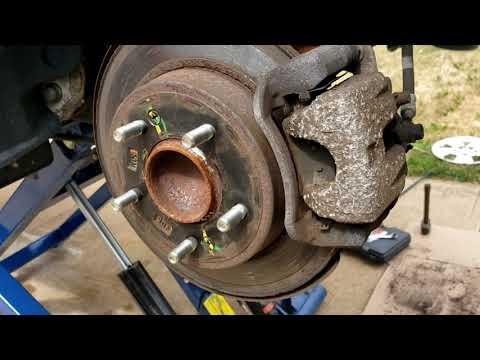






How to Replace Rear Brake Pads and Rotors on a 2014-2024 Kia Forte (Trim: LX)
Step-by-step DIY guide with required tools, parts, torque specs, and safety tips for 2014, 2015, 2016, 2017, 2018, 2019, 2020, 2021
How to Replace Rear Brake Pads and Rotors on a 2014-2024 Kia Forte (Trim: LX)
Step-by-step DIY guide with required tools, parts, torque specs, and safety tips for 2014, 2015, 2016, 2017, 2018, 2019, 2020, 2021


🔧 Forte - Rear Brake Pads and Rotor Replacement
This repair replaces the rear brake pads and both rear brake rotors on your Forte. The parking brake is built into the rear calipers, so each piston must be rotated while it is pushed inward.
Difficulty Level: Intermediate | Estimated Time: 2-3 hours
Assumption: These instructions apply to the factory rear disc-brake system with a manual parking brake.
⚠️ Safety & Precautions
- Work on level, solid ground and support the vehicle with jack stands. Never work under a vehicle supported only by a jack.
- Release the parking brake before removing the calipers. Chock both front wheels securely so the vehicle cannot roll.
- Brake dust may be harmful. Do not use compressed air to clean brake components.
- Wear safety glasses, nitrile gloves, and a suitable dust mask.
- Do not allow a caliper to hang from its flexible brake hose.
- Do not press the brake pedal while a caliper is removed.
- Brake fluid damages paint. Clean spills immediately with water.
- Battery disconnection is not required.
🔧 Required Tools
You'll need the following tools for this repair:
- 1/2-inch drive breaker bar
- 1/2-inch drive torque wrench rated 20-150 ft-lbs
- 3/8-inch drive ratchet
- 14mm socket
- 17mm socket
- 21mm deep socket
- Phillips No. 3 impact screwdriver
- Rear brake caliper piston rewind tool kit (specialty)
- 3-ton floor jack
- 3-ton jack stands
- Rubber wheel chocks
- Caliper support hook
- 8-ounce ball-peen hammer
- Small flat-blade screwdriver
- Small brass wire brush
- Hub-cleaning wire brush
- Brake rotor runout gauge with magnetic base (specialty)
- Brake fluid tester strips
- Drain pan
- Shop towels
- Nitrile mechanic gloves
- ANSI Z87.1 safety glasses
- N95 dust mask
🔩 Required Parts
HowToo sells all the parts you need for this repair:
- Rear brake pad set - Qty: 1
- Rear brake rotors - Qty: 2; replace in pairs
- Rear brake pad hardware kit - Qty: 1
- Silicone ceramic brake lubricant - Qty: 1 tube
- Non-chlorinated brake cleaner - Qty: 2 cans
📋 Before You Begin
- Park your Forte on level pavement, place the transmission in Park or first gear, switch off the engine, and chock both front wheels.
- Release the parking brake completely. The rear calipers cannot be removed and retracted correctly with it applied.
- Open the hood and inspect the brake-fluid reservoir. If it is at the MAX line, remove a small amount using clean brake-service equipment so piston retraction does not cause an overflow.
- Replace the pads and rotors on both rear wheels. Complete one side at a time so the assembled side remains available as a reference.
🔨 Step-by-Step Instructions
Follow these steps in order:
Step 1: Loosen the Rear Wheel Nuts
- With your Forte still on the ground, use a 21mm deep socket and 1/2-inch breaker bar to loosen each rear wheel nut about one-half turn.
- Do not remove the wheel nuts yet.
Step 2: Raise and Support the Rear
- Use the 3-ton floor jack at an approved rear lifting point, then place 3-ton jack stands beneath the reinforced side support points.
- Lower the vehicle gently onto the stands and verify that it is stable before proceeding.
- Use the 21mm deep socket and ratchet to remove the wheel nuts and both rear wheels.
Step 3: Inspect the Brake Assembly
- Wear the N95 dust mask, nitrile gloves, and safety glasses.
- Place the drain pan beneath the brake assembly. Use non-chlorinated brake cleaner and shop towels to remove loose dust without blowing it into the air.
- Inspect the caliper, flexible hose, parking-brake cable, and piston boot. Replace damaged components before continuing.
Step 4: Remove the Rear Caliper
- Use a 14mm socket and 3/8-inch ratchet to remove the upper and lower caliper guide-pin bolts.
- If a guide pin rotates, hold its flats with the correctly fitting open end supplied in the rewind-tool kit while using the 14mm socket.
- Lift the caliper from the bracket. Use the caliper support hook to suspend it from the suspension.
- Do not twist, stretch, or clamp the brake hose.
Step 5: Remove the Old Pads
- Use a small flat-blade screwdriver to remove the inner and outer pads from the bracket.
- Remove the stainless pad clips with the small flat-blade screwdriver.
- Note how the wear indicator and piston-side pad are positioned so the replacements can match them.
Step 6: Retract the Rear Caliper Piston
- A rewind tool pushes and turns the piston at the same time. Select the adapter from the rear brake caliper piston rewind tool kit that fully engages the piston slots.
- Use the rewind tool to rotate the piston clockwise while applying steady inward pressure. Work slowly and watch the brake-fluid reservoir for overflow.
- Stop when the piston is fully seated. Position the piston slots so the locating pin on the inner pad can engage correctly.
- Inspect the dust boot and make sure it is not twisted or trapped.
- Never force a piston that will not rotate.
Step 7: Remove the Caliper Bracket
- Use a 17mm socket and 1/2-inch breaker bar to remove the two caliper-bracket bolts.
- Lift the bracket away and place it on a clean work surface.
Step 8: Remove the Old Rotor
- If fitted, use a Phillips No. 3 impact screwdriver to remove the rotor retaining screw.
- Pull the rotor straight off the hub. If rust holds it in place, tap only the rotor hat between the wheel studs using the 8-ounce ball-peen hammer.
- Do not strike the wheel studs, hub bearing, or braking surface being retained for diagnosis.
Step 9: Clean the Hub and Bracket
- Use the hub-cleaning wire brush to remove rust and scale from the hub face and center pilot. The new rotor must sit completely flat.
- Use the small brass wire brush to clean the bracket surfaces beneath the stainless pad clips.
- Remove each guide pin by hand, wipe it with a shop towel, and inspect its rubber boot. The pins must slide smoothly without rust or pitting.
- Apply a thin film of silicone ceramic brake lubricant to each guide pin, then reinstall it into its original position.
- Do not put lubricant on the rotor or pad friction material.
Step 10: Install the New Rotor
- Use non-chlorinated brake cleaner and shop towels to clean both faces of the new rotor until no protective oil remains.
- Slide the rotor onto the clean hub.
- If equipped, install the retaining screw using the Phillips No. 3 impact screwdriver and tighten it to Torque to 5 Nm (44 in-lbs).
- Temporarily install three wheel nuts backward and tighten them evenly by hand using the 21mm deep socket to hold the rotor flat.
- Mount the brake rotor runout gauge with magnetic base and check near the rotor’s outer edge. Maximum installed lateral runout is 0.05 mm (0.002 in).
- If runout is excessive, remove the rotor, clean the mating surfaces again, rotate the rotor one or two stud positions, and retest.
Step 11: Reinstall the Caliper Bracket
- Position the bracket over the rotor and start both bolts by hand to prevent crossed threads.
- Use a 17mm socket and torque wrench to tighten both bracket bolts to Torque to 69 Nm (51 ft-lbs).
Step 12: Install the New Pads and Hardware
- Press the new stainless pad clips into the clean bracket by hand. Make sure every clip is fully seated.
- Apply a very thin layer of silicone ceramic brake lubricant to the pad ears where they contact the clips.
- Install the inner and outer pads in the same orientation as the originals. Make sure the inner pad’s locating feature aligns with the caliper-piston slots.
- Keep all lubricant away from pad and rotor friction surfaces.
Step 13: Reinstall the Caliper
- Remove the caliper support hook and place the caliper over the new pads without twisting the hose.
- Start both guide-pin bolts by hand.
- Use a 14mm socket and torque wrench to tighten both guide-pin bolts to Torque to 27 Nm (20 ft-lbs).
- Confirm the hose follows its natural route and both guide-pin boots are properly seated.
Step 14: Repeat on the Other Side
- Use the same listed tools and repeat Steps 3 through 13 on the opposite rear brake.
- Compare both assembled sides. Confirm all clips, pads, hoses, boots, and parking-brake cables are correctly positioned.
Step 15: Reinstall the Wheels
- Use the 21mm deep socket to install the wheel nuts finger-tight.
- Use the 3-ton floor jack to raise your Forte slightly, remove the jack stands, and lower it until the tires touch the ground.
- Use the 21mm deep socket and torque wrench to tighten the wheel nuts in a crisscross pattern to Torque to 107 Nm (79 ft-lbs).
✅ After Repair
- Before moving your Forte, press and release the brake pedal several times until it feels firm. This seats the pistons against the new pads.
- Check the brake-fluid level and inspect it with brake fluid tester strips. Correct the level to the reservoir’s MAX mark only with the cap-specified brake fluid if needed.
- Apply and release the parking brake several times. Confirm both rear wheels hold and release normally.
- Start the engine and verify that the brake warning lamp turns off. Inspect both calipers for fluid leaks.
- Test the brakes at walking speed in a safe, traffic-free area before normal driving.
- Follow the pad manufacturer’s bedding procedure. Unless directed otherwise, avoid panic stops and holding the brake pedal after hard stops during the first 300-500 km.
- Recheck wheel-nut torque after approximately 80-160 km.
💰 DIY vs Shop Cost
Shop Cost: ₹18,000-₹32,000 (parts + labor)
DIY Cost: ₹8,000-₹17,000 (parts only)
You Save: ₹10,000-₹15,000 by doing it yourself!
Labor rates around Sonīpat vary by workshop. This repair takes a shop approximately 1.5-2.5 hours.
🎯 Ready to get started?
HowToo makes it easy: same-day/2-day shipping on every part, plus all the tools and specialty tools you need! Check out the parts and tools sections below to add everything to your cart.