

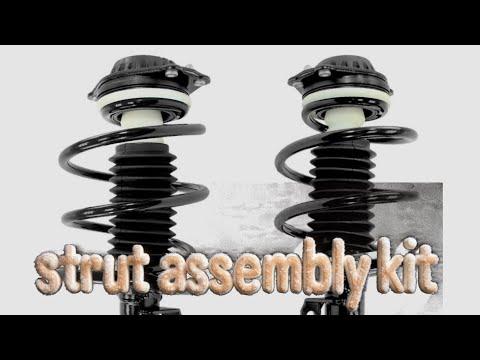







How to Replace Front Struts on a 2016-2025 Chevrolet Malibu
Step-by-step loaded strut installation with tools, torque specs, and safety tips for 2016, 2017, 2018, 2019, 2020, 2021, 2022, 2023, 2024, 2025
How to Replace Front Struts on a 2016-2025 Chevrolet Malibu
Step-by-step loaded strut installation with tools, torque specs, and safety tips for 2016, 2017, 2018, 2019, 2020, 2021, 2022, 2023, 2024, 2025


🔧 Malibu - Front Strut Replacement
Your Malibu uses strut assemblies at the front and separate shock absorbers at the rear. This procedure replaces both front struts using complete, preassembled “loaded” struts, which include the coil spring and upper mount.
Difficulty Level: Intermediate | Estimated Time: 4-6 hours
⚠️ Safety & Precautions
- ⚠️ Replace both front struts together to maintain balanced steering, braking, and ride control.
- ⚠️ Do not remove the large center nut from either strut. It holds a heavily compressed coil spring.
- ⚠️ Use complete loaded struts for this DIY repair. Transferring the springs requires a professional spring compressor and advanced training.
- ⚠️ Never work under your Malibu while it is supported only by a floor jack.
- ⚠️ Support the steering knuckle during removal. Its weight can damage the brake hose, ABS sensor wire, or CV axle.
- ⚠️ Replace the strut-to-knuckle bolts and nuts. These torque-plus-angle fasteners should not be reused.
- ⚠️ Have a four-wheel alignment performed immediately after the repair.
- ⚠️ Battery disconnection is not required.
🔧 Required Tools
You'll need the following tools for this repair:
- Hydraulic floor jack (rated 2-ton minimum)
- Jack stands (rated 2-ton minimum)
- Hydraulic support jack (rated 1-ton minimum)
- Wheel chocks (2-piece)
- 1/2-inch-drive breaker bar (24-inch)
- 1/2-inch-drive torque wrench (30-250 Nm)
- 1/2-inch-drive torque-angle gauge
- 3/8-inch-drive ratchet
- 13mm socket
- 18mm socket
- 21mm socket
- 22mm socket
- 24mm socket
- 18mm combination wrench
- 21mm combination wrench
- 24mm combination wrench
- 6mm hex-bit socket
- Plastic trim-clip removal tool
- Medium flat-blade screwdriver
- Rubber mallet (16-ounce)
- White paint marker
- Penetrating oil (aerosol)
- Mechanic gloves
- Safety glasses
🔩 Required Parts
HowToo sells all the parts you need for this repair:
- Front loaded strut assembly, left - Qty: 1
- Front loaded strut assembly, right - Qty: 1
- Front strut-to-steering-knuckle bolt and nut set - Qty: 2 sets
- Front upper strut-mount nuts - Qty: 6
- Front stabilizer-link nuts - Qty: 2
Replace in pairs: Install both front strut assemblies during the same repair.
📋 Before You Begin
- 📍 Park your Malibu on firm, level ground. Select Park, engage the parking brake, and switch off the ignition.
- 🛞 Place wheel chocks firmly behind both rear tires.
- 📦 Compare each new loaded strut with the matching original side. Check the upper studs, spring orientation, brake-hose bracket, and stabilizer-link bracket.
- 🔩 Leave the center shaft nut on each loaded strut untouched.
- 📱 No infotainment service mode, scan-tool command, EPB retraction, or battery registration is required.
🔨 Step-by-Step Instructions
Follow these steps in order:
Step 1: Loosen the Front Wheel Nuts
- Use the 22mm socket and breaker bar to loosen each front wheel nut approximately one-half turn.
- Keep the wheels on the ground while breaking the nuts loose.
Step 2: Raise and Support the Vehicle
- Use the 2-ton floor jack at the front-center lifting point to raise your Malibu.
- Place the 2-ton jack stands beneath the reinforced front side support points.
- Lower the vehicle onto the stands. Gently push the body to confirm that it is stable.
- Never place any part of your body beneath the vehicle until it is securely supported.
Step 3: Remove the Front Wheels
- Use the 22mm socket and ratchet to remove the wheel nuts.
- Remove both front wheels and place them flat beneath the side of the vehicle as an additional precaution.
Step 4: Mark the Original Alignment
- Use the white paint marker to mark where the strut bracket meets the steering knuckle.
- The steering knuckle is the heavy metal carrier holding the wheel hub and brake assembly.
- These marks provide only a starting reference; they do not replace a professional alignment.
- Photograph every bracket before taking it apart.
Step 5: Release the Hose and ABS Wire
- Use the plastic trim-clip removal tool to release the ABS wheel-speed-sensor wire retainers from the strut.
- Use the medium flat-blade screwdriver to release the brake-hose retainer where necessary.
- Do not disconnect or open the hydraulic brake hose.
- Position the hose and wire safely without stretching or sharply bending them.
Step 6: Disconnect the Stabilizer Link
- Apply penetrating oil to the stabilizer-link nut and allow it to soak briefly.
- Use the 18mm socket and ratchet to remove the link nut from the strut bracket.
- If the stud spins, hold its center with the 6mm hex-bit socket while turning the nut with the 18mm combination wrench.
- The stabilizer link is the short jointed rod attached to the strut.
Step 7: Support the Steering Knuckle
- Place the 1-ton support jack beneath the lower control arm near the steering knuckle.
- Raise the jack only enough to support the suspension’s weight.
- Do not lift your Malibu away from its jack stand.
Step 8: Remove the Strut-to-Knuckle Fasteners
- Use the 24mm socket, breaker bar, and appropriate 21mm or 24mm combination wrench to remove the two large strut-to-knuckle nuts and bolts.
- Fastener head sizes can vary with prior replacement hardware; use the socket that fits fully without looseness.
- Use the 16-ounce rubber mallet to tap the bolts out gently if necessary.
- Discard the removed bolts and nuts.
- Keep the knuckle supported so it cannot pull on the CV axle, brake hose, or ABS wire.
Step 9: Remove the Upper Mount Nuts
- Open the hood and locate the three small upper mounting nuts around the strut tower.
- Hold the strut securely through the wheel opening.
- Use the 13mm socket and ratchet to remove the three upper mount nuts.
- Do not touch the large center shaft nut.
- Guide the complete strut downward and out through the wheel opening.
Step 10: Compare the New and Old Struts
- Place the old and new assemblies side by side on the floor.
- Use the white paint marker to identify the left and right units if they are not clearly labeled.
- Confirm that the mounting studs, hose bracket, stabilizer-link bracket, and lower mounting ears match.
- Check that the bottom of the coil spring is seated against the formed stop in its lower seat.
Step 11: Install the New Strut at the Top
- Guide the correct loaded strut into the tower without trapping the brake hose or ABS wire.
- Start three new upper nuts by hand to prevent cross-threading.
- Use the 13mm socket and torque wrench to tighten the upper mount nuts evenly to 25 Nm (18 ft-lbs).
- Do not tighten or adjust the center shaft nut.
Step 12: Connect the Strut to the Knuckle
- Use the 1-ton support jack to align the steering-knuckle holes with the lower strut bracket.
- Install new strut-to-knuckle bolts and nuts in the same direction as the originals.
- Use the white paint marker to align the original reference marks as closely as possible.
- Use the 24mm socket, appropriate combination wrench, and torque wrench to tighten each new fastener initially to 150 Nm (111 ft-lbs).
- Use the 1/2-inch-drive torque-angle gauge and breaker bar to tighten each fastener an additional 60-75 degrees.
- Hold the bolt head stationary while turning the nut unless the new fastener’s instructions specify otherwise.
Step 13: Reconnect the Stabilizer Link
- Insert the stabilizer-link stud into the strut bracket and start a new nut by hand.
- Use the 18mm socket and torque wrench to tighten the nut to 65 Nm (48 ft-lbs).
- If the stud rotates, hold it with the 6mm hex-bit socket while tightening with the 18mm combination wrench.
Step 14: Secure the Hose and ABS Wire
- Use the plastic trim-clip removal tool to guide the ABS-wire retainers into their original locations.
- Secure the brake hose in the strut bracket using hand pressure and the original retainer.
- Check that the hose and wiring are not twisted and cannot contact the spring, tire, or axle.
Step 15: Replace the Opposite Strut
- Repeat Steps 4 through 14 on the other front side using the same listed tools.
- Check both sides against your reference photographs before reinstalling the wheels.
Step 16: Install and Torque the Wheels
- Install both wheels and start every wheel nut by hand.
- Use the 22mm socket and ratchet to snug the nuts in a crisscross pattern.
- Use the 2-ton floor jack to lift the vehicle, remove the jack stands, and lower the tires onto the ground.
- Use the 22mm socket and torque wrench to tighten the wheel nuts in a crisscross pattern to 140 Nm (103 ft-lbs).
✅ After Repair
- ✅ Start your Malibu and check that the ABS and stability-control warning lamps switch off normally.
- 🔍 Turn the steering wheel fully left and right. Listen for binding, clunks, or spring movement.
- 🔧 Recheck that every brake-hose bracket and ABS-wire retainer is secure.
- 🚗 Perform a slow test drive on a smooth road. Stop if the steering pulls strongly, feels unstable, or makes heavy clunking noises.
- 📐 Obtain a four-wheel alignment immediately. Do not rely on the paint marks for final alignment.
- 🛞 Recheck the wheel-nut torque to 140 Nm (103 ft-lbs) after 80-160 km.
💰 DIY vs Shop Cost
Shop Cost: ₹65,000-₹1,25,000 (parts, labor, and alignment)
DIY Cost: ₹38,000-₹80,000 (parts and alignment)
You Save: ₹27,000-₹45,000 by doing it yourself!
Pricing around Sonīpat varies because many Malibu suspension components are imported. This repair takes a shop approximately 3-4 hours, plus alignment time.
🎯 Ready to get started?
HowToo makes it easy: same-day/2-day shipping on every part, plus all the tools and specialty tools you need! Check out the parts and tools sections below to add everything to your cart.