

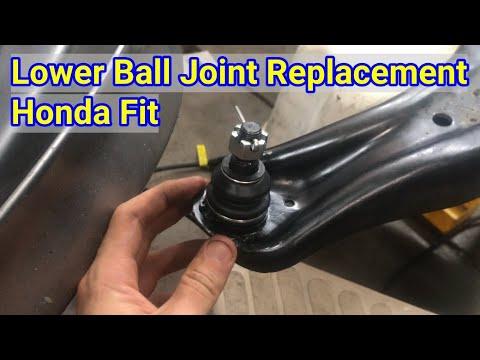







How to Replace Front Lower Ball Joints on a 2015-2019 Honda Fit
Step-by-step removal and installation guide with tools, parts, torque specs, and safety tips for 2015, 2016, 2017, 2018, 2019
How to Replace Front Lower Ball Joints on a 2015-2019 Honda Fit
Step-by-step removal and installation guide with tools, parts, torque specs, and safety tips for 2015, 2016, 2017, 2018, 2019


🔧 Fit - Front Lower Ball Joint Replacement
The front lower ball joint connects the steering knuckle to the lower control arm. On your Fit, the joint is pressed into the steering knuckle, so the knuckle must be removed and a ball-joint press used.
Difficulty Level: Advanced | Estimated Time: 3-5 hours per side
Assumption: This procedure covers one original-style front lower ball joint.
⚠️ Safety & Precautions
- ⚠️ Support your Fit with jack stands placed at the approved front support points. Never work beneath a vehicle supported only by a jack.
- ⚠️ Wear safety glasses while separating or pressing the ball joint; stored pressure can release parts suddenly.
- ⚠️ Do not pull the driveshaft outward or allow it to hang from the inner joint.
- ⚠️ Suspend the brake caliper securely. Never let it hang from its hose.
- ⚠️ Keep grease and oil away from the brake rotor and pads.
- ⚠️ Do not strike the threaded ends of the ball joint or tie-rod end.
- 🔋 Battery disconnection is not required.
- 📐 A four-wheel alignment is required after the repair.
🔧 Required Tools
You'll need the following tools for this repair:
- Safety glasses
- Mechanic's gloves
- Wheel chocks
- 2-ton minimum floor jack
- 2-ton minimum jack stands
- 1/2-inch drive breaker bar
- 1/2-inch drive torque wrench rated to 200 Nm
- 3/8-inch drive torque wrench rated to 120 Nm
- 19mm deep socket
- 32mm axle-nut socket
- 17mm socket
- 14mm socket
- 12mm socket
- 10mm socket
- 17mm combination wrench
- 14mm combination wrench
- 6-inch socket extension
- 3/8-inch drive ratchet
- 1/2-inch drive ratchet
- Medium flat-blade screwdriver
- Small flat-blade screwdriver
- Needle-nose pliers
- External snap-ring pliers
- Ball-joint separator (specialty)
- Hydraulic shop press rated 12-ton minimum (specialty)
- Honda-size ball-joint press adapters (specialty)
- Brass drift punch
- 16-ounce ball-peen hammer
- Caliper hanger
- Wire brush
- Paint marker
- Bungee cord rated 25 lb minimum
🔩 Required Parts
HowToo sells all the parts you need for this repair:
- Front lower ball joint - Qty: 1 per affected side
- Ball-joint retaining snap ring - Qty: 1 per affected side
- Ball-joint dust boot retaining rings - Qty: 1 set per affected side
- Lower ball-joint cotter pin - Qty: 1 per affected side
- Tie-rod-end cotter pin - Qty: 1 per affected side
- Front driveshaft spindle nut - Qty: 1 per affected side
- Multipurpose chassis grease - Qty: 1 tube
- Brake cleaner - Qty: 1 can
Replacing both sides is recommended if wear is similar.
📋 Before You Begin
- 🅿️ Park your Fit on level, solid ground. Shift to Park or first gear and apply the parking brake.
- 🛞 Place wheel chocks firmly behind both rear wheels.
- 📱 No infotainment service mode, scan-tool command, EPB retraction, battery registration, or ADAS calibration is required.
- 🔩 A press adapter supports the knuckle while allowing the ball joint to move through its bore. Using the wrong adapter can crack the aluminum knuckle.
- 📐 Arrange a wheel alignment before driving normally after the repair.
🔨 Step-by-Step Instructions
Follow these steps in order:
Step 1: Loosen the spindle nut and wheel nuts
- Use a small flat-blade screwdriver and 16-ounce ball-peen hammer to lift the staked edge of the spindle nut from the driveshaft groove.
- With your Fit on the ground, use a 32mm axle-nut socket and 1/2-inch breaker bar to loosen the spindle nut. Do not remove it yet.
- Use a 19mm deep socket and 1/2-inch breaker bar to loosen the five wheel nuts approximately one-quarter turn.
Step 2: Raise and support the vehicle
- Use the 2-ton floor jack at the approved front-center jacking point.
- Position both 2-ton jack stands beneath the reinforced front side support points, then lower your Fit onto them.
- Gently push the body to verify that it is stable.
- Use the 19mm deep socket and 1/2-inch ratchet to remove the wheel nuts and wheel.
Step 3: Remove the brakes
- Use a 17mm socket and 1/2-inch ratchet to remove the two caliper-bracket bolts from the steering knuckle.
- Lift off the caliper and bracket together. Support them with the caliper hanger.
- Use a medium flat-blade screwdriver to remove the brake-rotor retaining screws if equipped.
- Pull off the brake rotor by hand. If tight, tap only the rotor hat with the 16-ounce ball-peen hammer.
- Never press the brake pedal with the caliper removed.
Step 4: Release the ABS harness
- Use a 10mm socket and 3/8-inch ratchet to remove the wheel-speed-sensor harness bracket bolts.
- Use a medium flat-blade screwdriver to open the harness clips carefully.
- Move the harness away from the knuckle without pulling on the sensor wire.
- If sensor removal is necessary, use a 10mm socket. Twist the sensor gently by hand; do not pry against its plastic body.
Step 5: Disconnect the tie-rod end
- Use needle-nose pliers to remove the tie-rod-end cotter pin.
- Use a 17mm socket and 1/2-inch ratchet to remove the castle nut.
- Install the ball-joint separator between the tie-rod end and steering arm, then tighten the separator until the taper releases.
- Do not hammer the threaded stud.
Step 6: Disconnect the lower ball joint
- Use needle-nose pliers to remove the lower ball-joint cotter pin.
- Use a 17mm socket and 1/2-inch ratchet to remove the lower ball-joint castle nut.
- Install the ball-joint separator between the control arm and ball-joint stud. Tighten it until the stud releases from the arm.
- Use a bungee cord to keep the lower control arm from snapping downward.
Step 7: Release the driveshaft
- Use the 32mm axle-nut socket and 1/2-inch ratchet to remove the loosened spindle nut.
- Thread the old nut backward onto the driveshaft until it is flush with the end.
- Use a brass drift punch and 16-ounce ball-peen hammer to tap the driveshaft inward until its splines move freely.
- Remove the old nut. Do not reuse it.
Step 8: Separate the strut from the knuckle
- Use a paint marker to outline the strut-to-knuckle position as an assembly reference.
- Support the knuckle by hand or with the 2-ton floor jack.
- Use a 17mm combination wrench to hold each strut bolt while removing its nut with a 17mm socket and 1/2-inch breaker bar.
- Remove both bolts, then guide the knuckle off the driveshaft splines.
- Support the driveshaft with the bungee cord. Do not let it hang or pull outward.
Step 9: Press out the old ball joint
- Use a wire brush to clean the ball-joint area thoroughly.
- Use external snap-ring pliers to remove the ball-joint retaining snap ring.
- Place the knuckle squarely in the 12-ton hydraulic shop press with the correct Honda-size receiving adapter beneath the joint.
- Use the matching press driver against the ball-joint metal housing, not the stud or knuckle.
- Operate the hydraulic press slowly and press the old joint out of the knuckle.
- Stop immediately if the joint tilts or the knuckle shifts.
Step 10: Install the new ball joint
- Use a wire brush and brake cleaner to clean the knuckle bore. Allow it to dry completely.
- Position the new joint squarely in the bore, matching the original joint's orientation.
- Use the Honda-size ball-joint press adapters and 12-ton hydraulic shop press to press only against the joint's outer metal flange.
- Press until the flange is fully seated against the knuckle with no visible gap.
- Use external snap-ring pliers to install the new snap ring. Verify that it is fully seated around the entire groove.
- Use mechanic's gloves to install the dust boot without puncturing it. Install its retaining rings with needle-nose pliers.
- If the replacement joint has a grease fitting, use the specified grease applicator supplied with the joint and add grease only until the boot begins to expand.
Step 11: Reinstall the steering knuckle
- Apply a thin film of multipurpose chassis grease to the driveshaft splines by hand. Keep grease off the threads.
- Guide the knuckle over the driveshaft splines while supporting the shaft with the bungee cord.
- Align the paint marks and install the two strut bolts by hand.
- Use a 17mm combination wrench, 17mm socket, and torque wrench to tighten the strut-to-knuckle nuts to 116 Nm (86 ft-lbs).
Step 12: Connect the lower ball joint
- Insert the ball-joint stud into the lower control arm by hand.
- Install the castle nut and tighten it with a 17mm socket and torque wrench to 58 Nm (43 ft-lbs).
- If the cotter-pin holes do not align, use the 17mm socket and torque wrench to tighten the nut slightly farther. Never loosen it for alignment.
- Use needle-nose pliers to install and bend a new cotter pin securely.
Step 13: Connect the tie-rod end
- Insert the tie-rod-end stud into the steering arm and install its castle nut by hand.
- Use a 17mm socket and torque wrench to tighten the nut to 43 Nm (32 ft-lbs).
- If necessary, tighten slightly farther to align the cotter-pin hole. Do not loosen the nut.
- Use needle-nose pliers to install and bend a new cotter pin.
Step 14: Reinstall the ABS harness
- Route the harness exactly as it was before removal, keeping it clear of the driveshaft and tire.
- Use a 10mm socket and torque wrench to tighten the wheel-speed-sensor bolt, if removed, to 9.8 Nm (87 in-lbs).
- Use the 10mm socket and 3/8-inch ratchet to secure the harness brackets snugly without crushing them.
Step 15: Reinstall the brakes
- Clean both rotor faces with brake cleaner and a clean cloth.
- Install the rotor by hand. Reinstall its retaining screws, if equipped, with the medium flat-blade screwdriver until snug.
- Place the caliper assembly over the rotor without twisting the brake hose.
- Use a 17mm socket and torque wrench to tighten the caliper-bracket bolts to 108 Nm (80 ft-lbs).
Step 16: Install and stake the spindle nut
- Install a new spindle nut by hand.
- Use the 32mm axle-nut socket and torque wrench to tighten it to 181 Nm (134 ft-lbs).
- Use a brass drift punch and 16-ounce ball-peen hammer to stake the nut firmly into the driveshaft groove.
Step 17: Install the wheel
- Install the wheel and start all five nuts by hand.
- Use the 19mm deep socket and 1/2-inch ratchet to tighten them lightly in a star pattern.
- Use the 2-ton floor jack to lift your Fit, remove the jack stands, and lower the vehicle.
- Use the 19mm deep socket and torque wrench to tighten the wheel nuts in a star pattern to 108 Nm (80 ft-lbs).
✅ After Repair
- 🦶 Press the brake pedal several times until it feels firm before moving your Fit.
- 🔍 Turn the steering fully left and right. Verify that the ABS harness and brake hose do not stretch, rub, or twist.
- 🚗 Drive slowly in a safe area and listen for clunks. Confirm that steering and braking feel normal.
- ⚠️ Stop immediately if the ABS, stability-control, or brake warning light remains illuminated.
- 📐 Have a four-wheel alignment performed before normal driving.
- 🔩 Recheck the wheel-nut torque after approximately 80-160 km.
💰 DIY vs Shop Cost
Shop Cost: ₹12,000-₹25,000 per side (parts + labor)
DIY Cost: ₹3,500-₹8,000 per side (parts only)
You Save: ₹8,500-₹17,000 by doing it yourself!
Labor around Sonīpat varies considerably. This repair typically takes a shop approximately 2-3 hours per side, plus alignment.
🎯 Ready to get started?
HowToo makes it easy: same-day/2-day shipping on every part, plus all the tools and specialty tools you need! Check out the parts and tools sections below to add everything to your cart.