

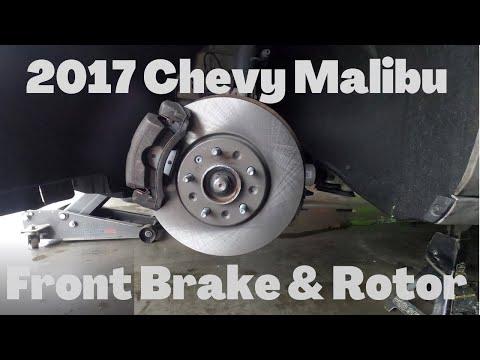







How to Replace Front Brake Pads and Rotors on a 2016-2020 Chevrolet Malibu (Trim: LS)
Step-by-step DIY instructions with tools, parts, torque specs, and safety tips for 2016, 2017, 2018, 2019
How to Replace Front Brake Pads and Rotors on a 2016-2020 Chevrolet Malibu (Trim: LS)
Step-by-step DIY instructions with tools, parts, torque specs, and safety tips for 2016, 2017, 2018, 2019


🔧 Malibu - Front Brake Pads and Rotors Replacement
This repair replaces the front brake pads and both front rotors on your Malibu. Work on one side at a time so the assembled side remains available as a reference.
Difficulty Level: Intermediate | Estimated Time: 2-3 hours
Assumption: Factory front brakes with stock single-piston calipers.
⚠️ Safety & Precautions
- ⚠️ Support your Malibu with jack stands. Never work beneath a vehicle supported only by a jack.
- 🛑 Replace front pads and rotors on both sides to maintain even braking.
- 🧤 Brake dust is harmful. Do not use compressed air; clean it with brake cleaner.
- 🔥 Allow the brakes to cool completely before beginning.
- 🔋 Battery disconnection is not required for this front-brake repair.
- 🚫 Do not press the brake pedal while either front caliper is removed.
- ⚙️ Do not let a caliper hang from its flexible brake hose.
- 💧 Brake fluid damages paint. Clean spills immediately with water.
🔧 Required Tools
You'll need the following tools for this repair:
- 2-ton floor jack
- 2-ton jack stands
- Wheel chocks
- 1/2-inch drive breaker bar
- 1/2-inch drive torque wrench rated to 200 Nm
- 3/8-inch drive ratchet
- 19mm deep socket
- 14mm socket
- 21mm socket
- Torx T30 bit socket
- 150mm socket extension
- 7mm flare-nut wrench
- Flat-blade screwdriver
- Large adjustable pliers
- Brake piston compression tool (specialty)
- Caliper hanger hooks (specialty)
- Wire brush
- Nylon detailing brush
- Rubber mallet
- Drain pan
- Plastic syringe
- 400-grit abrasive paper
- Clean lint-free shop towels
- Nitrile gloves
- Safety glasses
🔩 Required Parts
HowToo sells all the parts you need for this repair:
- Front brake pad set with hardware - Qty: 1
- Front brake rotors - Replace in pairs - Qty: 2
- Brake cleaner aerosol - Qty: 2 cans
- High-temperature silicone brake lubricant - Qty: 1 tube
- Medium-strength threadlocker - Qty: 1 tube
- DOT 3 brake fluid - Qty: 500 ml
📋 Before You Begin
- 📍 Park on firm, level ground. Place the transmission in Park and apply the parking brake.
- 🔒 Place wheel chocks securely behind both rear tires.
- 📱 No infotainment service mode or scan-tool command is required for the front brakes.
- 🔍 Open the hood and inspect the brake-fluid level. Remove a little fluid with a plastic syringe if it is near MAX, because retracting the pistons raises the level.
- 📸 Take a picture of each assembled brake before removing parts.
🔨 Step-by-Step Instructions
Follow these steps in order:
Step 1: Loosen the Front Wheel Nuts
- Use the 19mm deep socket and breaker bar to loosen each front wheel nut about one-quarter turn.
- Do not remove the nuts while your Malibu is on the ground.
Step 2: Raise and Support the Front
- Use the 2-ton floor jack at the reinforced front lifting point specified for your Malibu.
- Position the 2-ton jack stands beneath the reinforced side support points.
- Lower the vehicle onto the stands, leave the floor jack lightly supporting the vehicle, and gently shake the body to verify stability.
Step 3: Remove the Front Wheels
- Use the 19mm deep socket and ratchet to remove the wheel nuts.
- Remove both front wheels and slide them beneath the rocker-panel area as an additional precaution.
Step 4: Remove the Brake Caliper
- Turn the steering wheel to provide easier access to the side being serviced.
- Use the flat-blade screwdriver to gently check that the caliper can move on its guide pins.
- Use the 14mm socket and ratchet to remove the upper and lower caliper guide-pin bolts. Hold the guide pin with an appropriate wrench if it begins turning.
- Lift the caliper from the bracket and support it with a caliper hanger hook.
- A caliper hanger is a hook that supports the caliper without straining its hose.
- Never suspend the caliper by the brake hose.
Step 5: Remove the Old Brake Pads
- Pull both pads from the caliper bracket by hand.
- Use the flat-blade screwdriver to remove the stainless-steel pad hardware clips.
- Note the location of any wear indicator before discarding the old pads.
- Compare the inner and outer pad thickness. A major difference can indicate sticking guide pins or a binding caliper.
Step 6: Retract the Caliper Piston
- Place an old brake pad against the caliper piston.
- Open the brake-fluid reservoir cap and cover the surrounding area with clean shop towels.
- Use the brake piston compression tool to press the piston slowly and evenly into the caliper.
- A piston compression tool pushes the hydraulic piston back to make room for thicker new pads.
- Watch the reservoir and remove excess fluid with the plastic syringe before it overflows.
- If the piston binds, stop. Do not force it with large adjustable pliers because the piston or caliper can be damaged.
Step 7: Remove the Caliper Bracket
- Use the 21mm socket, 150mm extension, and breaker bar to remove the two caliper-bracket bolts.
- Remove the bracket and place it on a clean work surface.
- Use the nylon detailing brush and brake cleaner over the drain pan to clean the bracket.
Step 8: Service the Guide Pins and Pad Lands
- Pull each guide pin and rubber boot from the bracket by hand, keeping the upper and lower pins in their original positions.
- Use clean lint-free shop towels and brake cleaner to remove the old lubricant.
- Inspect the pins and boots for rust, scoring, swelling, or tears. Replace damaged parts before continuing.
- Apply a thin coat of high-temperature silicone brake lubricant to the smooth guide-pin surfaces, then reinstall the pins and seat the boots fully.
- Use the wire brush to clean rust from the bracket surfaces beneath the pad hardware.
- Install the new hardware clips by hand, then place a very thin film of silicone brake lubricant where the pad ears contact the clips.
- Keep lubricant away from the pad friction material and rotor faces.
- Thin lubricant layers prevent dirt buildup.
Step 9: Remove the Old Rotor
- Use the Torx T30 bit socket and ratchet to remove the rotor retaining screw, if fitted.
- If the rotor is rusted to the hub, strike the rotor hat between the wheel studs with the rubber mallet.
- Do not strike the wheel studs or the rotor’s thin outer edge.
- Remove the rotor from the hub.
Step 10: Clean the Hub
- Put on safety glasses and use the wire brush to remove rust from the hub face and center pilot.
- Use 400-grit abrasive paper for stubborn raised corrosion.
- Wipe the hub clean with brake cleaner and a lint-free shop towel.
- The new rotor must sit completely flat against the hub. Remaining rust can cause pedal pulsation.
Step 11: Prepare and Install the New Rotor
- Use brake cleaner and clean lint-free shop towels to clean both friction faces of the new rotor.
- Install the rotor over the wheel studs.
- Reinstall the retaining screw with the Torx T30 bit socket. Torque to 9 Nm (80 in-lbs).
- Do not over-tighten the small retaining screw.
Step 12: Reinstall the Caliper Bracket
- Clean the bracket-bolt threads with brake cleaner and a wire brush, then dry them.
- Apply one small drop of medium-strength threadlocker to the clean bracket-bolt threads.
- Install the bracket and start both bolts by hand.
- Use the 21mm socket and torque wrench to tighten both bolts. Torque to 150 Nm (111 ft-lbs).
Step 13: Install the New Brake Pads
- Fit the inner and outer pads into the new hardware clips by hand.
- Confirm that each pad slides freely without excessive looseness.
- Keep all grease and fingerprints away from the pad friction surfaces.
Step 14: Reinstall the Caliper
- Place the compressed caliper over the new pads without twisting the brake hose.
- Start both guide-pin bolts by hand to prevent cross-threading.
- Use the 14mm socket and torque wrench to tighten the guide-pin bolts. Torque to 28 Nm (21 ft-lbs).
- Confirm that the brake hose follows its natural route and cannot contact the tire.
Step 15: Repeat on the Other Side
- Use the same tools and procedure to replace the pads and rotor on the opposite front wheel.
- Compare the completed side with the side you are assembling if any clip position is unclear.
Step 16: Reinstall the Wheels
- Install each wheel and start all five nuts by hand.
- Use the 19mm deep socket and ratchet to snug the nuts in a star pattern.
- Use the floor jack to raise your Malibu slightly, remove the jack stands, and lower it until the tires touch the ground.
- Use the 19mm deep socket and torque wrench to tighten the wheel nuts in a star pattern. Torque to 140 Nm (100 ft-lbs).
Step 17: Restore Brake Pedal Pressure
- With the engine off, press the brake pedal slowly several times until it becomes firm.
- Do not move your Malibu until the pedal feels firm.
- Check the reservoir and adjust to the MAX line with fresh DOT 3 brake fluid if necessary.
- Install the reservoir cap securely and clean any spilled fluid with water.
✅ After Repair
- 🛑 Start the engine and hold firm pedal pressure for 30 seconds. The pedal should remain steady and must not sink toward the floor.
- 🔍 Inspect both front calipers and hoses for leakage before moving your Malibu.
- 🚗 Test the brakes at walking speed in a safe, traffic-free area.
- 🔥 Bed in the pads with 8-10 moderate stops from approximately 50 km/h to 15 km/h. Do not come to a complete stop during each cycle.
- 🌬️ Drive for 5-10 minutes afterward with minimal braking so the brakes can cool.
- 🚫 Avoid hard braking and holding the hot brakes at a complete stop for the first 300 km unless required for safety.
- 🔩 Recheck the wheel-nut torque to 140 Nm (100 ft-lbs) after approximately 80-100 km.
- ⚠️ If the pedal remains soft, the vehicle pulls strongly, grinding continues, or fluid leaks appear, do not drive it.
💰 DIY vs Shop Cost
Shop Cost: ₹18,000-₹32,000 (parts + labor)
DIY Cost: ₹8,000-₹17,000 (parts only)
You Save: ₹10,000-₹15,000 by doing it yourself!
Local labor and parts prices vary. This repair takes a shop approximately 1.5-2.5 hours.
🎯 Ready to get started?
HowToo makes it easy: same-day/2-day shipping on every part, plus all the tools and specialty tools you need! Check out the parts and tools sections below to add everything to your cart.