
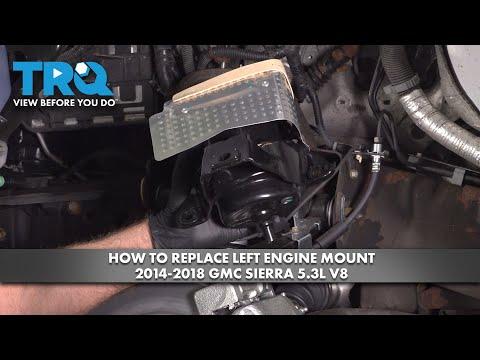







How to Replace Engine Mounts on a 2014-2018 GMC Sierra 1500 6.2L (Engine: V8 6.2L)
Step-by-step instructions for both hydraulic mounts, including tools, torque specs, and safety tips for 2014, 2015, 2016, 2017, 2018
How to Replace Engine Mounts on a 2014-2018 GMC Sierra 1500 6.2L (Engine: V8 6.2L)
Step-by-step instructions for both hydraulic mounts, including tools, torque specs, and safety tips for 2014, 2015, 2016, 2017, 2018


🔧 Sierra 1500 - Engine Mount Replacement
The Sierra 1500 uses separate left and right hydraulic engine mounts. Replace them one at a time while supporting the 6.2L engine from above; access is tight around the exhaust manifolds, steering shaft, and front differential on four-wheel-drive models.
Difficulty Level: Advanced | Estimated Time: 5-8 hours
Assumption: These instructions cover the original 6.2L engine and include both 2WD and 4WD access paths.
⚠️ Safety & Precautions
- ⚠️ Let the engine and exhaust system cool completely before working.
- ⚠️ Disconnect the negative battery cable because the starter wiring is close to the right mount.
- ⚠️ Support the engine with an engine support bar. Never work beneath an engine supported only by a floor jack.
- ⚠️ Never place a jack directly against the aluminum oil pan.
- ⚠️ Support the truck with appropriately rated jack stands on solid, level ground.
- ⚠️ Replace one mount at a time so the engine remains correctly positioned.
- ⚠️ Do not lift the engine against the firewall, fan shroud, wiring, hoses, or exhaust system.
- ⚠️ If the steering shaft is disconnected, keep the steering wheel stationary to prevent airbag clock-spring damage.
🔧 Required Tools
You'll need the following tools for this repair:
- Engine support bar rated 1,000 lb minimum (specialty)
- Engine lifting chain rated 1,000 lb minimum
- Floor jack rated 3-ton minimum
- Jack stands rated 3-ton minimum
- Wheel chocks
- Wood support block measuring approximately 12 × 6 × 1 inches
- 1/2-inch-drive torque wrench rated 20-150 ft-lbs
- 1/2-inch-drive breaker bar
- 3/8-inch-drive ratchet
- 1/2-inch-drive ratchet
- 10mm socket
- 13mm socket
- 15mm socket
- 18mm socket
- 21mm socket
- 15mm combination wrench
- 18mm combination wrench
- 3-inch socket extension
- 6-inch socket extension
- 12-inch socket extension
- 1/2-inch-drive universal joint
- Trim-clip removal tool
- Flat-blade screwdriver
- Paint marker
- Work light
- Mechanic gloves
- Safety glasses
🔩 Required Parts
HowToo sells all the parts you need for this repair:
- Left hydraulic engine mount - Qty: 1
- Right hydraulic engine mount - Qty: 1
- Engine-mount fastener set - Qty: 1
- Steering intermediate-shaft pinch bolt - Qty: 1 if removed
Replace the mounts in pairs. A new mount beside an old compressed mount can leave the engine sitting unevenly.
📋 Before You Begin
- 📋 Park your Sierra 1500 on solid, level ground. Select Park, apply the parking brake, and chock both rear wheels.
- 📋 Open the hood and remove the ignition key from the work area.
- 📋 Save any preferred radio settings. No infotainment service mode or programming is required.
- 📋 An engine support bar spans the body structure above the engine and holds the engine by its lifting point.
- 📋 Inspect the fan-to-shroud gap, coolant hoses, wiring, and exhaust clearance before lifting the engine.
- 📋 Fastener head sizes can vary with previous repairs. Match each socket fully before applying force.
🔨 Step-by-Step Instructions
Follow these steps in order:
Step 1: Disconnect the battery
- Use a 10mm socket and 3/8-inch-drive ratchet to loosen the negative battery-terminal clamp.
- Remove the negative cable and position it where it cannot spring back onto the terminal.
Step 2: Raise and support the truck
- Use the floor jack under the front frame crossmember to raise the front of the truck.
- Place the 3-ton jack stands beneath the left and right frame rails. Lower the truck gently onto them.
- Leave the floor jack touching the crossmember without carrying the truck’s weight.
- Use safety glasses before working underneath.
Step 3: Remove the lower shields
- Use a 13mm or 15mm socket, extensions, and 3/8-inch-drive ratchet to remove the front splash shield or skid plate fasteners.
- Use a trim-clip removal tool for any plastic retainers.
- Support the shield with one hand while removing its final fastener.
Step 4: Install the engine support bar
- Position the 1,000 lb engine support bar according to its instructions, using only its padded body-contact points.
- Attach the rated lifting chain to the factory engine lifting bracket. Do not attach it to the intake manifold or accessory brackets.
- Tighten the support bar only until the chain becomes firm and begins carrying the engine’s weight.
- Place the floor jack and wood support block beneath the broad rear portion of the oil pan as a light secondary safety support. Do not lift against the pan.
- Photograph hose and fan clearances before lifting.
Step 5: Inspect and mark the engine position
- Use a paint marker to draw alignment marks around both mounts and their frame brackets.
- Use the work light to check the fan shroud, transmission cooler lines, heater hoses, exhaust joints, and wiring.
- Do not raise the engine yet.
Step 6: Create left-side access
- Use the work light to locate the left mount below the exhaust manifold.
- If the steering intermediate shaft blocks a mount fastener, use a paint marker to mark the shaft’s exact relationship to the steering-gear input shaft.
- Hold the steering wheel still. Use a 15mm socket, extension, and ratchet to remove the steering-shaft pinch bolt, then slide the shaft upward without rotating either end.
- Do not reuse a removed steering-shaft pinch bolt.
Step 7: Loosen the left engine mount
- Use the correctly fitting 15mm or 18mm socket, extensions, universal joint, and breaker bar to loosen the left mount-to-frame fasteners.
- Use the correctly fitting 15mm socket, extensions, and ratchet to loosen the mount-to-engine-block fasteners.
- Leave two fasteners installed loosely until the engine is raised.
- Keep tools clear of the oxygen-sensor wiring and exhaust manifold.
Step 8: Lift the engine slightly
- Turn the engine support bar’s adjuster slowly until the left mount just unloads.
- Raise the engine only enough to create removal clearance, normally less than 25mm.
- Use the work light after every few turns to inspect the fan, hoses, wiring, transmission lines, and exhaust.
- Stop immediately if any component stretches or contacts the body.
Step 9: Remove the left mount
- Use the 15mm or 18mm socket, extensions, universal joint, and ratchet to remove the remaining mount fasteners.
- Work the mount out through the available lower opening. Do not pry against the aluminum engine block or oil pan.
- On 4WD models, the front differential can limit clearance. If the mount cannot leave without forcing it, stop; differential support and partial lowering are required and should be handled with the appropriate factory lifting equipment.
Step 10: Install the new left mount
- Compare the new and old mounts for matching brackets, locating tabs, heat shield, and electrical connector if equipped.
- Place the new mount in the same orientation as the original.
- Start every fastener by hand for at least three full turns. Do not use the ratchet until the threads are correctly engaged.
- Use the 15mm or 18mm socket and ratchet to snug the mount-to-block fasteners evenly.
- Use the engine support bar to lower the engine until the mount aligns naturally with the frame bracket.
- Install and snug the frame fasteners by hand.
- Use the 1/2-inch-drive torque wrench and correct socket to tighten the mount-to-engine-block bolts to 50 Nm (37 ft-lbs).
- Use the 1/2-inch-drive torque wrench and correct socket to tighten the mount-to-frame fasteners to 65 Nm (48 ft-lbs).
Step 11: Reconnect the steering shaft if removed
- Align the paint marks and slide the intermediate shaft fully onto the steering-gear input shaft.
- Confirm the pinch-bolt opening aligns with the machined groove in the steering-gear shaft.
- Install a new pinch bolt. Use the 15mm socket and torque wrench to tighten it to 50 Nm (37 ft-lbs).
- Use the paint marker to place a witness mark across the bolt and shaft.
Step 12: Replace the right engine mount
- Use the work light to identify the right mount and nearby starter cable, exhaust, wiring, and heat shields.
- Use the 15mm or 18mm socket, extensions, universal joint, and breaker bar to loosen the right mount-to-frame and mount-to-block fasteners.
- Use the engine support bar to lift the right side only enough to unload the mount.
- Use the same sockets and ratchet to remove the fasteners and withdraw the mount through the lower opening.
- On 4WD models, stop if the front differential prevents removal without force.
- Position the new mount and start every fastener by hand.
- Use the torque wrench and correct socket to tighten the mount-to-engine-block bolts to 50 Nm (37 ft-lbs).
- Use the torque wrench and correct socket to tighten the mount-to-frame fasteners to 65 Nm (48 ft-lbs).
Step 13: Remove the engine supports
- Use the engine support bar adjuster to lower the engine completely onto both mounts.
- Verify that the paint marks align and neither mount is twisted.
- Remove the lifting chain and engine support bar.
- Lower and remove the floor jack and wood support block.
Step 14: Reinstall the lower shields
- Position the splash shield or skid plate and start all fasteners by hand.
- Use the 13mm or 15mm socket and torque wrench to tighten an original aluminum skid plate’s bolts to 20 Nm (15 ft-lbs).
- Use the trim-clip removal tool by hand to reinstall reusable plastic retainers.
Step 15: Lower the truck and reconnect the battery
- Use the floor jack to raise the frame slightly and remove the jack stands.
- Lower the truck slowly and remove the wheel chocks.
- Reconnect the negative battery cable. Use the 10mm socket and torque wrench to tighten the terminal nut to 5 Nm (44 in-lbs).
✅ After Repair
- ✅ Before starting, verify that no tools remain near the fan, belts, or exhaust.
- ✅ Start the engine with the hood open. Watch for excessive movement, knocking, vibration, warning lights, or contact with the fan shroud.
- ✅ Hold the brake firmly and shift slowly through Reverse, Neutral, and Drive. The engine should move slightly without a heavy clunk.
- ✅ Check the steering wheel position and turn it gently from lock to lock if the steering shaft was removed. Stop if it binds or feels abnormal.
- ✅ Take a short, low-speed test drive. Recheck the mount area, steering-shaft witness mark, and lower shields afterward.
- ✅ No mount programming, battery registration, or infotainment reset is required.
💰 DIY vs Shop Cost
Shop Cost: $1,400-$2,400 (parts + labor)
DIY Cost: $250-$650 (parts only)
You Save: $750-$1,750 by doing it yourself!
Local pricing and imported-part costs in Sonīpat may vary substantially. Shop labor commonly runs $100-$150/hour in U.S. estimates; this repair takes a shop approximately 5-8 hours.
🎯 Ready to get started?
HowToo makes it easy: same-day/2-day shipping on every part, plus all the tools and specialty tools you need! Check out the parts and tools sections below to add everything to your cart.