

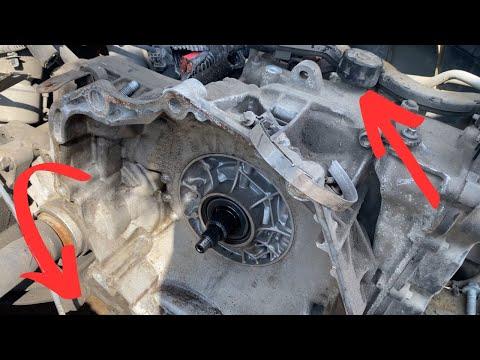






How to Change Transmission Fluid on a 2015-2022 Chevrolet Trax
Step-by-step 6T40 drain-and-refill guide with tools, DEXRON-VI fluid, and level-check specs for 2015, 2016, 2017, 2018, 2019, 2020, 2021, 2022
How to Change Transmission Fluid on a 2015-2022 Chevrolet Trax
Step-by-step 6T40 drain-and-refill guide with tools, DEXRON-VI fluid, and level-check specs for 2015, 2016, 2017, 2018, 2019, 2020, 2021, 2022


🔧 Trax - Automatic Transmission Fluid Drain and Refill
This procedure replaces part of the fluid in your Trax’s GM 6T40 six-speed automatic transmission. A drain and refill is safer than a power flush and requires a final fluid-level check at a specific transmission temperature.
Assumption: This procedure applies to the stock U.S.-market six-speed automatic transmission; the transmission fluid, not the transfer case or rear differential, is being serviced.
Difficulty Level: Advanced | Estimated Time: 2-3 hours
⚠️ Safety & Precautions
- ⚠️ The Trax must be level and securely supported at all four corners. Never work beneath a vehicle supported only by a jack.
- ⚠️ The final level check is performed with the engine running. Keep hands, clothing, and tools away from the cooling fan, belts, and exhaust.
- ⚠️ Transmission fluid reaches approximately 85-95°C (185-203°F) during the level check and can cause serious burns.
- ⚠️ Do not use a power-flush machine or add cleaners, conditioners, or universal transmission fluid.
- ⚠️ Incorrect fluid level can cause slipping, delayed engagement, foaming, overheating, or transmission damage.
- Battery disconnection is not required.
🔧 Required Tools
You'll need the following tools for this repair:
- Hydraulic floor jack rated 2-ton minimum
- Jack stands rated 2-ton minimum, set of four
- Wheel chocks rated for passenger vehicles
- Metric socket set, 8-15mm
- 10mm socket
- 11mm socket
- 3/8-inch drive ratchet
- 3/8-inch drive extension, 6-inch
- Torque wrench, 5-30 Nm range
- OBD-II scan tool with transmission-fluid-temperature data (specialty)
- Fluid transfer pump with flexible hose (specialty)
- Drain pan with 8-quart minimum capacity
- Graduated fluid measuring container, 6-quart capacity
- Digital level, 12-inch
- Plastic trim-clip removal tool
- Shop funnel with flexible neck
- Shop towels
- Nitrile gloves
- Safety glasses
🔩 Required Parts
HowToo sells all the parts you need for this repair:
- DEXRON-VI automatic transmission fluid - Qty: 6 quarts
- Transmission drain-plug seal - Qty: 1
- Transmission fluid-level plug seal - Qty: 1
📋 Before You Begin
- 📍 Park your Trax on firm, level pavement and apply the parking brake.
- Allow the transmission to cool enough that its case and fluid will not burn you.
- Confirm every fluid container is labeled DEXRON-VI. Do not substitute CVT fluid or DEXRON-HP.
- Use the digital level to confirm the raised vehicle is level from front to rear and side to side.
- Connect the OBD-II scan tool before the final level check. A scan tool reads the temperature reported by the transmission control system.
- Measure the drained fluid so the same approximate quantity can be installed before setting the exact level.
🔨 Step-by-Step Instructions
Follow these steps in order:
Step 1: Warm and position the vehicle
- Drive your Trax for approximately 10 minutes so contaminants remain suspended in the fluid.
- Park on level ground, move the shifter to Park, apply the parking brake, and switch off the engine.
- Place the wheel chocks firmly against the tires before lifting.
Step 2: Raise and support the Trax
- Use the hydraulic floor jack at the approved structural lifting points.
- Place all four jack stands beneath the approved support points, then lower the vehicle carefully onto them.
- Use the digital level on a flat body or chassis surface. Adjust the supports until the vehicle is level in both directions.
- Push the vehicle gently to verify that all four stands are stable.
Step 3: Remove the lower splash shield
- Wear safety glasses and nitrile gloves.
- Use the plastic trim-clip removal tool and the matching socket from the 8-15mm metric socket set to remove the lower shield fasteners.
- Lower the shield and place its fasteners in order for installation.
Step 4: Confirm the fill opening can be accessed
- Locate the transmission fill cap on top of the transmission, below the engine-compartment area near the battery tray.
- Clean around the cap with shop towels so dirt cannot enter.
- Loosen the cap by hand before draining any fluid. Do not continue if the cap cannot be removed.
- Reinstall the cap loosely to prevent contamination while draining.
Step 5: Drain the old transmission fluid
- Place the 8-quart drain pan beneath the transmission drain plug at the bottom of the case.
- Use the 11mm socket, 3/8-inch ratchet, and 6-inch extension to loosen the drain plug carefully.
- Remove the plug by hand and allow the fluid to drain until it slows to an occasional drip.
- Inspect the fluid for metallic flakes, heavy sludge, or a strong burned odor. Fine gray paste on a magnetic plug can be normal; chips are not.
- Pour the old fluid into the graduated measuring container and record the quantity.
Step 6: Reinstall the drain plug
- Clean the drain plug and sealing surface with shop towels.
- Install a new drain-plug seal and start the plug by hand to prevent cross-threading.
- Use the 11mm socket and torque wrench to tighten the drain plug to 12 Nm (106 in-lbs).
- Stop immediately if the plug will not thread easily.
Step 7: Add the initial fluid quantity
- Remove the upper fill cap by hand.
- Use the shop funnel to add the same quantity of fresh DEXRON-VI fluid that was drained.
- A normal drain commonly removes about 4-5 quarts, but use the measured amount rather than relying on an estimate.
- Reinstall the fill cap by hand until fully seated.
Step 8: Circulate the new fluid
- Connect the OBD-II scan tool to the diagnostic connector below the driver-side instrument panel.
- Start the engine while your Trax remains level on all four jack stands.
- Hold the brake pedal firmly. Move the shifter slowly through Park, Reverse, Neutral, Drive, and Manual mode, pausing about three seconds in each position.
- Return the shifter to Park and leave the engine idling.
- Use the scan tool to display transmission fluid temperature.
Step 9: Bring the fluid into the checking range
- Monitor transmission fluid temperature with the OBD-II scan tool until it reaches 85-95°C (185-203°F).
- Keep the engine idling, the shifter in Park, and the vehicle level.
- Do not place any part of your body near the exhaust or rotating engine components.
Step 10: Set the final fluid level
- Place the drain pan under the fluid-level plug on the transmission case.
- With the engine still idling, use the 10mm socket, ratchet, and extension to remove the fluid-level plug carefully.
- If fluid exits as a small stream and then becomes a slow drip, allow it to reach a slow drip. The level is correct.
- If no fluid exits, remove the upper fill cap by hand. Use the fluid transfer pump and flexible hose to add DEXRON-VI in small amounts until fluid begins dripping from the level opening.
- Keep the scan-tool temperature within 85-95°C (185-203°F). If it exceeds that range, reinstall the plug, shut off the engine, and allow the transmission to cool before repeating the check.
Step 11: Install the fluid-level plug
- Install a new seal on the cleaned fluid-level plug.
- Start the plug by hand, then use the 10mm socket and torque wrench to tighten it to 12 Nm (106 in-lbs).
- Wipe the drain plug and level-plug areas clean with shop towels.
- Reinstall the upper fill cap firmly by hand.
Step 12: Reinstall the splash shield
- Switch off the engine and disconnect the OBD-II scan tool.
- Position the lower splash shield and start every fastener by hand.
- Use the plastic trim-clip removal tool and matching socket from the 8-15mm metric socket set to secure the original clips and bolts without overtightening them.
Step 13: Lower the vehicle
- Use the hydraulic floor jack to raise each end enough to remove the jack stands.
- Lower your Trax slowly to the ground and remove the wheel chocks.
- Check beneath the vehicle for fresh leaks.
✅ After Repair
- ✅ Start the engine and verify that Reverse and Drive engage smoothly without excessive delay.
- Take a gentle 10-15 minute test drive. Avoid hard acceleration while checking shift quality.
- Park on clean, level pavement and inspect the drain plug and fluid-level plug for leaks.
- Recheck for leakage after the next two drives.
- A transmission adaptation reset is not required for a routine drain and refill.
- Dispose of the old fluid at an authorized recycling or hazardous-waste collection facility. Never pour it onto the ground or into a drain.
- If the old fluid contained metal chips, smelled severely burned, or the transmission slips after the service, stop driving and arrange professional diagnosis.
💰 DIY vs Shop Cost
Shop Cost: ₹9,000-₹16,000 (parts + labor)
DIY Cost: ₹4,000-₹7,000 (fluid and seals only)
You Save: ₹5,000-₹9,000 by doing it yourself!
Local labor rates vary. This repair takes a shop approximately 1-2 hours.
🎯 Ready to get started?
HowToo makes it easy: same-day/2-day shipping on every part, plus all the tools and specialty tools you need! Check out the parts and tools sections below to add everything to your cart.