

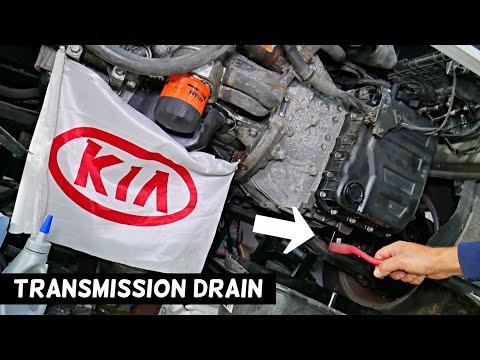






How to Change Transmission Fluid on a 2011-2020 Kia Optima 2.4L (Engine: Inline 4 2.4L)
Step-by-step automatic transmission drain and refill with SP-IV fluid, tools, and torque specs for 2011, 2012, 2013, 2014, 2015, 2016, 2017, 2018, 2019, 2020
How to Change Transmission Fluid on a 2011-2020 Kia Optima 2.4L (Engine: Inline 4 2.4L)
Step-by-step automatic transmission drain and refill with SP-IV fluid, tools, and torque specs for 2011, 2012, 2013, 2014, 2015, 2016, 2017, 2018, 2019, 2020


🔧 Optima - Automatic Transmission Fluid Drain and Refill
This procedure drains the old automatic transmission fluid, installs new sealing washers, and sets the fluid level at the specified temperature. Your Optima has no transmission dipstick, so the level must be checked through the level plug while the engine is running.
Assumption: This procedure applies to the stock Kia six-speed automatic transmission fitted with the 2.4L engine.
Difficulty Level: Intermediate | Estimated Time: 1.5-2.5 hours
⚠️ Safety & Precautions
- ⚠️ Support your Optima on four jack stands so it remains level. Never work beneath a vehicle supported only by a jack.
- ⚠️ Automatic transmission fluid can cause severe burns. Wear gloves and safety glasses.
- ⚠️ The final level check requires the engine to run while your Optima is raised. Keep hands, clothing, and tools away from moving parts.
- ⚠️ Use only fluid labeled Kia/Hyundai ATF SP-IV. SP-IV RR, SP-III, CVT fluid, and generic Dexron fluids are incorrect.
- ⚠️ Do not use a pressurized transmission-flush machine. This procedure is a normal drain and refill.
- ⚠️ Do not disconnect the battery. No transmission coding or adaptation reset is required.
🔧 Required Tools
You'll need the following tools for this repair:
- Hydraulic floor jack rated 2-ton minimum
- Jack stands rated 2-ton minimum, set of four
- Wheel chocks rated for passenger vehicles
- 10mm socket
- 24mm socket
- 3/8-inch drive ratchet
- 3/8-inch drive extension set
- 3/8-inch drive torque wrench rated 5-80 Nm
- Plastic trim-clip removal tool
- Fluid drain pan with 8-quart minimum capacity
- Graduated fluid measuring container with 6-quart capacity
- ATF fluid-transfer pump with flexible hose
- OBD-II scan tool capable of reading transmission-fluid temperature
- Digital level at least 9 inches long
- Fender cover
- Nitrile mechanic gloves
- Safety glasses
🔩 Required Parts
HowToo sells all the parts you need for this repair:
- Kia/Hyundai ATF SP-IV automatic transmission fluid - Qty: 6 quarts
- Transmission drain-plug sealing washer - Qty: 1
- Transmission fill-plug sealing washer - Qty: 1
- Transmission level-plug sealing washer - Qty: 1
📋 Before You Begin
- 📍 Park on a flat, solid surface. Apply the parking brake and chock the rear wheels.
- 📍 Drive for 10-15 minutes so the fluid flows easily, but allow the exhaust to cool before working underneath.
- 📍 Raise your Optima with the hydraulic floor jack and place all four corners securely on jack stands.
- 📍 Use the digital level on the front subframe and door sill to confirm your Optima is level front-to-rear and side-to-side.
- 📍 Connect the OBD-II scan tool and select the transmission-fluid-temperature data item. This shows the actual temperature inside the transmission.
- 📍 Measure the drained fluid. A normal drain usually removes approximately 4.5-5.0 quarts, but the final level must still be checked.
🔨 Step-by-Step Instructions
Follow these steps in order:
Step 1: Remove the Lower Engine Cover
- Use the 10mm socket and ratchet to remove the lower-cover bolts.
- Use the plastic trim-clip removal tool to release any retaining clips without breaking them.
- Lower the cover and place its fasteners in a safe container.
Step 2: Loosen the Fill Plug First
- Locate the transmission fill plug on the transmission case. Do not confuse it with an engine or transmission mounting bolt.
- Place the drain pan beneath the transmission in case fluid escapes.
- Use the 24mm socket, extension, and ratchet to loosen the fill plug before draining any fluid.
- If the fill plug cannot be removed, stop the repair. Draining first could leave the transmission empty and impossible to refill.
- Always confirm the fill plug opens first.
Step 3: Drain the Old Fluid
- Position the 8-quart drain pan directly beneath the transmission drain plug.
- Use the 24mm socket and ratchet to remove the drain plug slowly.
- Allow the fluid to drain until it slows to an occasional drip.
- Transfer the old fluid into the graduated measuring container and record the amount removed.
- Inspect the fluid. Dark fluid is common, but metal flakes, heavy sludge, or a strong burnt odor can indicate internal transmission wear.
Step 4: Install the Drain Plug
- Clean the drain plug and its sealing surface using a lint-free cloth.
- Install a new drain-plug sealing washer.
- Thread the plug in by hand to prevent cross-threading.
- Use the 24mm socket and torque wrench to tighten the drain plug to 34-44 Nm (25-32 ft-lbs).
Step 5: Add New SP-IV Fluid
- Route the fluid-transfer pump hose securely into the fill opening.
- Use the fluid-transfer pump to add approximately the same amount of Kia/Hyundai ATF SP-IV that was drained.
- Add approximately 0.25 quart extra so the level can be set through the level opening.
- Install the fill plug with a new sealing washer and tighten it temporarily with the 24mm socket and ratchet.
Step 6: Circulate the New Fluid
- Confirm your Optima remains stable and level on all four jack stands.
- Start the engine and hold the brake pedal firmly.
- Move the selector slowly through P-R-N-D, pausing at least three seconds in each position.
- Repeat the sequence twice, then leave the selector in Park with the engine idling.
- Use the OBD-II scan tool to monitor transmission-fluid temperature.
Step 7: Set the Fluid Level
- Wait until the scan tool shows a transmission-fluid temperature of 50-60°C (122-140°F).
- Keep the engine idling and your Optima level.
- Place the drain pan beneath the level plug.
- Use the 24mm socket and ratchet to remove the level plug carefully.
- A thin, steady stream that changes to a slow drip indicates the correct level.
- If no fluid comes out, reinstall the level plug loosely, switch off the engine, and use the fluid-transfer pump to add SP-IV fluid in 0.25-quart increments. Restart the engine, cycle the selector, and recheck within the specified temperature range.
- If fluid pours out heavily, allow it to drain until only a thin stream or slow drip remains.
- Temperature and vehicle level determine the final reading.
Step 8: Tighten the Level and Fill Plugs
- Install a new sealing washer on the level plug and thread it in by hand.
- Use the 24mm socket and torque wrench to tighten the level plug to 34-44 Nm (25-32 ft-lbs).
- Switch off the engine.
- Install a new sealing washer on the fill plug, then use the 24mm socket and torque wrench to tighten it to 34-44 Nm (25-32 ft-lbs).
- Clean all fluid residue so future leaks will be easy to identify.
Step 9: Reinstall the Lower Engine Cover
- Lift the lower cover into position.
- Use the plastic trim-clip removal tool by hand to reinstall the retaining clips.
- Use the 10mm socket and ratchet to reinstall the cover bolts snugly. Do not overtighten the small fasteners.
- Use the hydraulic floor jack to raise each end slightly, remove the four jack stands, and lower your Optima carefully.
✅ After Repair
- ✅ Start the engine and verify that Reverse and Drive engage smoothly without an unusual delay.
- ✅ Take a gentle 10-minute test drive. Check shifting at light throttle before using heavy acceleration.
- ✅ Park on clean, level pavement and inspect beneath the transmission for leaks.
- ✅ Recheck the drain, fill, and level-plug areas after the next drive.
- ✅ Dispose of the used transmission fluid at an authorized recycling or hazardous-waste collection facility.
- ✅ A drain and refill replaces only part of the total fluid. If the old fluid was badly degraded, a second drain and refill can be performed after several hundred kilometres.
💰 DIY vs Shop Cost
Shop Cost: ₹9,000-₹16,000 (parts + labor)
DIY Cost: ₹5,000-₹8,500 (parts only)
You Save: ₹4,000-₹7,500 by doing it yourself!
Labor rates around Sonīpat vary by workshop. This repair takes a shop approximately 1-1.5 hours.
🎯 Ready to get started?
HowToo makes it easy: same-day/2-day shipping on every part, plus all the tools and specialty tools you need! Check out the parts and tools sections below to add everything to your cart.